Alright, I’ve fought with these kinds of things since the inception of .NET, the key difference now is that there are the variances in .NET versions and also IDEs. The question is, how should I setup my solution and respective projects?
First – .NET Solution
Usually what I do is create an empty solution. Name it, check the options accordingly to create a directory and make it a Git repository.
Then, as a kind of general practice I create a class library to build out logic and what not, and add a test project and then whatever the interface is going to be. That might be a web app, a GUI, or console as I’ve got selected here. Sometimes, if useful I go ahead and create a Dockerfile.
At this point, there are a few key problems I always bump into. Obviously, since I have a repo I need a .gitignore file, preferably a README.md, and maybe even a license file right? How does one add, so that the IDE is aware of them, any extra files at the solution level? What I usually do here, is use the terminal to just build out the solution level files, but then the IDE doesn’t know about them. Similar problems come up in the other .NET IDEs like Visual Studio and such.
Second – Open a Folder Solution
The second type of solution I find myself creating is started by opening a repo folder.
Empty, with nothing else that looks like this.
Creating a .gitignore and other respective files is easy at this point. As a right click will allow me to do just that. I’ve also added some projects.
At this point everything works great. As you can see below the runner is wired up, the IDE is aware of the tests, and runners are available for that.
One problem I’ve run into however with this technique, is sometimes I close this type of project – one started by merely opening the folder – and all this awareness just disappears. On the same machine, same folder, no deletion of the .idea folder or anything like that. It just loses all the awareness.
So my question is, which method do you use to start a project and how to do you, fellow .NET coders, work around these types of issues?
Alright folks, let’s dive into the latest concoction from the JetBrains‘ lab – Writerside. This isn’t just another tool; it’s a game-changer in the technical writing arena. Buckle up as we take a tour of this nifty piece of tech wizardry.
The Gist of Writerside
Melding Code and Prose
JetBrains has pulled a rabbit out of their hat with Writerside, built on the IntelliJ platform. It’s like they’ve read the minds of developers and writers, blending their worlds seamlessly. Imagine crafting documentation right in the heart of your IDE – that’s Writerside for you!
Markdown Meets XML
Here’s where it gets spicy. Writerside juggles Markdown and a custom XML-based markup. It’s like having the best of both worlds, letting you switch hats between a Markdown maverick and an XML expert. This duality is a boon for those who want to add a bit more oomph to their docs.
Testing and Styling with Ease
Over 100 built-in tests? Check. Predefined designs that you can tweak? Double-check. Writerside isn’t just about writing; it’s about making sure your documentation is as robust as your code. No more fretting over broken links or layout hassles.
Real-Time Preview and AI Smarts
The live preview feature is like having a co-pilot, instantly showing you the impact of your edits and flagging errors on the fly. And the AI-based spellchecker and grammar tool? That’s the cherry on top, supporting a plethora of languages and keeping your prose polished.
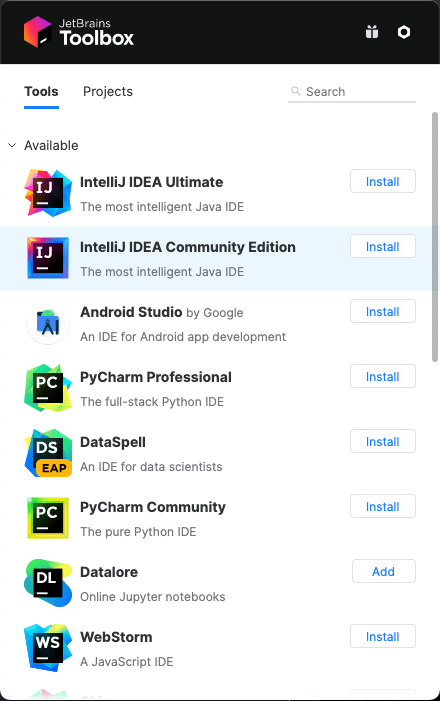
One thing I do just enough to remember I need to do, but not frequently enough to remember which settings are which, is installing the JetBrains Toolbox app to get the other JetBrains’ software installed.
The following is the quick list of the key things that I setup to get the most out of Toolbox. This is a quick process and I’ve detailed it here, one for memory, but also to detail what some of the features provide so this might be of more use to others.
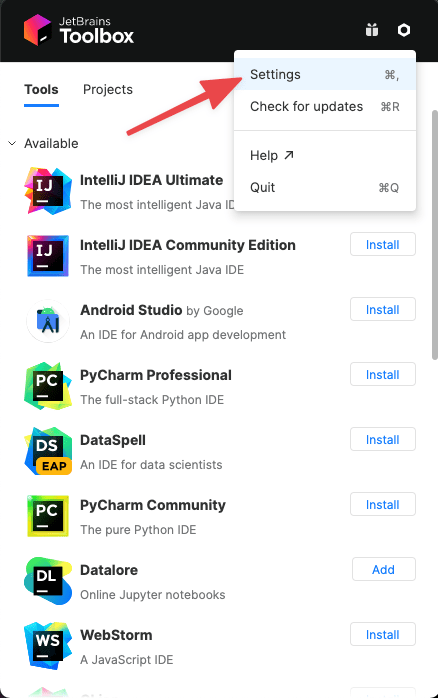
The Toolbox Settings options are located by clicking on the gear icon when the application is opened up. This is the same across operating systems; Windows, Ubuntu, MacOS, or others. Find the gear, click it!
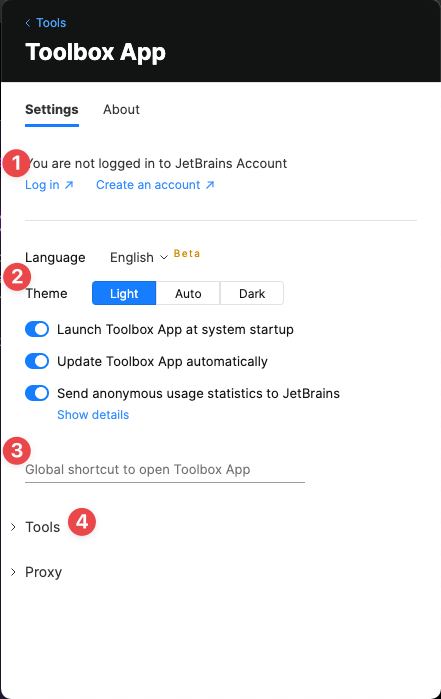
Once Settings are opened up the core 4 configurations include:
If you’ve got an account, login. Everything is easier if you’re logged into your account.
This second option around the theme is great on MacOS and Ubuntu. I’m not sure what it does on Windows exactly, but presume a similar effect. I myself set this to Auto since I always set the OS level theme to dark and love that almost all the apps that I use shift to that theme.
I don’t set a shortcut for the toolbox, I simply use the Ctrl+Space to launch it from the spotlight on MacOS and use whatever option to issue apps from command on Windows and Linux OS installations of Toolbox.
This section, I’ll detail further down, has a host of additional settings around the tools use itself.
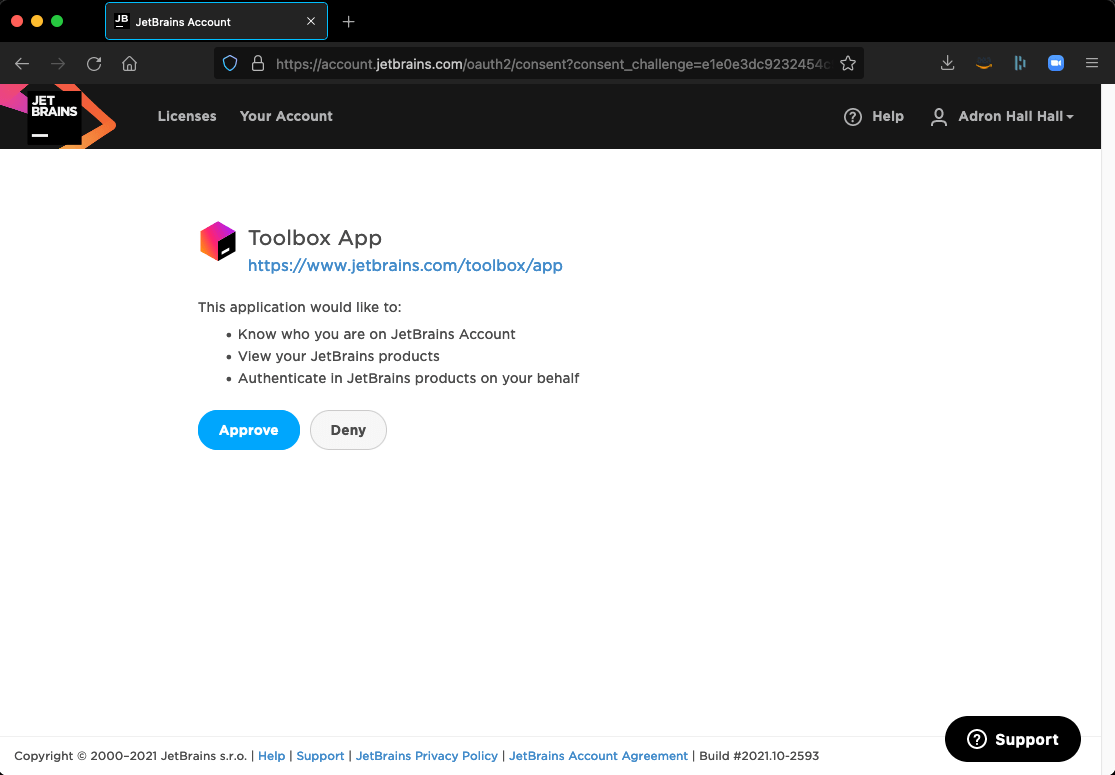
When logging into the app, the Toolbox will launch a browser to complete the process. The ! is what I do, log in with a regular JetBrains username and password based account versus using one of the Oauth options like Github. I feel like, however, maybe I should check if I can switch it or add the Github auth to use that, I am a fan of using it as my general dev auth across systems.
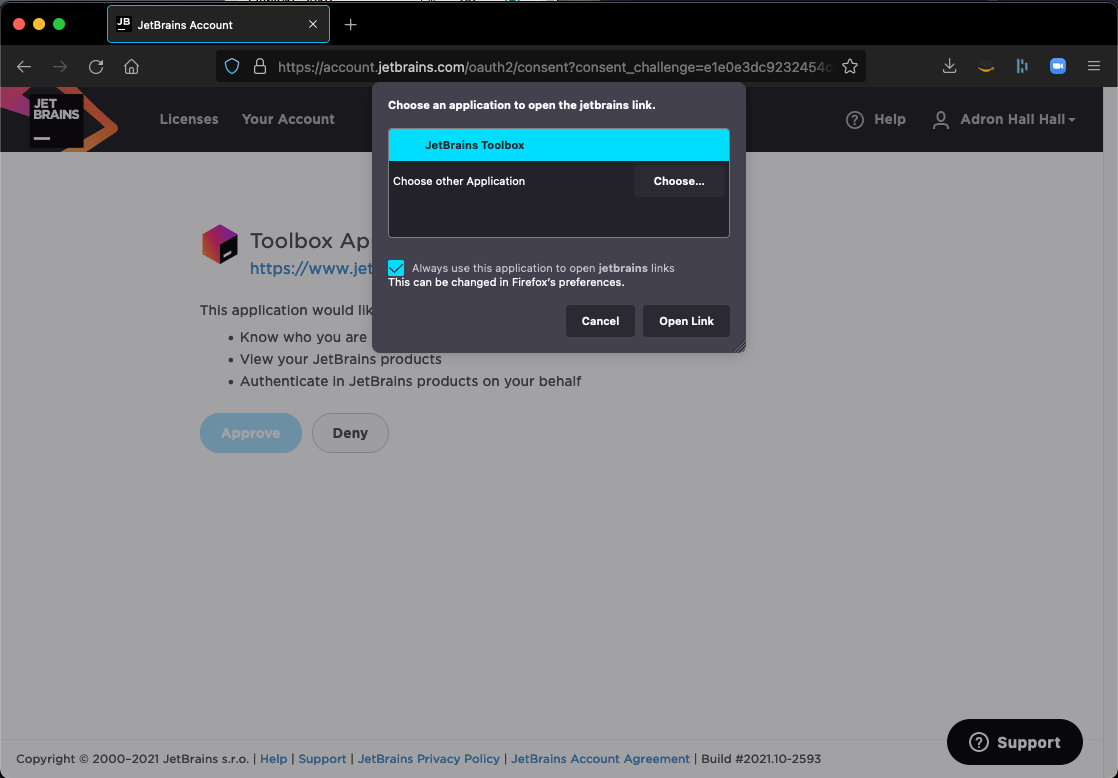
Upon logging in and clicking Approve the prompt to open and then match the Toolbox extension for opening to the Toolbox application in the browser.
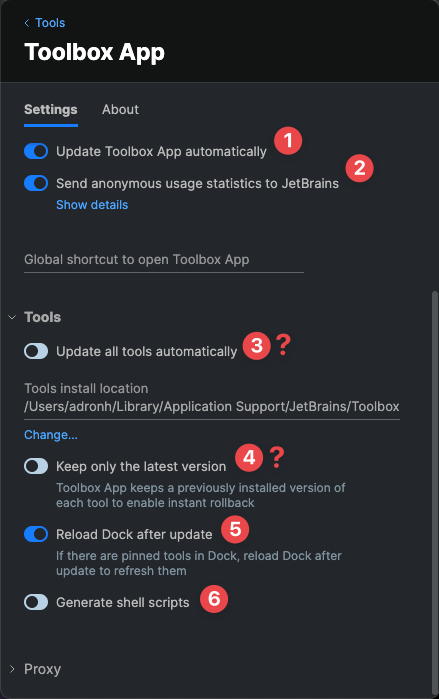
Once all that is setup, my next move is to get the Tools section updated and setup the update behaviors, reload setting, and shell scripts.
I toggle the Update Toolbox App automatically option on.
I also, cuz I’m such a nice person, send the anonymous usage statistics to JetBrains.
For the Update all tools automatically I often toggle this on. As in the vast majority of scenarios I’m working in, I need to ensure I have the latest patches and updates.
The Keep only the latest version is similar to #3 where as, I generally only want one version of the particular IDE, I don’t particularly need the EAP or previous versions, and I toggle this to keep only the latest version that is currently available.
I leave the Reload Dock after update option toggled on.
This last feature is one of the most important for me. I launch most of the IDEs, JetBrains or others, vai the terminal. My most used method is to issue the ide . so that the IDE opens the particular directory that the prompt is located in. This section, the Generate shell scripts enables this for all of the respective IDEs that are installed per the Toolbox App.
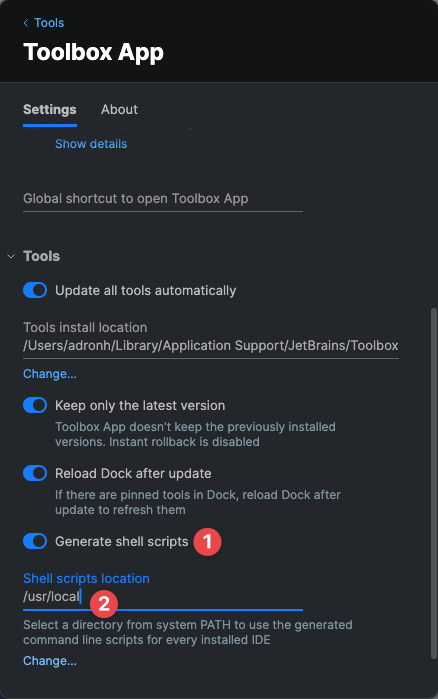
This is diving into, once the Generate shell scripts is toggled on.
The Shell scripts location, I’d argue, should be set to your /usr/local or some system directory so that it’s available specifically for you, or if multiple users use the machine that use all the apps, it’s available prospectively for everybody. The fact is you can set it to whatever path you want, I’ve had some issues managing that autonomously of a directory like /usr/local that one just tends to end up with as part of one’s path on a machine. With that, I’d wrap this up with a strong suggestion to set it to /usr/local and call it a day.
An important thing to note about this path, whatever is selected has to be the path and the permissions must allow the creation of the actual files once apply is clicked. Whichever IDEs are installed should show like this. If permissions or or something else prevents these from being created then another directory needs to be selected or the permissions changed or problems resolved.
At this point navigate to any directory and open the respective IDE by command or open the directory you’re located with ideaCmd . and the specific IDE will launch and open that particular directory.
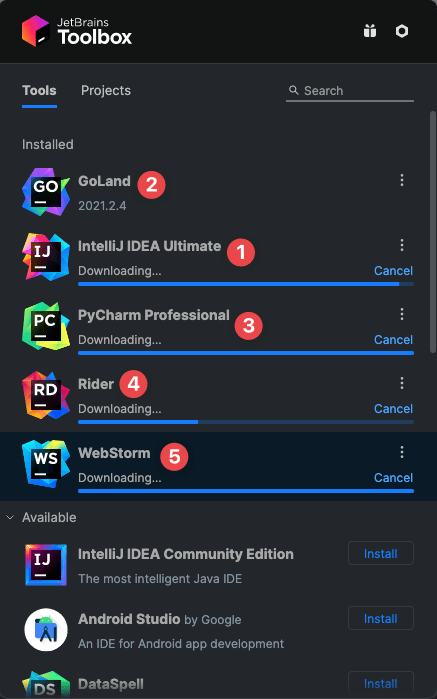
That’s it for the Toolbox settings. I’ll end this article with a few suggestions on IDEs to install, pending you’re using an account that has the entire suite or you have multiple IDE subscriptions purchased. I would recommend, to install IntelliJ IDEA Ultimate regardless of what other IDEs you install. It’s a good option that has a little bit of every other IDE and has been the one (my understanding here) that was the original and thus, longest developed of all the options.
Then, if you’re focused on a particular language stack, then install the IDE that is available for that particular language. GoLand for Go, PyCharm for Python, Rider for .NET, and WebStorm for web related development. There are others, so choose as you develop. Of course, any of these can all be developed in the IntelliJ IDEA IDE but your mileage may vary if you go that route, I’d highly recommend using the IDE specific to the language stack.
First steps. Let’s get .NET installed and setup. I’m running Ubuntu 18.04 for this setup and start of project. To install .NET on Ubuntu one needs to go through a multi-command process of keys and some other stuff, fortunately Microsoft’s teams have made this almost easy by providing the commands for the various Linux distributions here. The commands I ran are as follows to get all this initial setup done.
After all this I could then install the .NET SDK. It’s been so long since I actually installed .NET on anything that I wasn’t sure if I just needed the runtime, the SDK, or what I’d actually need. I just assumed it would be safe to install the SDK and then install the runtime too.
Alright. Now with this installed, I wanted to also see if Jetbrains Rider would detect – or at least what would I have to do – to have the IDE detect that .NET is now installed. So I opened up the IDE to see what the results would be. Over the left hand side of the new solution dialog, if anything isn’t installed Rider usually will display a message that X whatever needs installed. But it looked like everything is showing up as installed, “yay for things working (at this point)!”
Next up is to get a solution started with the pertinent projects for what I want to build.
For the next stage I created three projects.
InteroperationalBlackBox – A basic class library that will be used by a console application or whatever other application or service that may need access to the specific business logic or what not.
InteroperationalBlackBox.Tests – An xunit testing project for testing anything that might need some good ole’ testing.
InteroperationalBlackBox.Cli – A console application (CLI) that I’ll use to interact with the class library and add capabilities going forward.
Alright, now that all the basic projects are setup in the solution, I’ll go out and see about the .NET DataStax Enterprise driver. Inside Jetbrains Rider I can right click on a particular project that I want to add or manage dependencies for. I did that and then put “dse” in the search box. The dialog pops up from the bottom of the IDE and you can add it by clicking on the bottom right plus sign in the description box to the right. Once you click the plus sign, once installed, it becomes a little red x.
Alright. Now it’s almost time to get some code working. We need ourselves a database first however. I’m going to setup a cluster in Google Cloud Platform (GCP), but feel free to use whatever cluster you’ve got. These instructions will basically be reusable across wherever you’ve got your cluster setup. I wrote up a walk through and instructions for the GCP Marketplace a few weeks ago. I used the same offering to get this example cluster up and running to use. So, now back to getting the first snippets of code working.
Let’s write a test first.
[sourcecode language=”csharp”]
[Fact]
public void ConfirmDatabase_Connects_False()
{
var box = new BlackBox();
Assert.Equal(false, box.ConfirmConnection());
}
[/sourcecode]
In this test, I named the class called BlackBox and am planning to have a parameterless constructor. But as things go tests are very fluid, or ought to be, and I may change it in the next iteration. I’m thinking, at least to get started, that I’ll have a method to test and confirm a connection for the CLI. I’ve named it ConfirmConnection for that purpose. Initially I’m going to test for false, but that’s primarily just to get started. Now, time to implement.
[sourcecode language=”csharp”]
namespace InteroperabilityBlackBox
using System;
using Dse;
using Dse.Auth;
namespace InteroperabilityBlackBox
{
public class BlackBox
{
public BlackBox()
{}
public bool ConfirmConnection()
{
return false;
}
}
}
[/sourcecode]
That gives a passing test and I move forward. For more of the run through of moving from this first step to the finished code session check out this
By the end of the coding session I had a few tests.
[sourcecode language=”csharp”]
using Xunit;
namespace InteroperabilityBlackBox.Tests
{
public class MakingSureItWorksIntegrationTests
{
[Fact]
public void ConfirmDatabase_Connects_False()
{
var box = new BlackBox();
Assert.Equal(false, box.ConfirmConnection());
}
[Fact]
public void ConfirmDatabase_PassedValuesConnects_True()
{
var box = new BlackBox(“cassandra”, “”, “”);
Assert.Equal(false, box.ConfirmConnection());
}
[Fact]
public void ConfirmDatabase_PassedValuesConnects_False()
{
var box = new BlackBox(“cassandra”, “notThePassword”, “”);
Assert.Equal(false, box.ConfirmConnection());
}
}
}
[/sourcecode]
The respective code for connecting to the database cluster, per the walk through I wrote about here, at session end looked like this.
[sourcecode language=”csharp”]
using System;
using Dse;
using Dse.Auth;
namespace InteroperabilityBlackBox
{
public class BlackBox : IBoxConnection
{
public BlackBox(string username, string password, string contactPoint)
{
UserName = username;
Password = password;
ContactPoint = contactPoint;
}
After I wrapped up the session two things stood out that needed fixed for the next session. I’ll be sure to add these as objectives for the next coding session at 3pm PST on Thursday.
The tests really needed to more resiliently confirm the integrations that I was working to prove out. My plan at this point is to add some Docker images that would provide the development integration tests a point to work against. This would alleviate the need for something outside of the actual project in the repository to exist. Removing that fragility.
The application, in its “Black Box”, should do something. For the next session we’ll write up some feature requests we’d want, or maybe someone has some suggestions of functionality they’d like to see implemented in a CLI using .NET Core working against a DataStax Enterprise Cassandra Database Cluster? Feel free to leave a comment or three about a feature, I’ll work on adding it during the next session.
Today the JetBrains team wrapping up final processing for my webinar from last week. You can check out the webinar via their JetBrains Youtube Channel:
For even more information be sure to check out the questions and answers on the JetBrain WebStorm IDE blog entry. Some of the questions include:
Q: How to enable Node.js support in PhpStorm (PyCharm, IntelliJ IDEA, RubyMine)?
Q:How to enable autocompletion for Express, Mocha and other libraries?
Q: Is it possible to debug a Node.js application that runs remotely? Is it possible to debug when your node and the rest of the dependencies (database, etc.) are running in a VM environment like Vagrant?


You must be logged in to post a comment.