My Bespoke JetBrains Toolbox Configuration

One thing I do just enough to remember I need to do, but not frequently enough to remember which settings are which, is installing the JetBrains Toolbox app to get the other JetBrains’ software installed.

The following is the quick list of the key things that I setup to get the most out of Toolbox. This is a quick process and I’ve detailed it here, one for memory, but also to detail what some of the features provide so this might be of more use to others.

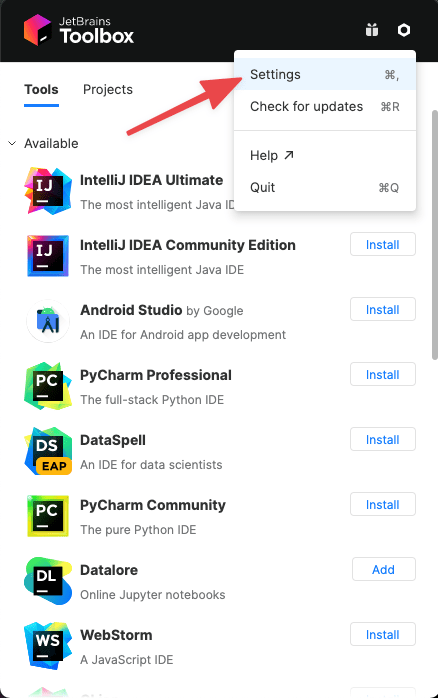
The Toolbox Settings options are located by clicking on the gear icon when the application is opened up. This is the same across operating systems; Windows, Ubuntu, MacOS, or others. Find the gear, click it!

Once Settings are opened up the core 4 configurations include:

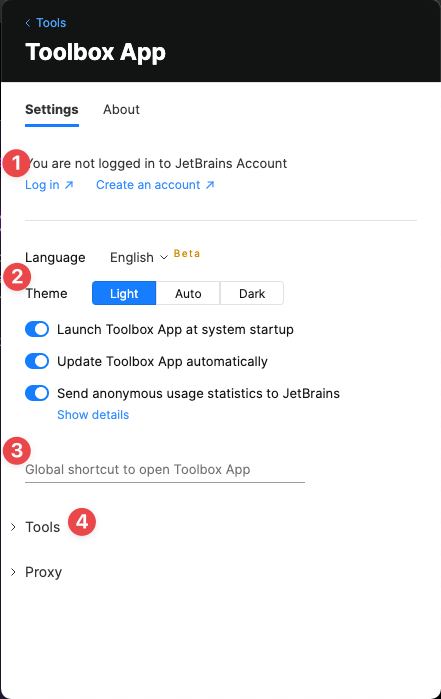
  1. If you’ve got an account, login. Everything is easier if you’re logged into your account.
  2. This second option around the theme is great on MacOS and Ubuntu. I’m not sure what it does on Windows exactly, but presume a similar effect. I myself set this to Auto since I always set the OS level theme to dark and love that almost all the apps that I use shift to that theme.
  1. I don’t set a shortcut for the toolbox, I simply use the Ctrl+Space to launch it from the spotlight on MacOS and use whatever option to issue apps from command on Windows and Linux OS installations of Toolbox.
  2. This section, I’ll detail further down, has a host of additional settings around the tools use itself.

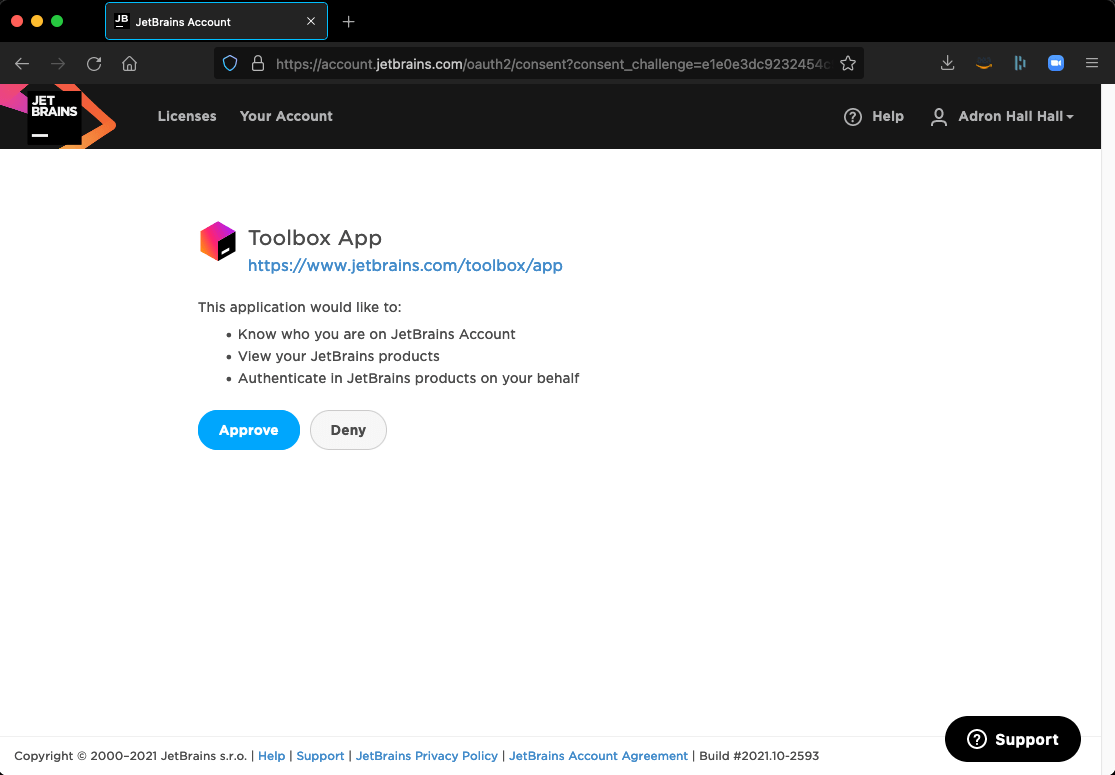
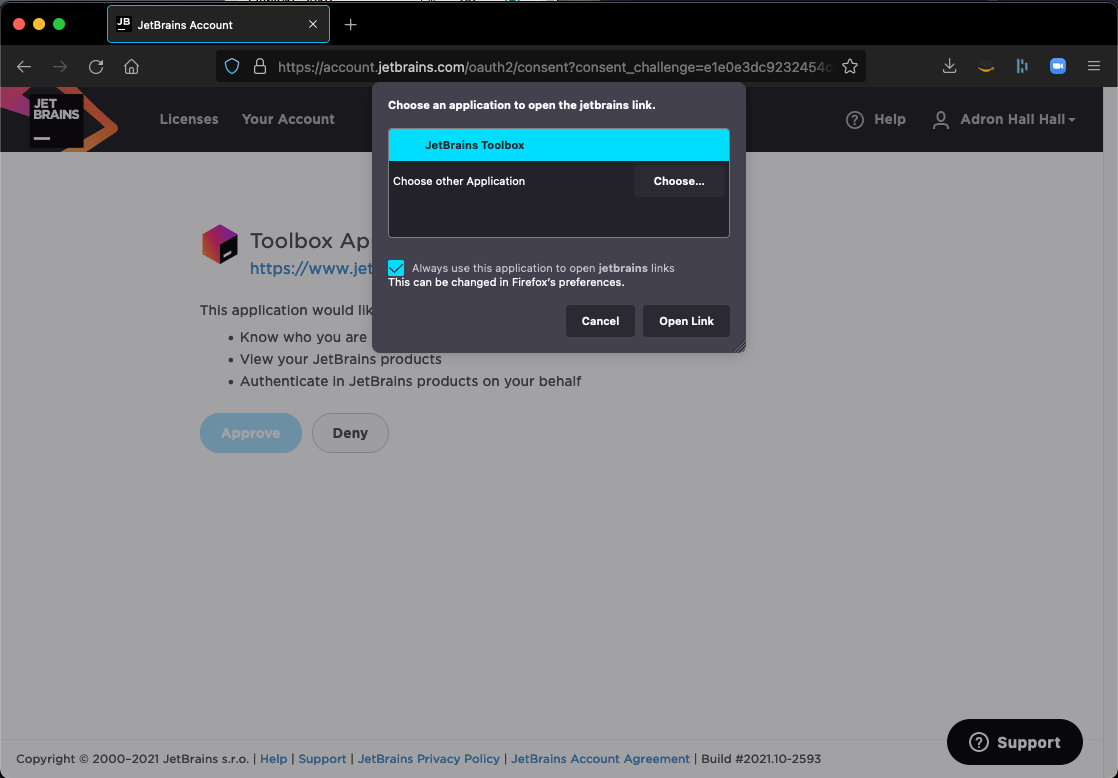
When logging into the app, the Toolbox will launch a browser to complete the process. The ! is what I do, log in with a regular JetBrains username and password based account versus using one of the Oauth options like Github. I feel like, however, maybe I should check if I can switch it or add the Github auth to use that, I am a fan of using it as my general dev auth across systems.

Upon logging in and clicking Approve the prompt to open and then match the Toolbox extension for opening to the Toolbox application in the browser.

Once all that is setup, my next move is to get the Tools section updated and setup the update behaviors, reload setting, and shell scripts.

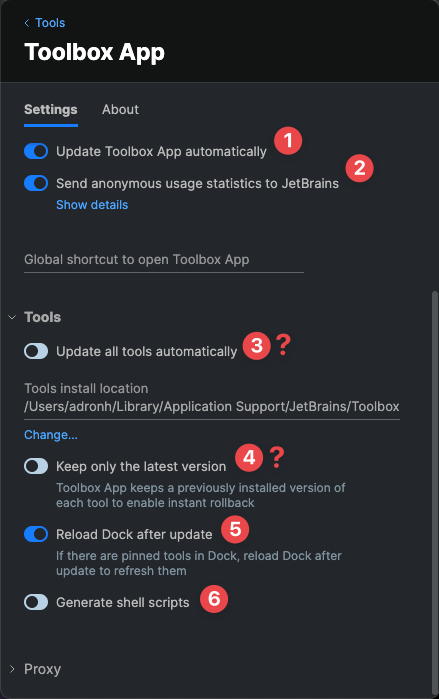
  1. I toggle the Update Toolbox App automatically option on.
  2. I also, cuz I’m such a nice person, send the anonymous usage statistics to JetBrains.
  3. For the Update all tools automatically I often toggle this on. As in the vast majority of scenarios I’m working in, I need to ensure I have the latest patches and updates.
  4. The Keep only the latest version is similar to #3 where as, I generally only want one version of the particular IDE, I don’t particularly need the EAP or previous versions, and I toggle this to keep only the latest version that is currently available.
  5. I leave the Reload Dock after update option toggled on.
  6. This last feature is one of the most important for me. I launch most of the IDEs, JetBrains or others, vai the terminal. My most used method is to issue the ide . so that the IDE opens the particular directory that the prompt is located in. This section, the Generate shell scripts enables this for all of the respective IDEs that are installed per the Toolbox App.
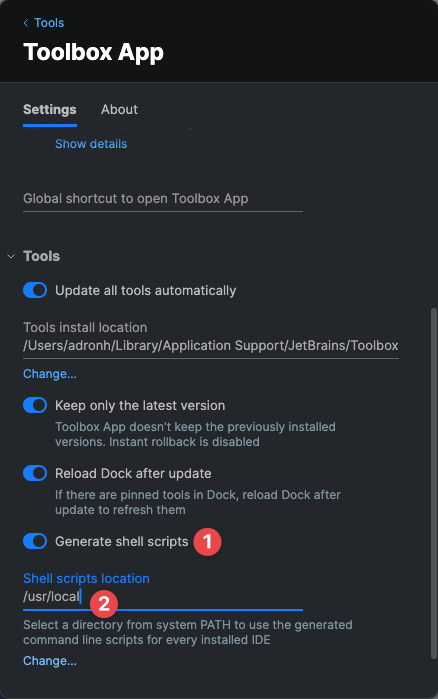
  1. This is diving into, once the Generate shell scripts is toggled on.
  2. The Shell scripts location, I’d argue, should be set to your /usr/local or some system directory so that it’s available specifically for you, or if multiple users use the machine that use all the apps, it’s available prospectively for everybody. The fact is you can set it to whatever path you want, I’ve had some issues managing that autonomously of a directory like /usr/local that one just tends to end up with as part of one’s path on a machine. With that, I’d wrap this up with a strong suggestion to set it to /usr/local and call it a day.

An important thing to note about this path, whatever is selected has to be the path and the permissions must allow the creation of the actual files once apply is clicked. Whichever IDEs are installed should show like this. If permissions or or something else prevents these from being created then another directory needs to be selected or the permissions changed or problems resolved.

At this point navigate to any directory and open the respective IDE by command or open the directory you’re located with ideaCmd . and the specific IDE will launch and open that particular directory.

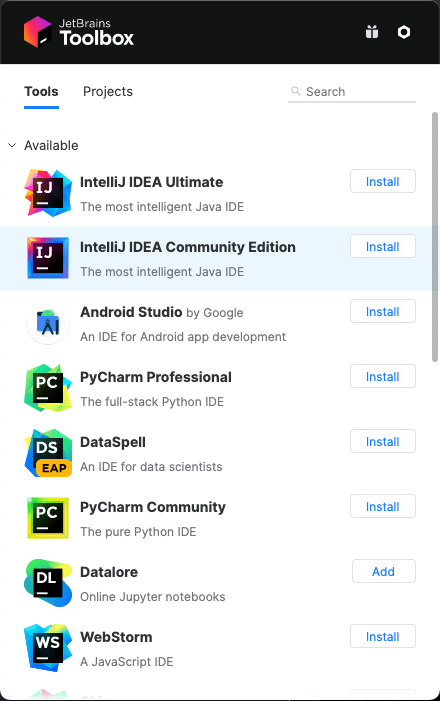
That’s it for the Toolbox settings. I’ll end this article with a few suggestions on IDEs to install, pending you’re using an account that has the entire suite or you have multiple IDE subscriptions purchased. I would recommend, to install IntelliJ IDEA Ultimate regardless of what other IDEs you install. It’s a good option that has a little bit of every other IDE and has been the one (my understanding here) that was the original and thus, longest developed of all the options.

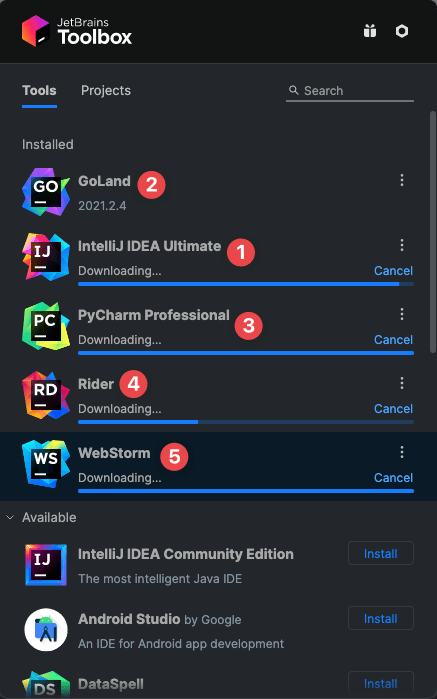
Then, if you’re focused on a particular language stack, then install the IDE that is available for that particular language. GoLand for Go, PyCharm for Python, Rider for .NET, and WebStorm for web related development. There are others, so choose as you develop. Of course, any of these can all be developed in the IntelliJ IDEA IDE but your mileage may vary if you go that route, I’d highly recommend using the IDE specific to the language stack.

Cheers, enjoy your thrashing code! 🤘🏻

Starting an Ubuntu Dev Tools List

I’ve recently setup a completely clean virtual machine for doing web, system, and related development on Ubuntu. Here’s the shortlist of what I’ve installed after a default installation. The ongoing list of tools and related items I have installed on my Linux dev box I’m keeping here, and it will be kept as a living doc, so I’ll change it as I add new tools, apps and related changes. So lemme know what I ought to add to that list and I’ll add it to my docs page here. Here’s what I have so far…

Other To-dos

  • Always run sudo apt-get update once the system is installed. It never hurts to have the latest updates.
  • I always install Chrome as my first app. Sometimes the Ubuntu Software Center flakes out on this, but just try again and it’ll work. I use the 64-bit Chrome btw, as I’ve noticed that the 32-bit often flakes out when attempting installation on my virtual machines. Your mileage may vary.

What this enables…

At this point I can launch into about any language; Java, JavaScript, and a few others with a minimal amount of headache. Since it’s a Linux instance it gives me a full range of Linuxy things at my disposal.


Default Java Installation

  1. Run a ‘sudo apt-get update’.
  2. To install the default Java JRE and the JDK run the following commands.

    [sourcecode language=”bash”]sudo apt-get install default-jre
    sudo apt-get install default-jdk[/sourcecode]


Oracle Java v8 Installation

  1. [sourcecode language=”bash”]sudo add-apt-repository ppa:webupd8team/java
    sudo apt-get update
    sudo apt-get install oracle-java8-installer[/sourcecode]


WebStorm Installation

  1. I download the application zip from JetBrains and then run

    [sourcecode language=”bash”]tar xfz WebStorm-*.tar.gz[/sourcecode]

  2. Next I always move the unzipped content to the directory in which I’d like to have the application stored. It’s good practice to not keep things in the download directory, just sayin’. Generally I put these in my usr/bin directory.

    [sourcecode language=”bash”]mv /downloads/WebStorm-* your/desired/spot[/sourcecode]

  3. Now at your terminal, navigate to the path where the application is stored and run the WebStorm.sh executable.

    [sourcecode language=”bash”]./bin/webstorm.sh[/sourcecode]

  4. To add WebStorm to the Quicklaunch, just right click on the icon and select to Lock to Launcher.


IDEA IntelliJ Installation

  1. Follow all the steps listed under WebStorm, it’s the exact same process.


Sublime 3

  1. Go to download the latest v3.
  2. Run the package and it should launch the actual Ubuntu installer, setup Sublime for bash use and get it installed.

(NOTE UPDATED 1/18/2016 > The installer doesn’t seem to get it installed, so I went with this link http://olivierlacan.com/posts/launch-sublime-text-3-from-the-command-line/ which has a good solution.)

Glassfish, Java, JSF and Explorations of IntelliJ IDEA 13

I recently dove into working with some tooling at Jetbrains. The first thing I needed to take a dive into is the latest EAP of IntelliJ IDEA 13. If you do any sort of Java development you’ve definitely heard of IntelliJ, and if you work in other realms like C#, Node.js & JavaScript, Python or other languages you’ve likely heard of other Jetbrains tools like ReSharper, WebStorm or PHPStorm, Pycharm or a host of the other IDEs that they produce. A few ways to describe their product line; solid, quality, useful and kick ass. But I digress, here’s a run down of the look into IntelliJ IDEA 13.

Getting Something to Serve These Pages

Glassfish 4.0 is the latest and greatest of the Glassfish Server. I downloaded and got the server up and running to use as a base to do local development off of. I had installed Glassfish 3.1.2 but realized rapidly that it just wasn’t a good idea. Thus, a piece of advice, stick to Glassfish 4.

When installing Glassfish 4. I ran into a recurring problem, which is obviously recurring far beyond my use. The installer has the error trapped with an intelligent response.

Click for full size image.

So thus the Glassfish doesn’t understand where the default installation location is for the JRE. Thus you’ll likely have to help it out and provide it the path via the -j switch. Your path will likely look like this:

[sourcecode language=”bash”]
"C:\Users\you\Downloads\glassfish-4.0-windows.exe" -j "C:\Program Files\Java\jre7"
[/sourcecode]

Once that was taken care of Glassfish 4.0 installed just fine and I was on my way to some sample app building. On to that sample app building shortly, for now let’s talk about configuration of IntelliJ IDEA 13 to work with Glassfish as an application server and the respective bits to get going.

IntelliJ IDEA 13 Configuration

Once you have IntelliJ IDEA 13 open, create a new project.

Welcome Screen for IntelliJ IDEA 13. Click for full size image.

Once you click that, pending you’ve already configured IntelliJ IDEA you’ll see a screen display as shown below. If you haven’t configured it already, I’ll go through how to configure things after project creation. That way one can double back and configure the applications you might have already started or pulled from git or something without Glassfish or other servers being setup.

Glassfish and other things, already setup, available for options during project creation. Click for full size image.

Note the JavaEE Web Module selection, then set a project name, project location (or leave the default, it’ll fill in when you enter the project name), set the Project SDK. If one isn’t available you’ll need to setup the SDK via the New button. This will bring up a dialog that will allow you to point to the SDK path and IntelliJ will know which version is available. You can do this for additional versions also, but for this example I’ve just installed 1.7 and run with it. Next set the Application server to Glassfish 4.0.0. Next click on Finish, then you’re all set.

When setting up Glassfish a few other options I like to set are shown in the dialog below. This is my default Glassfish setup for Local development. I’ve set the default browser to launch after a build to Chrome. Set the application server to GlassFish 4.0.0. It might seem silly to have this selection on the GlassFish Server dialog, but when there are multiple versions available you may need to setup a different version for different configurations. Next, I often run the server locally without security username and password, so be sure to remove the admin username that is there for the default configuration.

Glassfish Local setup. Click for full size image.

One last thing that I do to myself when setting up JSF, is keep forgetting to add the appropriate option to GlassFish to run JSF Workflow Apps. To run these apps open up the application server configuration for glassfish itself and select the JSF framework library.

Selecting JSF. Click for full size image.

Now with the application created there is a list of files & libraries.

To the left you can view a number of files & libraries listed. Click for full size image.

Just to make sure everything is wired up right and the application is able to run, double click on the index.jsp file and add some HTML content. I’ve set up my file like this just to get started.

[sourcecode language=”html”]
<%– Created by IntelliJ IDEA. –%>
<%@ page contentType="text/html;charset=UTF-8" language="java" %>
<html>
<head>
<title>Octo Bear!</title>
</head>
<body>
<h1>Bears!</h1>

<p>Lorem ipsum dolor sit amet, consectetur adipiscing elit. Nulla at iaculis eros. Cras eget aliquam mi, ut suscipit
arcu. Suspendisse accumsan auctor tellus in condimentum. Integer interdum a neque eget pharetra. Mauris nec dolor
ipsum. Quisque quis fermentum lorem. Sed tempor egestas dui, sed bibendum justo vulputate eget. Pellentesque tempus
auctor tellus id aliquam. Lorem ipsum dolor sit amet, consectetur adipiscing elit. In erat leo, pharetra eget
convallis ut, interdum et eros. Morbi in tortor id tellus tristique aliquet at non urna. Pellentesque habitant morbi
tristique senectus et netus et malesuada fames ac turpis egestas.</p>
</body>
</html>
[/sourcecode]

Now click on the run button in the top right corner of IntelliJ. You might hit this error if you’ve just installed Glassfish and moved straight to creating the project.

Running the new project immediately after installing Glassfish.

Open up a browser and navigate to http://localhost:4848/ to bring up the administration page for Glassfish 4.0.

Glassfish 4.0 Administration site. (click for full size image)

Click on the server (Admin server) section that’s pointed to in the image above. A page will display that has a button to stop the Glassfish server. Click on stop and that will enable IntelliJ to take over and run the server instead. You’ll want IntelliJ to do this as it will manage the restart, redeploy, update of classes and resources during coding & running the web application. This is much easier than attempting to attach or otherwise manage the server during development.

That’s just a few of the tips and tricks to getting started with the latest IntelliJ IDEA 13 EAP IDE for Java. In my next article I’m going to dive into a few of IntelliJ IDEA 13’s newest features for JSF Workflow Faces Applications.