Giving Every Agent Its Own Branch: Git Worktrees for Parallel AI Work

Run two coding agents against a single working tree and they will fight. One is halfway through editing app/api/messages/route.ts while the other checks out a different branch underneath it. The index lock flickers. A git stash from one session swallows the other’s uncommitted work. I have lost real edits this way, and every time the root cause was the same: one working tree, one HEAD, two writers.

The InterlinedList repo already had matching agents for the jobs I hand off most: a Next.js implementer, a migrations specialist, unit and e2e testers, a docs writer, security and UX reviewers. They are good at their lanes. What they were missing was a lane in the literal sense. They all drove on one road.

I found the pattern I wanted written up in Augment’s guide to git worktrees for parallel AI execution, and it maps almost one to one onto how I already think about agents. This is the writeup of what I built on top of it for this repo: the directory convention, the seven scripts that manage the lifecycle, and the wiring that makes every agent use them without being reminded.

The one-tree problem

A normal clone gives you a single working directory backed by one .git. That is fine for one person doing one thing. The moment you parallelize, the shared mutable state (the working files, the index, the current branch) becomes the bottleneck. You cannot have the migrations agent on agent/add-webhooks and the docs agent on agent/help-refresh at the same instant, because “the branch” is a property of the whole checkout.
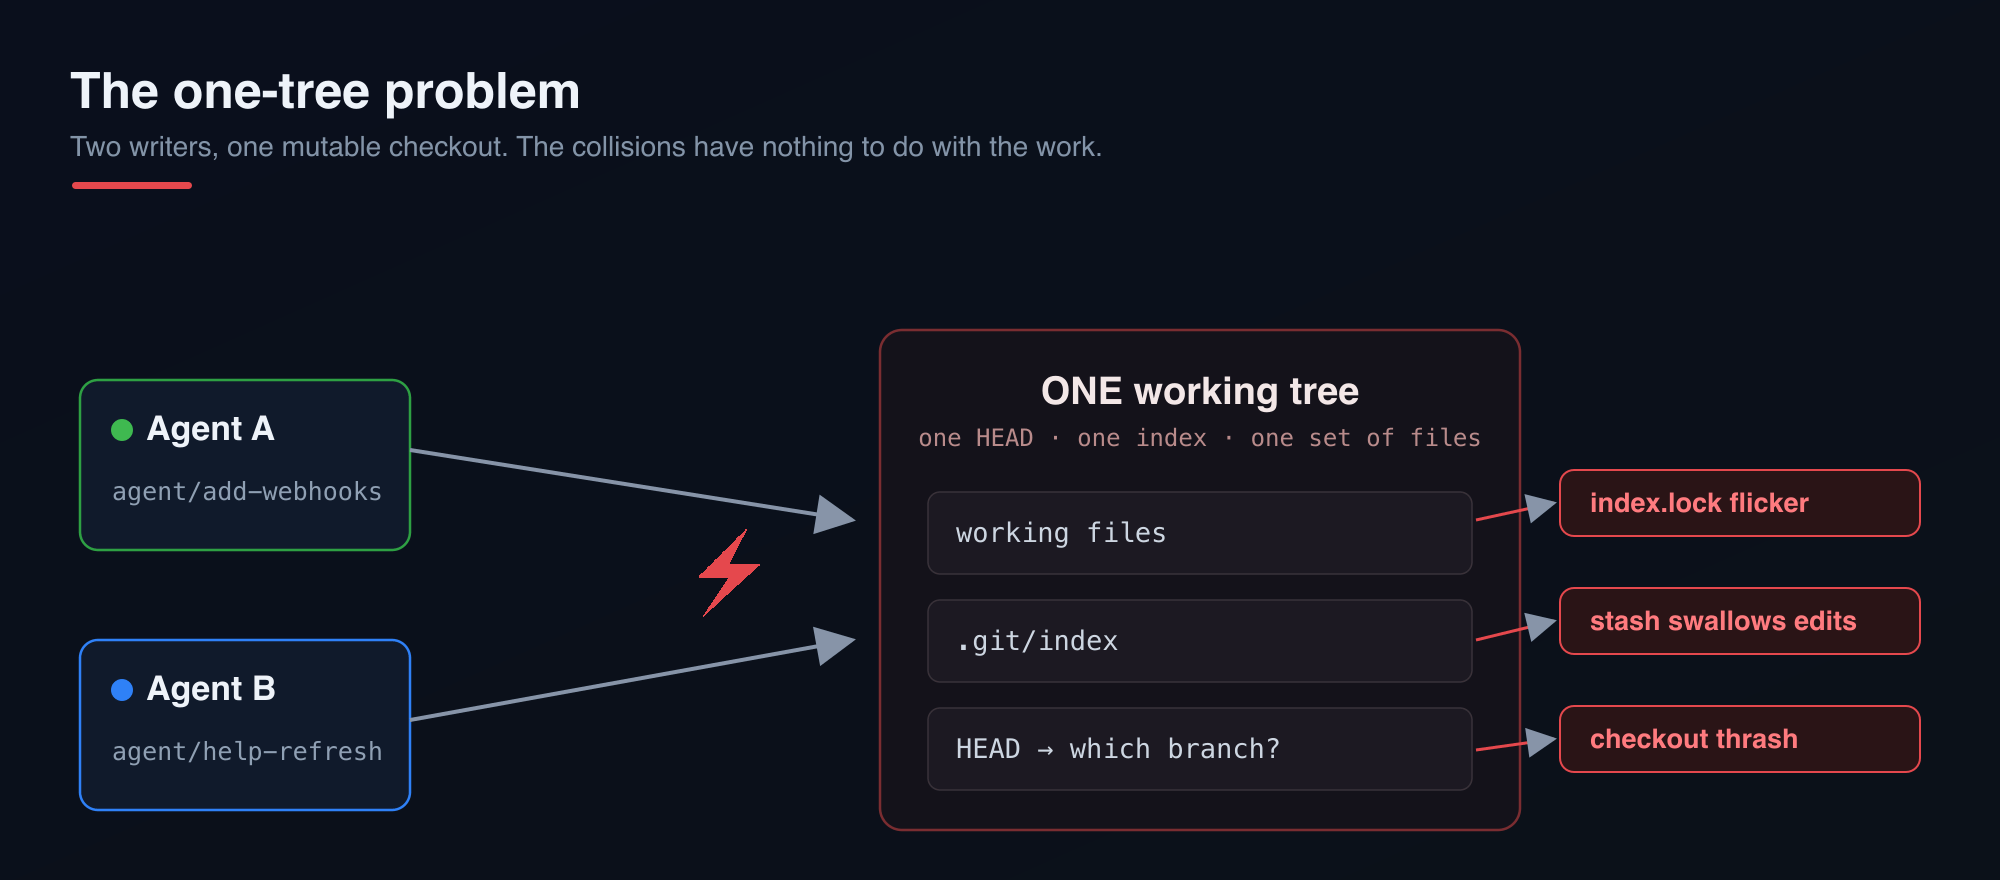
Diagram illustrating 'The one-tree problem' in software development with two agents, A and B, interacting with a mutable checkout and related issues like index.lock flicker and checkout thrash.

Two writers, one mutable checkout. The collisions have nothing to do with the work: an index lock flickers, a git stash swallows the other session’s edits, HEAD thrashes between branches.

Git solved this in 2015 with git worktree. A worktree is a second (third, fourth) working directory attached to the same repository. Each one has its own files, its own index, and its own checked-out branch, while sharing one object store on disk. The object store is the expensive part, so you share it. A directory of files is cheap, so you duplicate it per task. That is exactly the tradeoff you want for parallel agents.
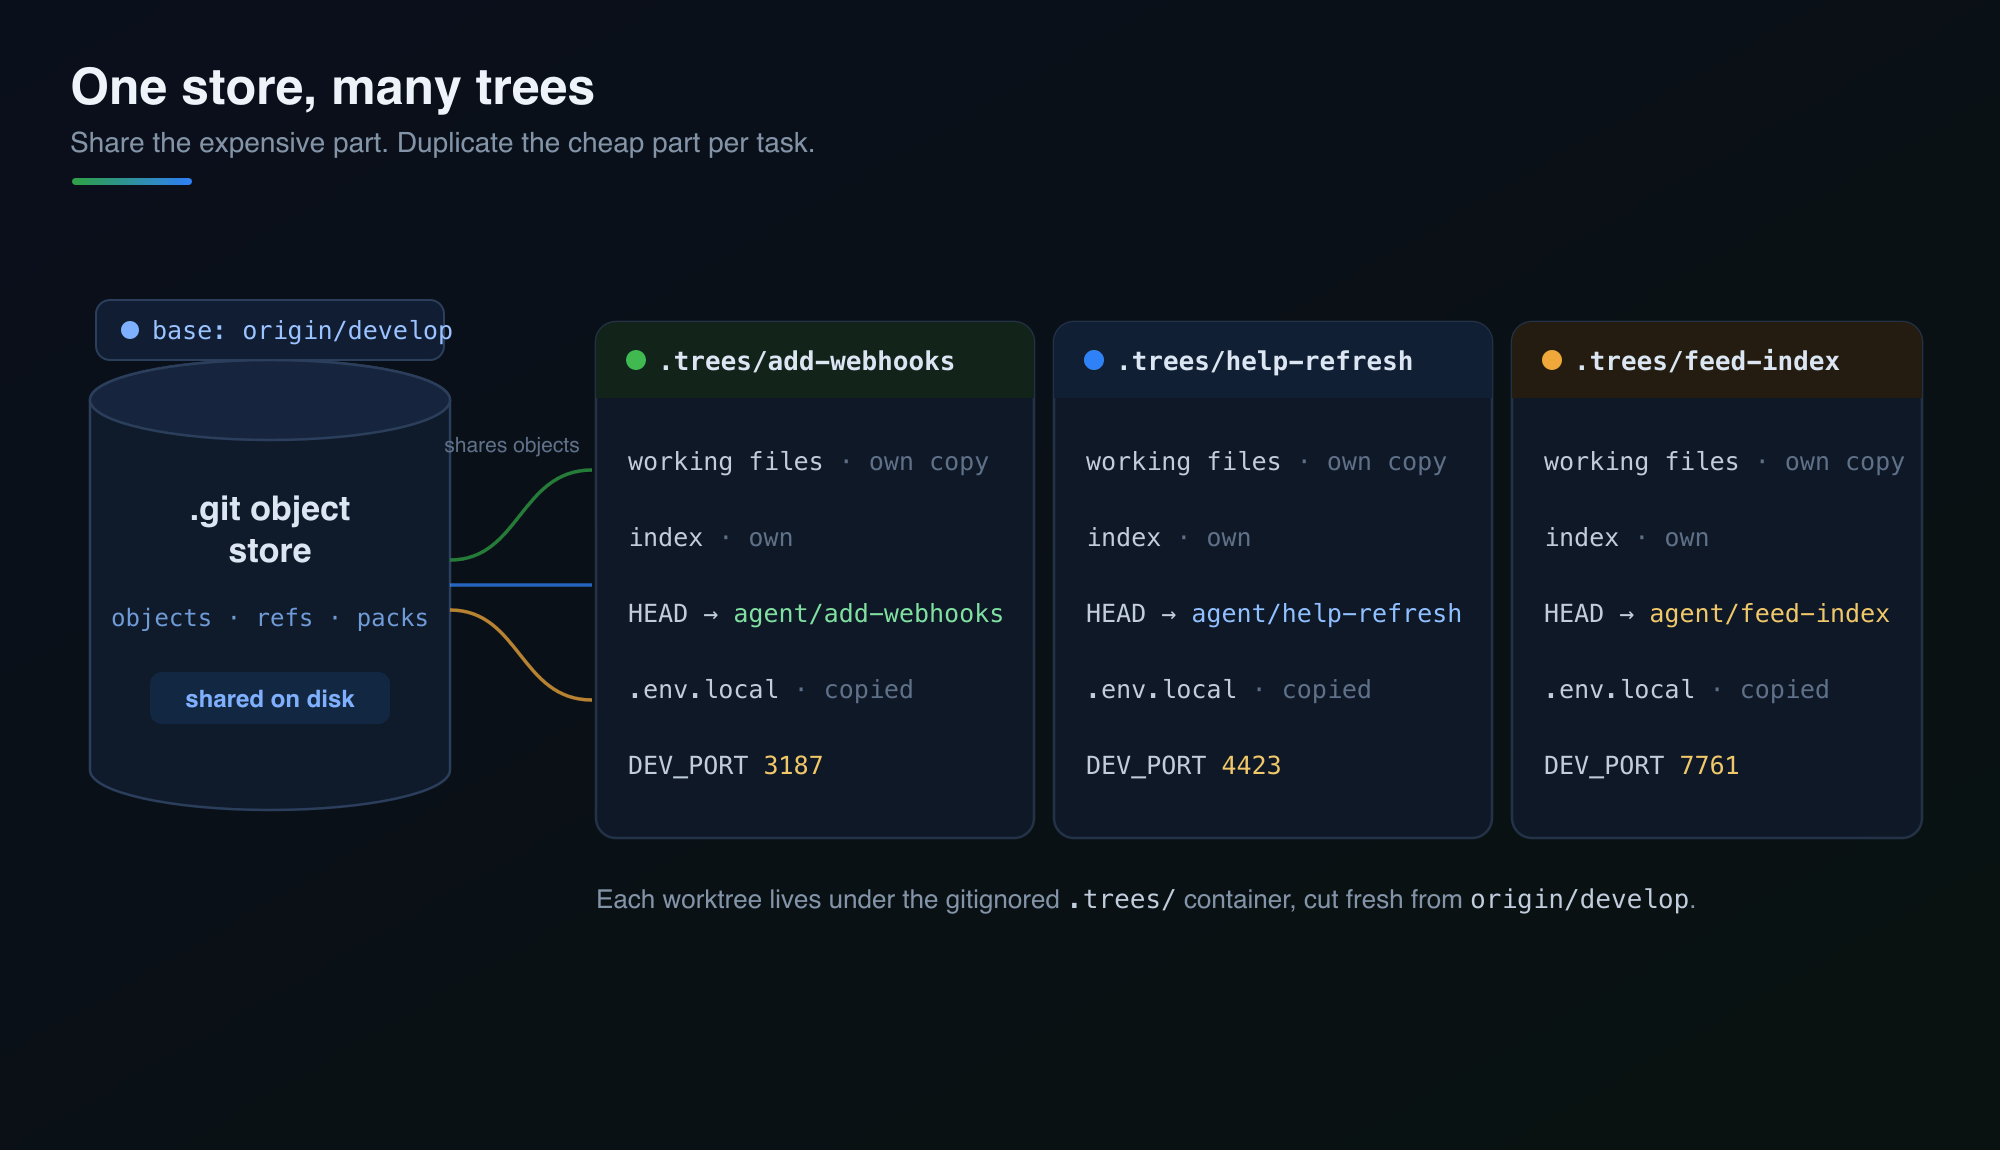
Diagram illustrating a Git object store with multiple worktrees, highlighting shared storage and individual configurations for each task.

Share the expensive part, duplicate the cheap part. The object store lives on disk once; the working files, the index, the checked-out branch, and even the dev-server port are private to each worktree.

The convention

Every agent works in .trees/<task-id> on a branch named agent/<task-id>, cut from origin/develop (this repo integrates on develop, not main). So a task called add-list-webhooks lives at .trees/add-list-webhooks on branch agent/add-list-webhooks. The directory name and the branch name always agree because both are derived from the same sanitized slug.

The .trees/ container is gitignored. Worktrees are workspace, not history:

# .gitignore
# Agent worktrees (see scripts/worktrees/)
.trees/

That single ignore line is the whole footprint the pattern leaves in the tracked tree. Everything else is scripts and instructions.

The scripts

I did not want agents (or me) typing raw git worktree incantations and getting the branch name wrong, or forgetting to copy .env.local, or leaving stale metadata behind. So the lifecycle lives in scripts/worktrees/ as a small set of focused shell scripts. Here is every one of them.
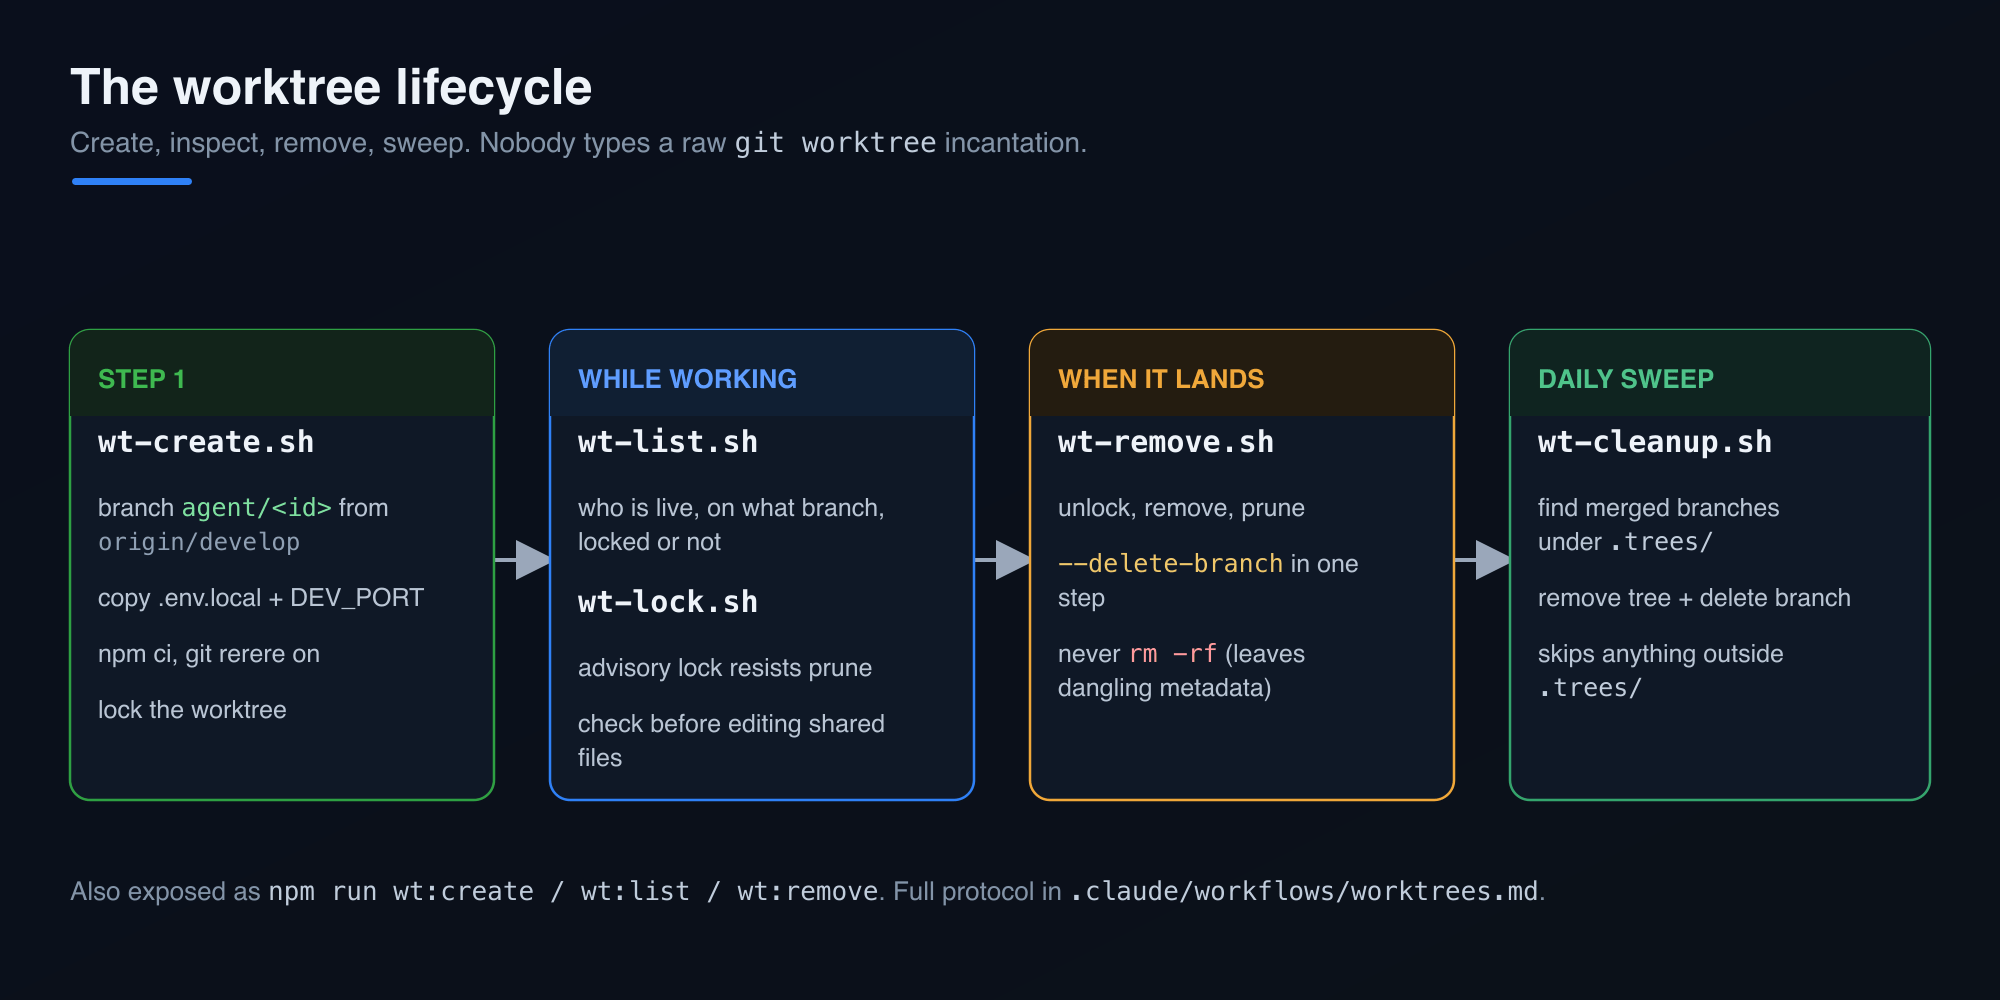
Diagram illustrating the worktree lifecycle in Git, detailing steps for creating, inspecting, removing, and cleaning worktrees. Sections include 'STEP 1' for branch creation, 'WHILE WORKING' for listing and locking, 'WHEN IT LANDS' for removing branches, and 'DAILY SWEEP' for cleanup processes.

The whole lifecycle before the per-script detail. Create, inspect while working, remove when it lands, sweep the merged trees on a schedule.

_lib.sh is the shared library the others source. It holds the functions that keep conventions consistent: wt_repo_root resolves the primary checkout even when you call it from inside a linked worktree (it reads git rev-parse --git-common-dir and walks up), wt_sanitize lowercases a task id and strips it to [a-z0-9._-]wt_resolve_base fetches and prefers origin/<base> over a local branch, wt_port_for hashes a branch name into a stable dev port, and wt_is_locked reads the porcelain worktree list to check lock state. Nothing in it is clever. It exists so the clever bits are written once.

wt-create.sh <task-id> [base] is the one agents call first. It creates the worktree and makes it ready to work in, in one shot:

scripts/worktrees/wt-create.sh add-list-webhooks

Under the hood it resolves the base ref (default develop), ensures .trees/ is in .gitignore, turns on git rerere so repeated conflict resolutions replay across parallel merges, runs git worktree add -b agent/<slug> .trees/<slug> origin/<base>, copies the root .env.local into the worktree, appends a deterministic DEV_PORT derived from the branch name, runs npm ci --prefer-offline, and finally locks the worktree so other sessions can see it is in use. Flags let you opt out where it makes sense: --no-install skips the dependency install for a quick plumbing check, --no-lock leaves it unlocked, and --baseline runs the test suite right after setup so a green baseline proves any later failure came from the agent’s change rather than a pre-existing break.

The port assignment is worth a sentence. Two agents both running next dev on 3000 is another collision, a quieter one. wt_port_for runs the branch name through cksum and maps it into the 3100 to 9998 range, so each worktree gets a stable, distinct port written into its own .env.local. Start the server with npm run dev -- -p "$DEV_PORT" and two dev servers coexist.

wt-list.sh answers “what is running right now.” It prunes stale metadata, then prints one row per worktree with path, branch, lock state, and short HEAD:

PATH BRANCH LOCKED HEAD
/Users/adron/Codez/interlinedlist feature/fix-blog-image - 58afa91562
/Users/adron/Codez/interlinedlist/.trees/add-list-webhooks agent/add-list-webhooks yes b78faf9e21

Before an agent touches a shared file, it can look here and see who else is holding what. Git will not warn you about two branches editing the same file, so this list plus discipline about non-overlapping file domains is the actual safety mechanism.

wt-lock.sh <task-id> [reason] and wt-unlock.sh <task-id> are thin wrappers over git worktree lock/unlock. A lock is advisory: it resists prune and move, and it is the signal in wt-list.sh that says “an agent is live in here, do not reap this.”

wt-remove.sh <task-id> is the teardown. It unlocks if needed, runs git worktree remove, and prunes. This matters more than it looks: deleting a worktree with rm -rf leaves dangling metadata in .git/worktrees/ that haunts you until the next prune. The script never does that. --force discards uncommitted changes on purpose, and --delete-branch drops agent/<task-id> in the same step when the work has landed.

wt-cleanup.sh [base] is the bulk sweep. It walks every worktree physically under .trees/, and for each one whose branch is already an ancestor of origin/develop (in other words, merged), it removes the worktree and deletes the branch. It deliberately skips anything outside .trees/, so the primary checkout and any sibling worktrees I keep elsewhere on disk are never touched. This is the script you point a daily cron or a post-merge hook at.

Each of these is also exposed as an npm script, so npm run wt:create -- add-list-webhooksnpm run wt:list, and npm run wt:remove -- add-list-webhooks all work if you prefer that entry point. There is a scripts/worktrees/README.md documenting the whole set alongside the code.

Wiring it into the agents

Scripts nobody runs are decoration. The point was to make every agent reach for a worktree by default, so I added the instruction in three places at three levels of specificity.

At the top, CLAUDE.md now states the standing rule: every agent works in an isolated worktree, torn down with the lifecycle scripts. That is the repo-wide contract.

In the middle, two shared protocol docs under .claude/workflows/ hold the full detail: worktrees.md spells out the create-work-remove lifecycle, the boundaries (shared object store, non-overlapping files, and the important caveat that the database is shared even though the files are not), and plan-first.md covers the companion habit I wrote about separately. Every agent and skill links to these rather than repeating them.

At the leaf, each of the eight agent definitions in .claude/agents/ got a “Work in an isolated git worktree (required)” section written for its job. The implementers (Next.js, migrations, tests, docs, blog) get the full create-work-remove flow. The two read-only reviewers (security, UX) get a variant that tells them to cd into the worktree under review and read its diff, and explicitly not to create, lock, or remove anything. The migrations agent gets an extra warning in bold, because the worktree isolates schema.prisma and the migration files but not the Postgres instance: db:migrate still hits localhost and db:migrate:deploy still hits production from any worktree. That is the one place the isolation is a lie, and the agent needs to know it.

The five paired skills in .claude/skills/ (the ones that back the implementer agents) got a short “Worktree-first, plan-first” block near the top pointing at the same protocol docs, so whether the work comes in through the agent or the skill, the instruction is there.

Proving it works

I ran the whole lifecycle before committing any of it. Create a worktree from develop, confirm it is locked and has its port, unlock and re-lock it, remove it with the branch, and verify the cleanup pass leaves the sibling worktrees alone:

scripts/worktrees/wt-create.sh wt-smoke-test --no-install
scripts/worktrees/wt-list.sh # shows agent/wt-smoke-test, LOCKED yes
scripts/worktrees/wt-unlock.sh wt-smoke-test
scripts/worktrees/wt-lock.sh wt-smoke-test "smoke re-lock"
scripts/worktrees/wt-remove.sh wt-smoke-test --delete-branch
scripts/worktrees/wt-cleanup.sh develop # safe no-op, siblings untouched

Every step did what it said, the .gitignore guard refused to duplicate the .trees/ line it found already present, and the sibling worktree I keep for feed-perf work was never in scope for cleanup. That last part was the thing I most wanted to confirm, because a cleanup script that reaches outside its sandbox is worse than no cleanup script.

Where agents still get confused

Isolating the filesystem fixes the filesystem. It does nothing about the fact that the work itself overlaps, and there are a handful of ways an agent still gets lost.

The database is one instance, and every worktree writes to it. I flagged this to the migrations agent in bold, but it deserves more than a warning. If the migrations agent adds a column on agent/add-webhooks, that column now exists in the same localhost Postgres every other worktree points at. The docs agent three trees over never sees the changed schema.prisma, yet its queries hit the mutated database anyway. Additive-only migrations keep this survivable most of the time, since an extra column nobody reads is harmless. But the moment two agents touch the same table, or one runs db:migrate:deploy and reaches production from what looked like a sandbox, the isolation is a fiction. The files are private. The database is not.

Green in isolation, red on merge. This is the one that bites. Agent A changes a function signature in lib/lists/queries.ts. Agent B, on its own branch, calls that function from a route it owns. Their files never overlap, so wt-list.sh shows no conflict and git stays quiet. Both test suites pass, because A’s worktree still holds B’s old caller and B’s worktree still holds A’s old signature. It’s all green right up until both branches land on develop, and then the integration is broken in a way neither agent could see from inside its own tree. Worktrees convert a loud, immediate collision into a quiet one that surfaces later. Often a fair trade, but a trade.

Stale base drift. Every worktree is cut from origin/develop the moment it’s created. Agents aren’t always short-lived. Let one run for a few hours while three others merge back, and it’s now building on a develop that no longer exists. It will reintroduce a helper that got deleted upstream, or write against an API another agent already reshaped. The worktree has no idea the ground moved under it. Nothing in the create-work-remove loop forces a re-fetch, so a long-running agent drifts out of date without noticing.

“Does this already exist?” stops having one answer. With five branches in flight, whether feature X is “already built” depends on which tree you grep. An agent that checks the primary checkout won’t see work-in-progress on another branch, and it will happily build a second copy. I’ve watched two sessions independently implement overlapping halves of the same feature, each sure it was first, because neither branch was visible to the other and neither said up front what it was about to touch. wt-list.sh tells you which branches exist. It says nothing about what each one intends to change.

The lock is a suggestion. wt-lock resists prune and move, and it flags a tree as live in the list, but it will not stop another agent from opening the same file on its own branch and editing away. The real guard against two agents clobbering one file is the up-front decomposition plus the discipline to run wt-list.sh and honor what it shows. An agent that skips the check has no seatbelt, just the shape of one.

Abandoned trees pile up. wt-cleanup.sh only sweeps branches already merged into develop. A worktree from a crashed or cancelled session is unmerged, still locked, and invisible to the sweep. It sits on disk with a full node_modules until someone removes it by hand. And an agent resuming a task can trip over a half-finished tree from an earlier run and read its stale state as current work.

Losing the current directory. The workflow says cd .trees/<task-id> and do everything there. Shell state doesn’t always survive between tool calls, and an absolute path into the primary checkout looks identical to one into a worktree. An agent that loses track of where it is can read the main checkout’s copy of a file, reason about it as though it were its branch’s version, and edit the wrong tree. The isolation holds only as long as the agent keeps its bearings.

What this buys

The honest version: worktrees do not make independent tasks independent. If two agents both need to edit the same route, isolating their filesystems just delays the merge conflict, it does not prevent it. The decomposition still has to be real. What the pattern removes is the accidental collision, the kind that has nothing to do with the work and everything to do with sharing one mutable checkout. Those were most of my pain, and now they are gone by construction.

Advantages and disadvantages

Advantages

  • Accidental collisions disappear. Each agent gets its own files, index, and HEAD, so index-lock flicker, a stray git stash eating another session’s edits, and checkout thrash stop happening.
  • Every task lands on its own agent/<task-id> branch, which keeps review and merge clean and stops one task’s half-finished mess from bleeding into another’s diff.
  • The object store is shared, so the costly part of the repo lives on disk once and spinning up another tree is cheap.
  • Each worktree gets a deterministic DEV_PORT, so several next dev servers run side by side instead of fighting over 3000.
  • The lifecycle is scripted and wired into every agent definition, so the right setup and teardown happen without anyone remembering the incantation.
  • git rerere is on by default, so a conflict you resolve once replays across the parallel merges that hit it again.
  • Cleanup is fenced to .trees/, so the bulk sweep never reaches the primary checkout or the sibling worktrees I keep elsewhere.

Disadvantages

  • The database isn’t isolated, and neither is anything else global (production through db:migrate:deploy, OAuth apps, third-party rate limits). File isolation quietly implies an isolation that isn’t there.
  • Overlapping edits on separate branches turn into silent, deferred conflicts and semantic breakage that pass every isolated test and only show up at integration.
  • A long-running worktree drifts from a moving develop, and nothing in the loop forces the re-fetch that would catch it up.
  • Locks are advisory, so the actual protection against two agents editing one file is decomposition plus discipline, not anything git enforces.
  • With several branches live, “does this already exist” has no single answer, and agents duplicate each other’s work when branches can’t see one another.
  • Every worktree carries a full node_modules, so disk use and npm ci time multiply with each active task.
  • Crashed or abandoned sessions leave locked, unmerged trees that the merged-only cleanup won’t reap, so someone clears them by hand.
  • Coordination is still manual: the tooling shows which branches exist, not which files each agent means to touch.

The next habit I want in every agent sits upstream of all of this: stop and plan before touching a single file. That one is worth its own post.

More solutions to the confusion above are coming in the next few posts. Subscribe so you don’t miss ’em: drop your email into the box just below this post, or grab the RSS feed.

I’m Adron, brainstorming and building InterlinedList.

GitHub Copilot: A Getting Started Guide to GitHub Copilot

Note: I’ve decided to start writing up the multitude of AI tools/tooling and this is the first of many posts on this topic. This post is effectively a baseline of what one should be familiar with to get rolling with Github Copilot. As I add posts, I’ll add them at the bottom of this post to reference the different tools, as well as back reference them to this post, etc, so that they’re all easily findable. With that, let’s roll…

Intro

GitHub Copilot is thoroughly changing how developers write code, serving as a kind of industry standard – almost – for AI-powered code completion and generation. As someone who’s been in software development for over two decades, I’ve seen many tools come and go, but the modern variant of Copilot represents a fundamental shift in how we approach coding – it’s not just a tool, it’s a new paradigm for human-AI collaboration in software development.

In this comprehensive guide, I’ll walk you through everything you need to know to get started with GitHub Copilot, from basic setup to advanced features that will transform your development workflow.

What is GitHub Copilot?

GitHub Copilot is an AI-powered code completion tool that acts as your virtual pair programmer. It’s built on OpenAI’s Codex model and trained on billions of lines of public code, making it incredibly adept at understanding context, suggesting completions, and even generating entire functions based on your comments and existing code.

Key Capabilities

  • Real-time code suggestions as you type
  • Comment-to-code generation from natural language descriptions
  • Multi-language support across 50+ programming languages
  • Context-aware completions that understand your project structure
  • IDE integration with VS Code, Visual Studio, Neovim, and JetBrains IDEs

Getting Started: Setup and Installation

Prerequisites

Installation Steps

1. Subscribe to GitHub Copilot

2. Install the Extension

  • VS Code: Search for “GitHub Copilot” in the Extensions marketplace
  • Visual Studio: Install from Visual Studio Marketplace
  • JetBrains IDEs: Install from JetBrains Marketplace
  • Neovim: Use copilot.vim or copilot.lua

3. Authenticate

  • Sign in to your GitHub account when prompted
  • Authorize the extension to access your account
  • Verify your Copilot subscription is active
Screenshot of Visual Studio Code showing the welcome interface, including options for opening chat features, managing code completions, and accessing recent projects.

Core Features and How to Use Them

1. Inline Suggestions

Copilot provides real-time code suggestions as you type. These appear as gray text that you can accept by pressing Tab or Enter.

# Type this comment and Copilot will suggest the function
def calculate_compound_interest(principal, rate, time, compounds_per_year):
    # Copilot will suggest the complete implementation

2. Comment-to-Code Generation

One of Copilot’s most powerful features is generating code from natural language comments.

// Create a function that validates email addresses using regex
// Copilot will generate the complete function with proper validation

3. Function Completion

Start typing a function and let Copilot complete it based on context:

def process_user_data(user_input):
    # Start typing and Copilot will suggest the next lines
    if not user_input:
        return None
    
    # Continue with the implementation

4. Test Generation

Copilot can generate test cases for your functions:

def add_numbers(a, b):
    return a + b

# Type "test" or "def test_" and Copilot will suggest test functions

Advanced Features and Techniques

1. Multi-line Completions

Press Tab to accept suggestions line by line, or use Alt + ] to accept multiple lines at once.

2. Alternative Suggestions

When Copilot suggests code, press Alt + [ or Alt + ] to cycle through alternative suggestions.

3. Inline Chat (Copilot Chat)

The newer Copilot Chat feature allows you to have conversations about your code:

  • Press Ctrl + I (or Cmd + I on Mac) to open inline chat
  • Ask questions about your code
  • Request refactoring suggestions
  • Get explanations of complex code sections

4. Custom Prompts

Learn to write effective prompts for better code generation:

Good prompts:

# Create a REST API endpoint that accepts POST requests with JSON data,
# validates the input, and returns a success response with status code 201

Less effective prompts:

# Make an API endpoint

Best Practices for Effective Copilot Usage

1. Write Clear Comments

The quality of Copilot’s suggestions directly correlates with the clarity of your comments and context.

# Good: Clear, specific description
def parse_csv_file(file_path, delimiter=',', skip_header=True):
    """
    Parse a CSV file and return a list of dictionaries.
    
    Args:
        file_path (str): Path to the CSV file
        delimiter (str): Character used to separate fields
        skip_header (bool): Whether to skip the first row as header
    
    Returns:
        list: List of dictionaries where keys are column names
    """

2. Provide Context

Help Copilot understand your project structure and coding style:

# This function follows the project's error handling pattern
# and uses the standard logging configuration
def process_payment(payment_data):

3. Review Generated Code

Always review and test code generated by Copilot:

  • Check for security vulnerabilities
  • Ensure it follows your project’s coding standards
  • Verify the logic matches your requirements
  • Run tests to confirm functionality

4. Iterative Refinement

Use Copilot as a starting point, then refine the code:

  • Accept the initial suggestion
  • Modify it to match your specific needs
  • Ask Copilot to improve specific aspects
  • Iterate until you have the desired result

Language-Specific Tips

Python

  • Copilot excels at Python due to its extensive training data
  • Great for data science, web development, and automation scripts
  • Excellent at generating docstrings and type hints

JavaScript/TypeScript

  • Strong support for modern ES6+ features
  • Good at React, Node.js, and frontend development patterns
  • Effective at generating test files and API clients

Java

  • Good support for Spring Boot and enterprise patterns
  • Effective at generating boilerplate code and tests
  • Strong understanding of Java conventions

Go

  • Growing support with good understanding of Go idioms
  • Effective at generating HTTP handlers and data structures
  • Good at following Go best practices

Troubleshooting Common Issues

1. Suggestions Not Appearing

  • Verify your Copilot subscription is active
  • Check that you’re signed into the correct GitHub account
  • Restart your IDE after authentication
  • Ensure the extension is properly installed and enabled

2. Poor Quality Suggestions

  • Improve your comments and context
  • Check that your file has the correct language extension
  • Provide more context about your project structure
  • Use more specific prompts

3. Performance Issues

  • Disable other AI coding extensions that might conflict
  • Check your internet connection (Copilot requires online access)
  • Restart your IDE if suggestions become slow
  • Update to the latest version of the extension

4. Security Concerns

  • Never paste sensitive data or credentials into Copilot
  • Review generated code for security vulnerabilities
  • Use Copilot in private repositories when possible
  • Be cautious with code that handles user input or authentication

Integration with Development Workflows

1. Pair Programming

Copilot can act as a third member of your pair programming session:

  • Generate alternative implementations for discussion
  • Create test cases to explore edge cases
  • Suggest refactoring opportunities
  • Help with debugging by generating test scenarios

2. Code Review

Use Copilot to enhance your code review process:

  • Generate additional test cases
  • Suggest alternative implementations
  • Identify potential improvements
  • Create documentation for complex functions

3. Learning and Exploration

Copilot is excellent for learning new technologies:

  • Generate examples of new language features
  • Create sample projects to explore frameworks
  • Build reference implementations
  • Practice with different coding patterns

Enterprise and Team Features

1. GitHub Copilot Business

  • Cost: $19/user/month
  • Features: Advanced security, compliance, and team management
  • Use Cases: Enterprise development teams, compliance requirements

2. GitHub Copilot Enterprise

  • Cost: Custom pricing
  • Features: Advanced security, custom models, dedicated support
  • Use Cases: Large enterprises, government, highly regulated industries

3. Team Management

  • Centralized billing and user management
  • Usage analytics and reporting
  • Security and compliance features
  • Integration with enterprise identity providers

Resources and Further Learning

Official Resources

Third-Party Tutorials and Guides

Advanced Techniques and Pro Tips

1. Custom Snippets and Templates

Create custom snippets that work well with Copilot:

// VS Code snippets.json
{
  "API Endpoint": {
    "prefix": "api-endpoint",
    "body": [
      "app.post('/${1:endpoint}', async (req, res) => {",
      "  try {",
      "    const { ${2:params} } = req.body;",
      "    ${3:// Copilot will suggest validation and processing logic}",
      "    res.status(201).json({ success: true, data: result });",
      "  } catch (error) {",
      "    res.status(500).json({ success: false, error: error.message });",
      "  }",
      "});"
    ]
  }
}

2. Context-Aware Prompts

Learn to write prompts that leverage your project’s context:

# This function should follow the same pattern as the other API functions
# in this file, using the shared error handling and response formatting
def get_user_profile(user_id):

3. Testing Strategies

Use Copilot to generate comprehensive test suites:

# Generate tests that cover edge cases, error conditions, and normal operation
# Use the same testing patterns as the existing test files in this project
def test_user_authentication():

4. Documentation Generation

Let Copilot help with documentation:

# Generate comprehensive docstring following Google style
# Include examples, parameter descriptions, and return value details
def process_payment(payment_data, user_id, options=None):

Security and Privacy Considerations

1. Data Privacy

  • Copilot processes your code to provide suggestions
  • Avoid pasting sensitive information, credentials, or proprietary code
  • Use private repositories when working with confidential code
  • Review GitHub’s privacy policy and data handling practices

2. Code Security

  • Generated code may contain security vulnerabilities
  • Always review and test generated code
  • Use security scanning tools to identify potential issues
  • Follow security best practices for your specific domain

3. Compliance Requirements

  • Consider compliance requirements for your industry
  • Evaluate whether Copilot meets your security standards
    • Will the data going out and back be ok with the org?
    • Do additional SLAs or other requirements need put in place?
  • Consult with your security team before adoption
    • That in and out, being it is a service, could pose a significant number of risks for any org.
  • Document usage policies and guidelines

Performance Optimization

1. IDE Configuration

Optimize your IDE for better Copilot performance:

// VS Code settings.json
{
  "github.copilot.enable": {
    "*": true,
    "plaintext": false,
    "markdown": false,
    "scminput": false
  },
  "github.copilot.suggestions": {
    "enable": true,
    "showInlineSuggestions": true
  }
}

2. Network Optimization

  • Ensure stable internet connection
  • Use VPN if required by your organization
  • Consider enterprise deployment for better performance
  • Monitor network usage and optimize as needed

3. Resource Management

  • Disable other AI coding extensions
  • Monitor memory and CPU usage
  • Restart IDE periodically if performance degrades (?? I’ve seen this suggestion multiple places and it bothers me immensely)
  • Update extensions and IDE regularly

Conclusion

GitHub Copilot represents a fundamental shift in software development, moving us from manual coding to AI-assisted development. While it’s not a replacement for understanding programming fundamentals, it’s a powerful tool that can significantly enhance your productivity and code quality.

The key to success with Copilot is learning to work with it effectively writing clear prompts, providing good context, and always reviewing generated code. Start with the basics, practice regularly, and gradually incorporate more advanced features into your workflow.

As we move forward in this AI-augmented development era, developers who can effectively collaborate with AI tools like Copilot will have a significant advantage. The future of programming isn’t about replacing developers – albeit a whole lot of that might be happening right now – it’s more about augmenting their capabilities and enabling them to focus on higher-level problem solving and innovation.

Next Steps

  1. Set up your GitHub Copilot subscription and install the extension
  2. Practice with simple projects to get comfortable with the workflow
  3. Experiment with different prompting techniques to improve suggestion quality
  4. Integrate Copilot into your daily development routine
  5. Share your experiences and learn from the community

Remember, mastery of AI programming tools like GitHub Copilot is a journey, not a destination. Start today, practice consistently, and you’ll be amazed at how quickly it transforms your development experience.

Next up, more on getting started with the various tools and the baseline knowledge you should have around each.

Follow me on LinkedInMastadon, or Blue Sky for more insights on AI programming and software development.

Implementing Datadog in iOS: A SwiftUI vs UIKit Perspective

I’ve been diving deep into implementing Datadog in iOS applications and wanted to share my experience with both SwiftUI and UIKit approaches and the related elements of the work. Let’s break this down into what works, what doesn’t, and why you might choose various options when using Datadog (or deciding not to use Datadog).

The Setup

First things first, you’ll need these Datadog SDK packages:

dependencies: [
    .package(url: "https://github.com/DataDog/dd-sdk-ios", from: "2.27.0")
]
Continue reading “Implementing Datadog in iOS: A SwiftUI vs UIKit Perspective”

A Simple Git Branching Strategy for a Small Team (Because We All Know Git Is Fun!)

Git. It’s the tool that makes some of us developers wonder why they didn’t become a carpenter. But let’s face it: Git is here to stay. And for a small team—like, say, 3-4 developers working on the same codebase—getting your branching strategy right can be the difference between smooth sailing and a storm of merge conflicts that will make you question every decision you’ve ever made in life.

So let’s dive into a “simple” strategy for keeping Git under control. No complex workflows, no corporate jargon—just a few solid, time-tested practices to keep you from drowning in source control hell. Because seriously, git is actually super easy and a thousand times better than all the garbage attempts at source control that came before.

The Core Branches (Yes, There Are Only Two You Really Need)

If you’re working on a small team, you don’t need to be fancy. Forget about multiple branches for every single thing under the sun—just stick with main and feature branches. That’s it. Keep it simple. We don’t need a thousand different integration branches or some mythical release branch. Keep it neat.

  • main: This is your production-ready code. The one branch that should always work, always deployable, and always sacred. No exceptions.
  • Feature branches: These are where the magic happens. New features, bug fixes, the stuff that makes your app worth using. Each feature gets its own branch. Think of it like a sandbox—do whatever you want there, but don’t drag your mess into main.

Example 1: The Plain Old Feature Branch (The Easy Way)

Continue reading “A Simple Git Branching Strategy for a Small Team (Because We All Know Git Is Fun!)”

Generating Realistic Humidity Data for TimeScale DB with Data Diluvium

For next steps of why I set up TimeScale DB up for local dev, and being able to just do things, I need two new data generators over on Data Diluvium. One for humidity, which will be this post, and one for temperature, which will be next.

Why Humidity Data?

When working with TimeScale DB for time-series data, having realistic environmental data is crucial. I’ve found that humidity is a particularly important parameter that affects everything from agriculture to HVAC systems. Having realistic humidity data is essential for:

  • Testing environmental monitoring systems
  • Simulating weather conditions
  • Developing IoT applications
  • Training machine learning models for climate prediction

The Implementation

I created a humidity generator that produces realistic values based on typical Earth conditions. Here’s what I considered:

  • Average humidity ranges (typically 30-70% for most inhabited areas)
  • Daily variations (higher in the morning, lower in the afternoon)
  • Seasonal patterns
  • Geographic influences
Continue reading “Generating Realistic Humidity Data for TimeScale DB with Data Diluvium”