When the AI Ghost Vanishes

You’re cruising along, vibe-coding your way through a new feature, and—poof—the AI assistant goes dark. Maybe it hallucinated a library that doesn’t exist. Maybe it repeated the same wrong snippet ad nauseam. Welcome to the moment of reckoning: your blind faith in “make me the code” meets cold, hard compiler errors.

Spinning the wheel of madness: You tweak a comment here. You change “public” to “private” there. You pray to the Codegen Deity. You hope it understands your increasingly desperate prompts.

Lose an hour or a day: You still haven’t fixed the NullReferenceException, and your caffeine cold-brew is now room temperature.

Blame the tool that’ll fix it!: It’s obviously a bug in the AI, right? Right? RIGHT? Your sanity is going to ebb, beware the blaming of tools!

This cycle feels familiar because it is, the tooling is great at scaffolding code, less so at understanding your context. When it bails on you, you’ll need a plan B.

The Anatomy of a Recovery

Failing fast is noble. Spending two hours begging an AI for a solution? Less so. Instead:

  1. Reproduce the error locally Strip out everything except the failing snippet. If your Flask app explodes because of a missing import, build the smallest Python file that reproduces it. If your Go routine deadlocks, isolate the channel logic into a tiny example.
  2. Read the damn docs Yes, really. Whenever you feel the urge to prompt “How do channels work in Go?”, open the official spec. At least skim the examples. You’ll find nuance and edge cases that AI glosses over.
  3. Rubber-duck debugging Explain the problem to your cat, a parked car, or that leftover latte. Forces you to articulate assumptions and often reveals the root cause.
  4. Iterative testing Write a quick unit test or REPL snippet. If the test passes in isolation, you’ve proven the language runtime isn’t at fault but your integration glue is.
  5. Ask a human Stack Overflow can still deliver. It might seem like it is dying, but he format is workable. Frame your question with “Here’s what I tried… here’s the minimal repro… here’s the error.” One clear question beats fifty AI-style broad requests.

Don’t Let the AI Become a Crutch

If you rely exclusively on vibe coding, you’ll never internalize the idioms and patterns. These patterns make you efficient when the AI goes offline. And it will. Here’s how to shore up your fundamentals:

  • Learn a snippet a day Memorize small, high value constructs. In Go, it might be select on channels. In Python, context managers with with. Drill them in mini kata sessions. Get that wrote memory benefit, it’s significant!
  • Read production code Pick a well maintained open source project on GitHub. Read through the areas you use most. Notice how maintainers structure error handling, testing, logging.
  • Write it by hand occasionally Every few weeks, build “Hello, world” apps in your core stacks without any AI help. It’s painful but effective.

Embrace the Grind—and the Gains

Vibe coding speeds up boilerplate. It frees mental cycles for architecture, edge cases, and creative leaps. But it also creates atrophy: your muscle memory for syntax and patterns weakens over time. When you strike that balance, you get:

  • Faster scaffolding when you need it.
  • Sharper debugging when scaffolding fails.
  • Deeper comprehension of the “why” behind the “what.”

Final Thoughts

Vibe coding isn’t a death sentence for fluency. Treat it like a power tool: incredibly useful when wielded by someone who knows both the machine and the craft. When you hit that inevitable wall of hallucinations, madness, AI gas lighting, looped prompts, or silent errors just don’t panic. Revert to first principles:

Code is logic expressed in syntax.

Learn your language’s logic until it becomes second nature. Use AI to scaffold, but never outsource your understanding. Because when the newcomers ask “What’s fmt.Printf?”, you won’t be scrambling Google, you’ll already know.

The Terror of Microsoft Teams & Workarounds

If you’ve used Microsoft Teams, you’ve had issues and likely have spent hours working through things that you shouldn’t have had to deal with. I have endeavored to help others work their way through mitigating Teams calamities. I’ve put together this short list of my own workarounds.

Here are three things Teams consistently screws up—and what you can do if you don’t want to keep banging your head against the wall:

1) Messages Lag & Drop in the Web App

What’s happening: The browser version of Teams is a resource-heavy single-page app. All that JavaScript, caching and real-time syncing means your chat can stall, duplicate, or even fail to show new messages for minutes.

Workarounds:

  • Switch to the desktop client (it handles updates more gracefully).
  • Force a manual refresh with Ctrl + Shift + R (Win) or ⌘ + Shift + R (Mac) whenever you notice stalls.
  • Use a different Chromium-based browser if you must stay in a browser—Edge tends to be slightly less flaky than Chrome or Brave.
  • Clear your Teams cache periodically: kill Teams, delete %appdata%\Microsoft\Teams\Cache, then restart. You’d be surprised how often a corrupt cache causes phantom delays.

2) Desktop Client Eats CPU & RAM Alive

What’s happening: Teams is an Electron app. That means Chromium under the hood—so every chat, tab, and plugin is another hungry process. It’ll happily slurp down gigabytes of memory and peg your CPU, even when idle.

Workarounds:

  • Disable GPU acceleration: go to Settings → General → Turn off “Disable GPU hardware acceleration.” It sounds counter-intuitive, but forcing software rendering can stabilize usage on flaky graphics drivers.
  • Limit background apps: sign out of extra accounts, close unused chats, and uninstall unneeded Teams apps (like Polly or Who).
  • Schedule a daily restart: create a simple Windows Task Scheduler job or a cron on Mac that kills and relaunches Teams overnight, so you’re not accumulating memory leaks over days.
  • Consider the PWA: install Teams as a Progressive Web App in Edge—PWAs often consume less RAM than the full Electron client.

3) Search & History? Good Luck.

What’s happening: Teams’ built-in search often misses keywords, misindexes attachments, or simply times out on large orgs. Want to find that link John posted two weeks ago? You’ll either get zero results or a never-ending spinner – sometimes. Emphasis on that sometimes because it’ll leave you spinning yourself if you think you’ll get results but don’t know sometimes you have to give up hope and use alternate methods.

Workarounds:

  • Filter aggressively: hit Ctrl + E, type your keyword, then click the “Filters” dropdown—restrict to “From:” or “In: channel” so you don’t drag the entire tenant into one search.
  • Use Outlook’s Search: if your org archives Teams chats to Exchange (most do), search from Outlook’s “All Items” and include “Conversations.” It’s clunkier but more reliable than the Teams index.
  • Pin or Bookmark: for anything you’ll need later—a spec link, an image, a decision—pin the message right away. Teams shows your pinned items under Profile → Saved. It’s not elegant, but it beats hoping the search finally works.

Note: (The later two seem to be less common on the MacOS version, more common on Windows. But YMMV)

Take five minutes now to apply these workarounds—otherwise you’ll spend the next five hours wondering why Teams is broken…again. Good luck fellow Teams users! 🤙🏻

NOTE: If you’re curious, yes, I created a generated AI image for this post. I hilariously misspelled Microsoft when asking for the image and it rendered up what you see on this post. It was entertaining enough that I just left it as is!

A Simple Git Branching Strategy for a Small Team (Because We All Know Git Is Fun!)

Git. It’s the tool that makes some of us developers wonder why they didn’t become a carpenter. But let’s face it: Git is here to stay. And for a small team—like, say, 3-4 developers working on the same codebase—getting your branching strategy right can be the difference between smooth sailing and a storm of merge conflicts that will make you question every decision you’ve ever made in life.

So let’s dive into a “simple” strategy for keeping Git under control. No complex workflows, no corporate jargon—just a few solid, time-tested practices to keep you from drowning in source control hell. Because seriously, git is actually super easy and a thousand times better than all the garbage attempts at source control that came before.

The Core Branches (Yes, There Are Only Two You Really Need)

If you’re working on a small team, you don’t need to be fancy. Forget about multiple branches for every single thing under the sun—just stick with main and feature branches. That’s it. Keep it simple. We don’t need a thousand different integration branches or some mythical release branch. Keep it neat.

  • main: This is your production-ready code. The one branch that should always work, always deployable, and always sacred. No exceptions.
  • Feature branches: These are where the magic happens. New features, bug fixes, the stuff that makes your app worth using. Each feature gets its own branch. Think of it like a sandbox—do whatever you want there, but don’t drag your mess into main.

Example 1: The Plain Old Feature Branch (The Easy Way)

Step-by-Step Workflow:

1. Create a New Feature Branch

So, you’re ready to tackle the “super urgent” login page. (Because, obviously, it’s the thing that will single-handedly change the world.) Start by creating a feature branch off of main.

Git Command:

git checkout main           # Get on main first. Always. Always.
git pull origin main         # Update your local main. It's not a suggestion.
git checkout -b feature/login-page  # Create the login page branch. It's happening.

Congratulations, you now have a feature branch named feature/login-page. You’re officially “working” now.

2. Do Your Thing

You know what you need to do here—build the UI, write the logic, cry when it doesn’t work. Just get it done. Don’t forget to commit regularly. Like every time you reach a new milestone. Don’t let that “work in progress” rot sit there uncommitted for days because… well, we all know what happens when you do that.

Git Command:

git add .                    # Add files. If you're unsure, just add everything.
git commit -m "Add login form UI"  # Commit. It's that simple.

Pro Tip: Commit early, commit often. Don’t wait until you’ve implemented the moon and then try to remember what you were doing. It’s the little things that kill productivity—and Git conflicts.

3. Rebase, Not Merge (But Maybe Merge Later)

Here’s where things get a little spicy. While you’re working on your feature, other people are also doing their thing on their feature branches. Now, normally, this wouldn’t matter. Except that Git has this sneaky habit of merging things you didn’t expect—so you’ll want to keep your branch up-to-date by rebasing it onto main.

Git Command:

git checkout main         # Get on `main` again, because that's your foundation.
git pull origin main       # Get the latest changes from `main`
git checkout feature/login-page  # Back to your feature branch.
git rebase main            # Keep it fresh by rebasing. The idea is to stay ahead.

Important: If you’re going to rebase, do it regularly. Don’t wait until the end of your feature development to rebase. This is where most of your merge conflicts will creep up on you—if you’re not rebasing iteratively, you’ll find yourself with a mess that’ll make a bad divorce look civil.

Pro Tip: Rebase often, especially when you’re working in parallel with other people. It keeps your history clean and less of a nightmare when you finally merge.

4. Open a Pull Request (PR) for Code Review

Yes, this is still a thing. Even though it’s just a small team, your code still needs a second pair of eyes. A pull request is a great way to get feedback (or to argue why you’re right, because let’s face it, you are). Don’t skip this step.

GitHub Command (for PR creation):

  • Go to GitHub (or whichever Git platform you use), and create a PR from feature/login-page to main.
  • Assign reviewers (someone besides you, obviously).

5. Merge Once Approved

If the code looks good and has passed your team’s review process, it’s time to merge. Please, for the love of sanity, squash commits when merging. Keep that history clean. Git isn’t a place for hundreds of tiny commits like “Fix typo” or “Oops.” It’s a place for logical, meaningful changes.

Git Command:

git checkout main              # Get on `main`
git pull origin main            # Make sure `main` is up to date
git merge feature/login-page    # Merge that beautiful feature
git push origin main            # Push to the remote

6. Delete the Feature Branch

You’re done. Move on. Delete the branch. The feature has been merged, and you don’t need that branch hanging around anymore.

Git Command:

git branch -d feature/login-page  # Local cleanup
git push origin --delete feature/login-page  # Remote cleanup

Example 2: Add develop If You’re Feeling Fancy

For those of you who think you need a little extra structure (I mean, you do you), we can throw in a develop branch. But let’s be clear: it’s not necessary for small teams unless you plan to add a lot of complexity later on.

The idea here is that develop serves as the staging ground before pushing everything to main.

1. Setup the develop Branch

If you’re starting from scratch, create develop from main. Once it’s there, you can pull from main into develop whenever needed.

Git Command:

git checkout main              # On `main`, always.
git pull origin main            # Update `main`
git checkout -b develop         # Create `develop`
git push origin develop         # Push `develop`

2. Create Feature Branches from develop

Any feature branch now gets created from develop, not main. So go ahead and create your new branches from develop.

Git Command:

git checkout develop            # On develop
git pull origin develop          # Keep `develop` fresh
git checkout -b feature/login-page  # Create a new feature branch

3. Merge Feature Branches into develop

Once your feature is done, instead of merging it into main directly, it gets merged into develop first.

Git Command:

git checkout develop            # Switch to develop
git pull origin develop          # Get latest from develop
git merge feature/login-page    # Merge feature

4. Merge develop into main for Release

Finally, when everything on develop is ready, you merge develop into main for production release.

Git Command:

git checkout main               # Switch to main
git pull origin main             # Keep it fresh
git merge develop               # Merge `develop` into `main`
git push origin main            # Push changes

Keeping Your Branches Up to Date (Not Just Once)

Here’s the thing: if you’re only rebasing when you’re about to merge, you’re doing it wrong. Rebase your feature branch iteratively. No, seriously. It’s not something you do on the final day before your feature is done. If you’re working on a feature for more than a couple of days, update your branch regularly. Keep it fresh, keep it aligned with main.

Git Command for Iterative Rebasing:

git checkout feature/login-page    # Back to your feature branch
git fetch origin                   # Get latest updates
git rebase origin/main              # Rebase onto the updated `main`

Pro Tip: If you’re working on a big feature, you’ll want to keep rebasing multiple times throughout the development process. Merge conflicts are inevitable, but iterative rebasing minimizes the pain. Don’t wait until your branch is a dozen commits deep and you have a literal battlefield of conflicts to resolve. Merge conflicts suck when you’re dealing with big chunks of code—small, manageable conflicts are much easier to wrangle.

When Merge Conflicts Happen (And They Will)

Merge conflicts are the reality of any Git workflow. If you’re managing to avoid them, you’re either a wizard or lying. The key here is to keep conflicts small and easy to manage.

Example: A Merge Conflict Scenario

Let’s say you’re both working on the same section of code. You modify a function in your branch, and your teammate does the same in theirs. When it’s time to merge, Git will see two different versions of the same function and go, “Nope. You figure this out.”

What To Do:

1. Rebase Your Branch

Before attempting to merge, always rebase. This brings your branch up to date with main, minimizing large-scale conflicts and ensuring you’re working with the latest code.

Git Command:

git checkout feature/login-page  # Ensure you're on your feature branch
git fetch origin                 # Fetch latest updates from the repo
git rebase origin/main            # Rebase your feature onto `main`

2. Handle the Conflict Git will point out the areas of conflict. Open those files, identify the conflict markers (they look like <<<<<<<, =======, and >>>>>>>), and manually decide which version of the code to keep.

3. Resolve the Conflict

After you’ve resolved the conflict, remove the conflict markers and commit the changes.

Git Command:

git add .                    # Stage the resolved files
git rebase --continue         # Continue the rebase after resolving

4. Merge Your Branch (With Confidence)

Now that you’ve successfully rebased and dealt with conflicts early, you can merge your feature into main or develop without fear of chaos.

Git Command:

git checkout main             # Switch to `main`
git merge feature/login-page  # Merge feature into `main`

Lagniappe: Interactive Rebasing (Because We’re Fancy Like That)

Sometimes, your Git history could use a little tidying up. Enter interactive rebasing. This gem of a tool allows you to rewrite your commit history, squash multiple commits into one, reorder them, or even drop some unnecessary noise.

Why You Should Care:

  • Squash commits: Combine several small, inconsequential commits into one meaningful one. Instead of having a long list of tiny “fix typo” commits, you can merge them into one “Fix typos across multiple files” commit.
  • Reorder commits: If you realize you want a commit to appear earlier in the history (say, a refactor that should come before a feature implementation), interactive rebasing can handle that.
  • Edit commit messages: You can also clean up commit messages that, at the time, seemed like a good idea but now, reading them, make you cringe.

How to do it:

  1. Run the interactive rebase:
git rebase -i HEAD~5  # Rebase the last 5 commits
  1. The editor will open, and you’ll see something like this:
pick f7f3f6d Add login form UI
pick 310154e Add form validation
pick 9b1f4fc Fix typo in login form
  1. You can change pick to squash (or just s), which tells Git to squash commits together. For example:
pick f7f3f6d Add login form UI
squash 310154e Add form validation
squash 9b1f4fc Fix typo in login form
  1. Save and exit. Git will now squash those commits into one.

The Pro Tip: Use interactive rebasing for cleaning up your commit history before merging to main or develop. It’ll make you look like a Git rockstar and keep your history from looking like a dumpster fire.

You’re Welcome

In a small team, Git doesn’t need to be your worst nightmare. Stick to these simple branching practices, and you’ll save yourself countless hours of misery. Keep it to main, feature branches, and—if you’re really into over-complicating things—add a develop branch. Rebase regularly (and iteratively, please), commit often, and keep your history clean.

Oh, and remember: Git is a tool, not a religion. Don’t let it control your life, but definitely respect it.


Adding Time Range Generation to Data Diluvium

Following up on my previous posts about adding humidity and temperature data generation to Data Diluvium, I’m now adding a Time Range generator. I decided this would be a nice addition to give any graphing of the data a good look. This will complete the trio of generators I needed for my TimeScale DB setup. While humidity and temperature provide the environmental data, the Time Range generator ensures we have properly spaced time points for our time-series analysis.

Why Time Range Generation?

When working with TimeScale DB for time-series data, having evenly spaced time points is crucial for accurate analysis. I’ve found that many of my experiments require data points that are:

  • Evenly distributed across a time window
  • Properly spaced for consistent analysis
  • Flexible enough to handle different sampling rates
  • Random in their starting point to avoid bias

The Implementation

I created a Time Range generator that produces timestamps based on a 2-hour window. Here’s what I considered:

  • Default 2-hour time window
  • Even distribution of points across the window
  • Random starting point within a reasonable range
  • Support for various numbers of data points

Here’s how I implemented this in Data Diluvium:

export const timeRangeGenerator: GeneratorConfig = {
  name: 'Time Range',
  description: 'Generates evenly spaced timestamps across a 2-hour window',
  category: 'timestamp',
  compatibleTypes: [
    'TIMESTAMP', 'TIMESTAMP WITH TIME ZONE', 'DATETIME',
    'TIMESTAMP(6)', 'TIMESTAMP(6) WITH TIME ZONE'
  ],
  defaultOptions: {
    windowHours: 2,
    randomizeStart: true,
    startTimeRange: {
      min: '2024-01-01T00:00:00Z',
      max: '2024-12-31T23:59:59Z'
    }
  },
  generate: async (count: number, options?: GeneratorOptions) => {
    const finalOptions = { ...timeRangeGenerator.defaultOptions, ...options };

    // Calculate the time window in milliseconds
    const windowMs = finalOptions.windowHours! * 60 * 60 * 1000;

    // Determine the start time
    let startTime: Date;
    if (finalOptions.randomizeStart) {
      const minTime = new Date(finalOptions.startTimeRange!.min!);
      const maxTime = new Date(finalOptions.startTimeRange!.max!);
      startTime = new Date(minTime.getTime() + Math.random() * (maxTime.getTime() - minTime.getTime()));
    } else {
      startTime = new Date(finalOptions.startTimeRange!.min!);
    }

    // Generate evenly spaced timestamps
    return Array.from({ length: count }, (_, index) => {
      const timeOffset = (index / (count - 1)) * windowMs;
      return new Date(startTime.getTime() + timeOffset);
    });
  }
};

Using the Generator with TimeScale DB

I’ve made it easy to use this generator in your Data Diluvium configuration like this:

{
  "generator": "time-range",
  "options": {
    "windowHours": 2,
    "randomizeStart": true,
    "startTimeRange": {
      "min": "2024-01-01T00:00:00Z",
      "max": "2024-12-31T23:59:59Z"
    }
  }
}

This configuration works perfectly with TimeScale DB’s time-series capabilities, allowing you to generate properly spaced timestamps that can be used as the time dimension for your other data generators.

What Makes This Implementation Special?

I’ve designed this implementation with several key features that work well with time-series databases:

  1. Even Distribution: Points are evenly spaced across the time window, ensuring consistent sampling rates.
  2. Flexible Window: While defaulting to 2 hours, the window size can be adjusted if needed.
  3. Random Start: The generator can start at a random point within a specified time range, preventing bias in the data.
  4. Type Compatibility: The generator supports various timestamp SQL types including TIMESTAMP, TIMESTAMP WITH TIME ZONE, and DATETIME.
  5. Precision Control: Supports different timestamp precisions through compatible types.

Testing the Generator

I’ve implemented comprehensive testing to ensure our time range generator produces properly spaced timestamps:

describe('Time Range Generator', () => {
  it('should generate correct number of timestamps', () => {
    const timestamps = generateTimeRange({ count: 12 });
    expect(timestamps).toHaveLength(12);
  });

  it('should space timestamps evenly', () => {
    const timestamps = generateTimeRange({ count: 3 });
    const intervals = timestamps.slice(1).map((t, i) =>
      t.getTime() - timestamps[i].getTime()
    );
    expect(intervals[0]).toBe(intervals[1]); // All intervals should be equal
  });

  it('should respect the time window', () => {
    const timestamps = generateTimeRange({ count: 100 });
    const windowMs = 2 * 60 * 60 * 1000; // 2 hours in milliseconds
    expect(timestamps[timestamps.length - 1].getTime() - timestamps[0].getTime())
      .toBe(windowMs);
  });

  it('should generate timestamps within specified range', () => {
    const minTime = new Date('2024-01-01T00:00:00Z');
    const maxTime = new Date('2024-12-31T23:59:59Z');
    const timestamps = generateTimeRange({
      randomizeStart: true,
      startTimeRange: { min: minTime.toISOString(), max: maxTime.toISOString() }
    });

    timestamps.forEach(timestamp => {
      expect(timestamp.getTime()).toBeGreaterThanOrEqual(minTime.getTime());
      expect(timestamp.getTime()).toBeLessThanOrEqual(maxTime.getTime());
    });
  });
});

Combining with Other Generators

The Time Range generator is particularly powerful when combined with the humidity and temperature generators. For example:

{
  "columns": [
    {
      "name": "timestamp",
      "generator": "time-range",
      "options": {
        "windowHours": 2,
        "randomizeStart": true
      }
    },
    {
      "name": "temperature",
      "generator": "temperature",
      "options": {
        "minTemperature": 15,
        "maxTemperature": 25,
        "includeTimeVariation": true
      }
    },
    {
      "name": "humidity",
      "generator": "humidity",
      "options": {
        "minHumidity": 40,
        "maxHumidity": 60,
        "includeTimeVariation": true
      }
    }
  ]
}

This configuration will generate a complete dataset with:

  • Evenly spaced timestamps across a 2-hour window
  • Temperature values that vary realistically with time
  • Humidity values that complement the temperature data

That should do it! Let’s generate some data and see where we’ve arrived.

Happy thrashing coding! ⏰

Generating Temperature Data with Data Diluvium for Time Series Data with TimeScaleDB

Following up on my previous post about adding humidity data generation to Data Diluvium, I’m now adding temperature data generation. This completes the pair of environmental data generators I needed for my TimeScale DB setup. Temperature data is crucial for time-series analysis and works perfectly alongside the humidity data we just implemented.

Why Temperature Data?

When working with TimeScale DB for time-series data, having realistic environmental data is crucial. I’ve found that temperature is one of the most fundamental environmental parameters we measure. Having realistic temperature data is essential for:

  • Weather simulation systems
  • Climate modeling
  • Building automation systems
  • Agricultural planning
  • Energy consumption analysis

The Implementation

I created a temperature generator that produces realistic values based on typical Earth conditions. Here’s what I considered:

  • Average temperature ranges (typically -10°C to 35°C for most inhabited areas)
  • Daily temp cycles (warmer in afternoon, cooler at night)
  • Seasonal variations
  • Geographic influences

At least, I’m aiming to include all those, hopefully I can get all these criteria in there in one code session!

Here’s how I implemented this in Data Diluvium:

export const temperatureGenerator: GeneratorConfig = {
  name: 'Temperature',
  description: 'Generates realistic temperature values with daily and seasonal variations',
  category: 'number',
  compatibleTypes: [
    'NUMBER', 'DECIMAL', 'NUMERIC', 'FLOAT', 'DOUBLE',
    'NUMBER(5,2)', 'DECIMAL(5,2)', 'NUMERIC(5,2)'
  ],
  defaultOptions: {
    minTemperature: -10,
    maxTemperature: 35,
    includeTimeVariation: true,
    includeSeasonalVariation: true,
    useCelsius: true
  },
  generate: async (count: number, options?: GeneratorOptions) => {
    const finalOptions = { ...temperatureGenerator.defaultOptions, ...options };

    return Array.from({ length: count }, () => {
      let baseTemperature = finalOptions.minTemperature! +
        (Math.random() * (finalOptions.maxTemperature! - finalOptions.minTemperature!));

      if (finalOptions.includeTimeVariation) {
        // Add daily variation (warmer in afternoon, cooler at night)
        const hour = new Date().getHours();
        const timeFactor = Math.sin((hour - 14) * Math.PI / 12); // Peak at 2 PM
        baseTemperature += timeFactor * 8; // 8°C daily variation
      }

      if (finalOptions.includeSeasonalVariation) {
        // Add seasonal variation (warmer in summer, cooler in winter)
        const month = new Date().getMonth();
        const seasonalFactor = Math.sin((month - 6) * Math.PI / 6); // Peak in July
        baseTemperature += seasonalFactor * 15; // 15°C seasonal variation
      }

      // Ensure the value stays within bounds
      baseTemperature = Math.max(finalOptions.minTemperature!, Math.min(finalOptions.maxTemperature!, baseTemperature));

      // Convert to Fahrenheit if needed
      return finalOptions.useCelsius ? baseTemperature : (baseTemperature * 9/5) + 32;
    });
  }
};

Using the Generator with TimeScale DB

I’ve made it easy to use this generator in your Data Diluvium configuration like this:

{
  "generator": "temperature",
  "options": {
    "minTemperature": -5,
    "maxTemperature": 30,
    "includeTimeVariation": true,
    "includeSeasonalVariation": true,
    "useCelsius": true
  }
}

This configuration works perfectly with TimeScale DB’s time-series capabilities, allowing you to generate continuous temperature data that follows natural patterns over time. When used alongside the humidity generator, you can create comprehensive environmental datasets.

What Makes This Implementation Special?

I’ve designed this implementation with several key features that work well with time-series databases:

  1. Realistic Ranges: I set the default range of -10°C to 35°C to cover most inhabited areas on Earth.
  2. Time-Aware: The generator considers daily patterns, producing warmer values in the afternoon and cooler values at night.
  3. Seasonal Awareness: Values naturally vary with the seasons, warmer in summer and cooler in winter.
  4. Unit Flexibility: I’ve added support for both Celsius and Fahrenheit temperature scales.
  5. Type Compatibility: The generator supports various numeric SQL types including NUMBER, DECIMAL, NUMERIC, FLOAT, and DOUBLE.

Testing the Generator

I’ve implemented comprehensive testing to ensure our temperature generator produces realistic values that will work well with TimeScale DB:

describe('Temperature Generator', () => {
  it('should generate values within specified range', () => {
    const value = generateTemperature({
      minTemperature: 15,
      maxTemperature: 25
    });
    expect(value).toBeGreaterThanOrEqual(15);
    expect(value).toBeLessThanOrEqual(25);
  });

  it('should respect time-based variations', () => {
    const morningValue = generateTemperature({ includeTimeVariation: true });
    const afternoonValue = generateTemperature({ includeTimeVariation: true });
    expect(afternoonValue).toBeGreaterThan(morningValue);
  });

  it('should convert between Celsius and Fahrenheit', () => {
    const celsiusValue = generateTemperature({ useCelsius: true });
    const fahrenheitValue = generateTemperature({ useCelsius: false });
    expect(fahrenheitValue).toBeCloseTo((celsiusValue * 9/5) + 32, 1);
  });
});

String-Based Temperature Generators

While the numeric temperature generator is perfect for database storage and calculations, I also needed string-based temperature generators for display and reporting purposes. I’ve added two new generators:

Celsius String Generator

export const celsiusStringGenerator: GeneratorConfig = {
  name: 'Temperature (Celsius String)',
  description: 'Generates temperature values as strings with °C suffix',
  category: 'text',
  compatibleTypes: [
    'CHAR', 'VARCHAR', 'VARCHAR2', 'TEXT', 'STRING',
    'CHARACTER VARYING'
  ],
  defaultOptions: {
    minTemperature: -10,
    maxTemperature: 35,
    includeTimeVariation: true,
    includeSeasonalVariation: true,
    decimalPlaces: 1
  },
  generate: async (count: number, options?: GeneratorOptions) => {
    const finalOptions = { ...celsiusStringGenerator.defaultOptions, ...options };

    return Array.from({ length: count }, () => {
      let baseTemperature = finalOptions.minTemperature! +
        (Math.random() * (finalOptions.maxTemperature! - finalOptions.minTemperature!));

      if (finalOptions.includeTimeVariation) {
        const hour = new Date().getHours();
        const timeFactor = Math.sin((hour - 14) * Math.PI / 12);
        baseTemperature += timeFactor * 8;
      }

      if (finalOptions.includeSeasonalVariation) {
        const month = new Date().getMonth();
        const seasonalFactor = Math.sin((month - 6) * Math.PI / 6);
        baseTemperature += seasonalFactor * 15;
      }

      baseTemperature = Math.max(finalOptions.minTemperature!, Math.min(finalOptions.maxTemperature!, baseTemperature));

      return `${baseTemperature.toFixed(finalOptions.decimalPlaces!)}°C`;
    });
  }
};

Fahrenheit String Generator

export const fahrenheitStringGenerator: GeneratorConfig = {
  name: 'Temperature (Fahrenheit String)',
  description: 'Generates temperature values as strings with °F suffix',
  category: 'text',
  compatibleTypes: [
    'CHAR', 'VARCHAR', 'VARCHAR2', 'TEXT', 'STRING',
    'CHARACTER VARYING'
  ],
  defaultOptions: {
    minTemperature: 14, // 57.2°F
    maxTemperature: 95, // 203°F
    includeTimeVariation: true,
    includeSeasonalVariation: true,
    decimalPlaces: 1
  },
  generate: async (count: number, options?: GeneratorOptions) => {
    const finalOptions = { ...fahrenheitStringGenerator.defaultOptions, ...options };

    return Array.from({ length: count }, () => {
      let baseTemperature = finalOptions.minTemperature! +
        (Math.random() * (finalOptions.maxTemperature! - finalOptions.minTemperature!));

      if (finalOptions.includeTimeVariation) {
        const hour = new Date().getHours();
        const timeFactor = Math.sin((hour - 14) * Math.PI / 12);
        baseTemperature += timeFactor * 14.4; // 8°C = 14.4°F
      }

      if (finalOptions.includeSeasonalVariation) {
        const month = new Date().getMonth();
        const seasonalFactor = Math.sin((month - 6) * Math.PI / 6);
        baseTemperature += seasonalFactor * 27; // 15°C = 27°F
      }

      baseTemperature = Math.max(finalOptions.minTemperature!, Math.min(finalOptions.maxTemperature!, baseTemperature));

      return `${baseTemperature.toFixed(finalOptions.decimalPlaces!)}°F`;
    });
  }
};

These string-based generators are particularly useful for:

  • Displaying temperatures in reports
  • Creating human-readable logs
  • Generating sample data for UI testing
  • Creating documentation examples

You can use them in your Data Diluvium configuration like this:

{
  "generator": "temperature-celsius-string",
  "options": {
    "minTemperature": -5,
    "maxTemperature": 30,
    "includeTimeVariation": true,
    "includeSeasonalVariation": true,
    "decimalPlaces": 1
  }
}

or for fahrenheit:

{
  "generator": "temperature-fahrenheit-string",
  "options": {
    "minTemperature": 23,
    "maxTemperature": 86,
    "includeTimeVariation": true,
    "includeSeasonalVariation": true,
    "decimalPlaces": 1
  }
}

The examples here are of course if you’re running the site code itself. Otherwise navigate over to https://datadiluvium.com and you can just get the data generated on the site, as I’ve pushed this feature to prod and it’s good to go!

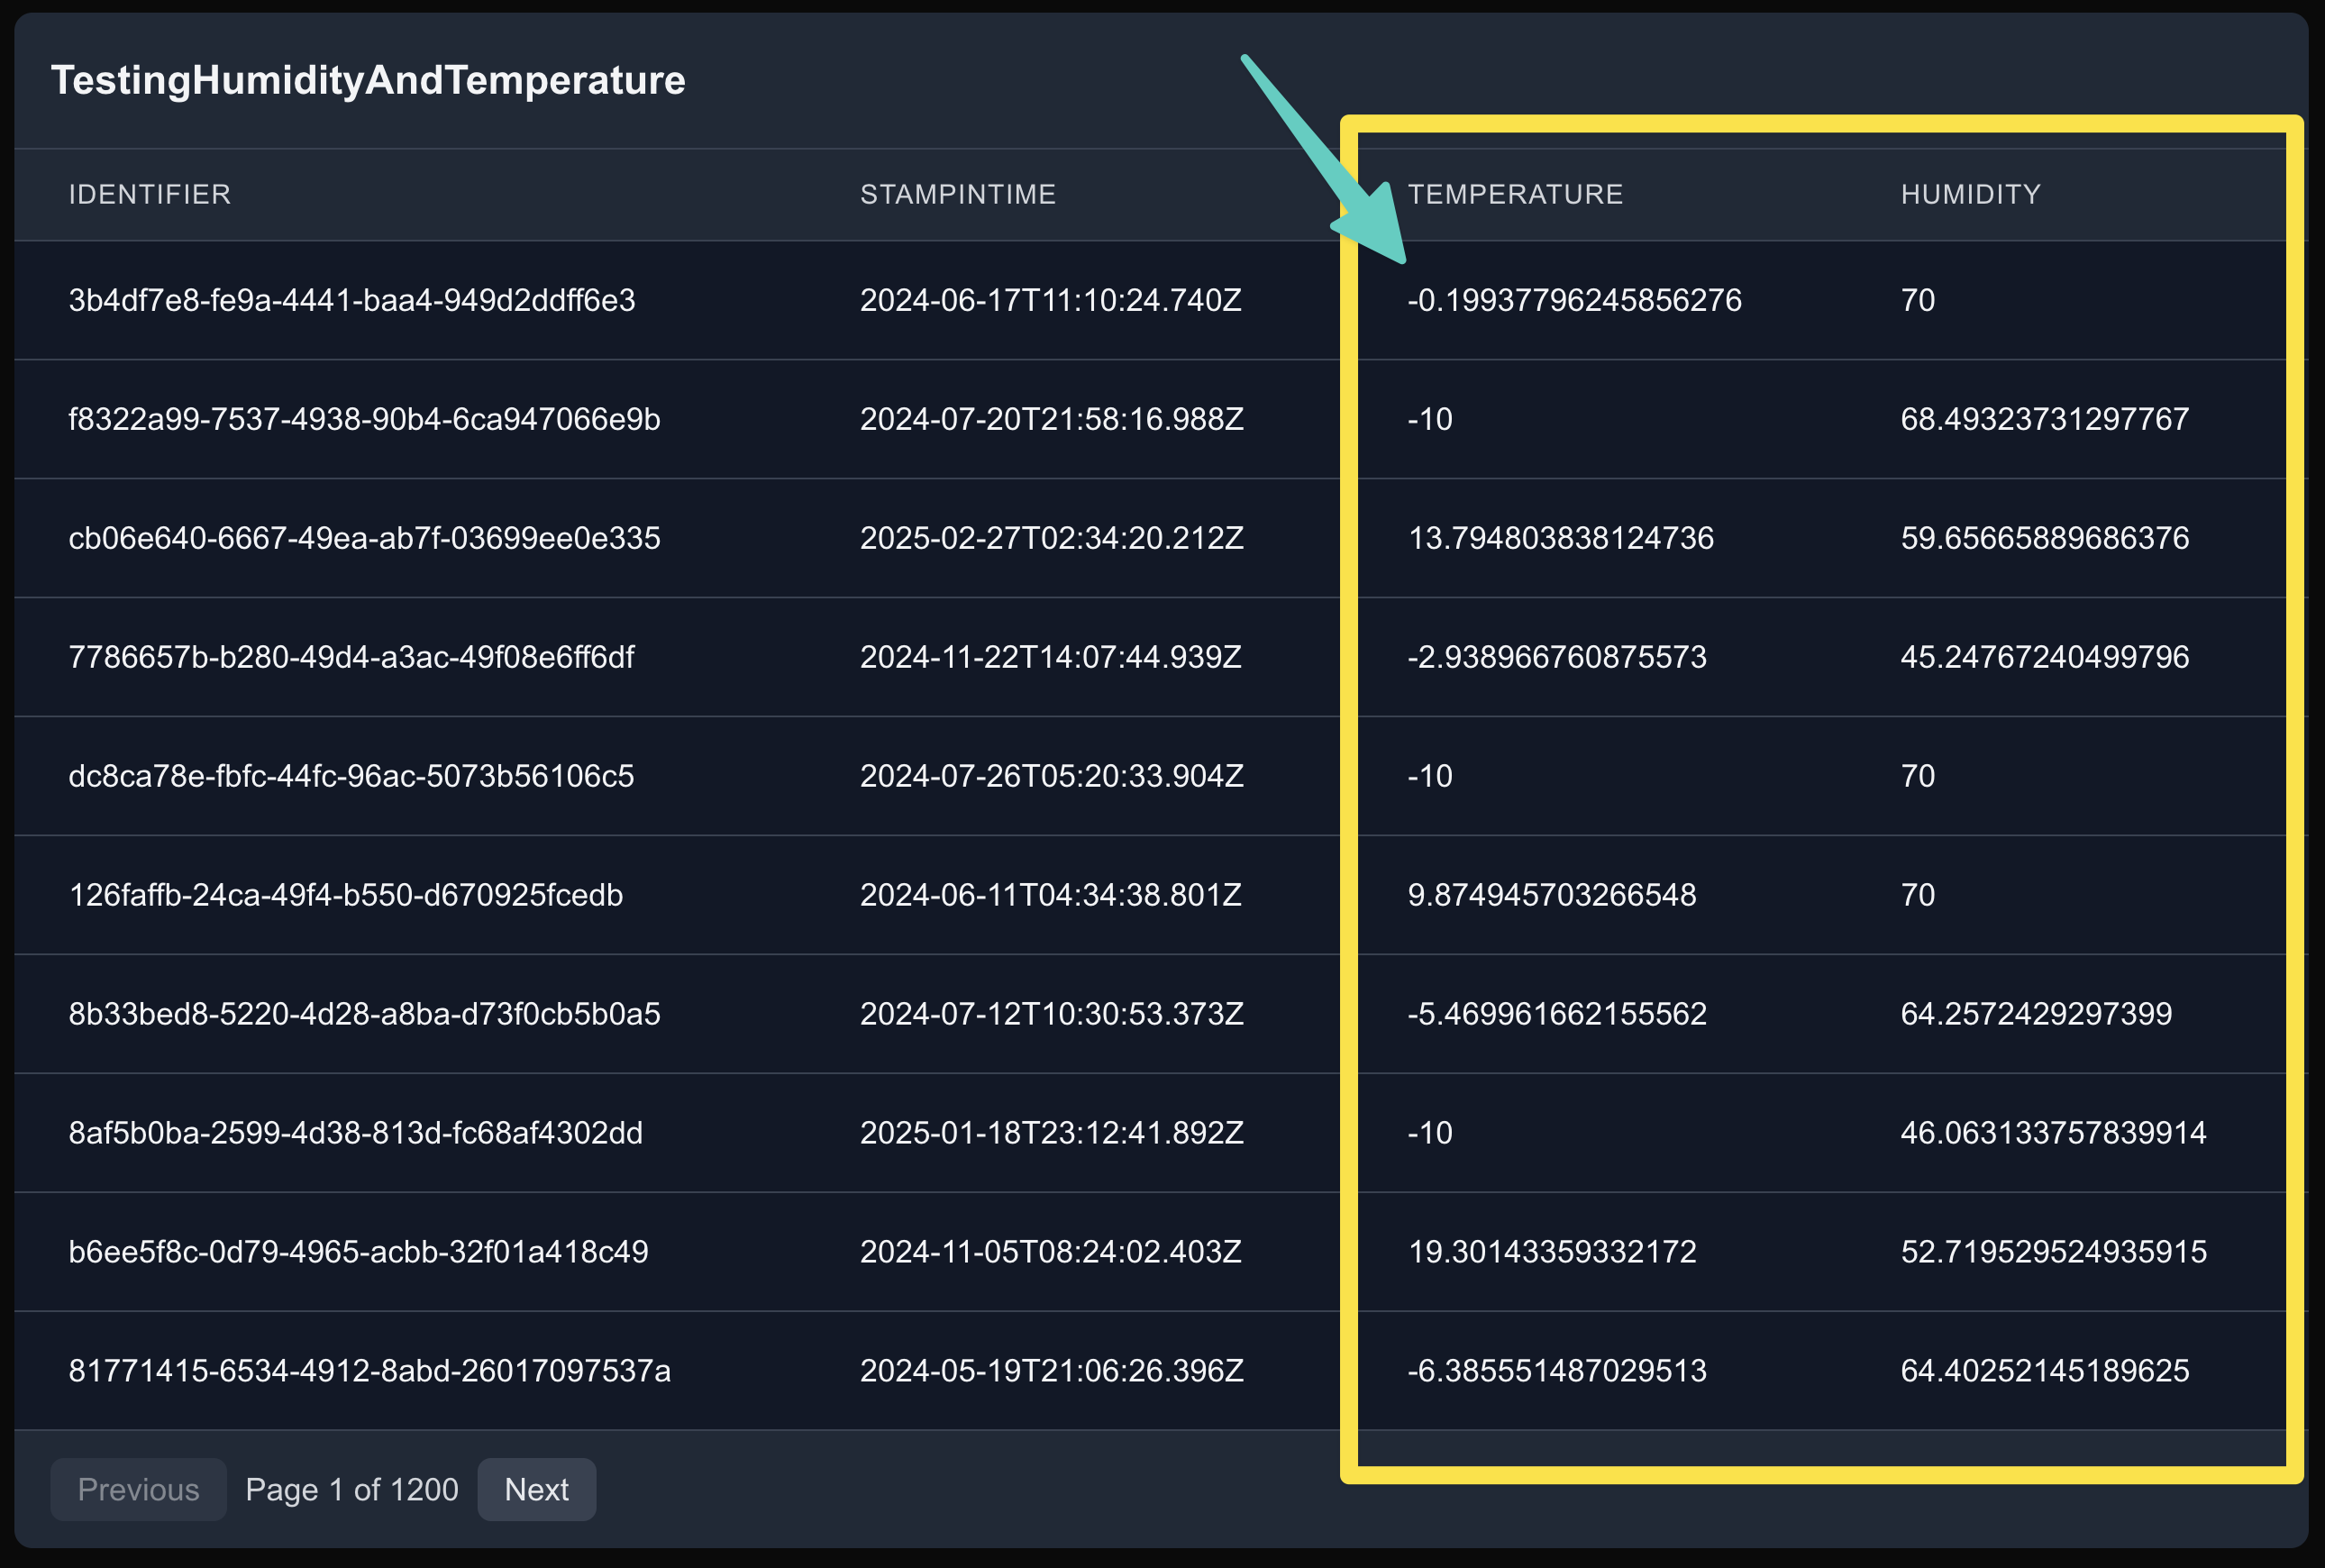
The data when generated per my sample schema looks like this.

That should do it!

Happy thrashing coding! 🌡️ Next post coming up will be the next steps in the TimeScaleDB sample I started in this post.