Red Hat, OpenShift PaaS and Cartridges for Riak

Today I participated in the OpenShift Community Day here in Portland at the Doubletree Hotel. One of the things I wanted to research was the possibility of putting together a OpenShift Origin Cartridge for Riak. As with most PaaS Systems this isn’t the most straight forward process. The reason is simple, OpenShift and CloudFoundry have a deployment model based around certain conventions that don’t fit with the multi-node deployment of a distributed database. But there are ways around this and my intent was to create or come up with a plan for a Cartridge to commit these work-arounds.

After reading the “New OpenShift Cartridge Format – Part 1” by Mike McGrath @Michael_Mcgrath I set out to get a Red Hat Enterprise Linux image up and running. The quickest route to that was to spool up an AWS EC2 instance. 30 seconds later I had exactly that up and running. The next goal was to get Riak installed and running on this instance. I wasn’t going to actually build a cluster right off, but I wanted at least a single running Riak node to use for trying this out.

In the article “New OpenShift Cartridge Format – Part 1” Mike skips the specifics of the cartridge and focuses on getting a service up and running that will be turned into a Cartridge. As Mike writes,

What do we really need to do to create an new cartridge? Step one is to pick something to create a cartridge for.

…to which my answer is, “alright, creating a Cartridge for Riak!”  😉

However, even though I have the RHEL instance up and running already, with Riak installed, I decided I’d follow along with his exactly example too. So I dove in with

[sourcecode language=”bash”]
sudo yum install httpd
[/sourcecode]

to install Apache. With that done I now have Riak & Apache installed on the RHEL EC2 instance. The goal with both of these services is to get them running as the regular local Unix user in a home directory.

With both Riak and Apache installed, time to create a local user directory for each of the respective tools. However, before that, with this version of Linux on AWS we’ll need to create a local user account.

[sourcecode language=”bash”]
useradd -c "Adron Hall" adron
passwd adron

Changing password for user adron.
New password:
Retype new password:
passwd: all authentication tokens updated successfully.
[/sourcecode]

Next I switched to the user I created ‘su adron’ and created the following directories in the home path for attempting to get Apache and Riak up and running locally like this. I reviewed the rest of the steps in making the Cartridge w/ Apache and then immediately started running into a few issues with getting Riak setup just like I need it to be able to build a cartridge around it. At least, with my first idea of how I should build a cartridge.

At this point I decided we need to have a conversation around the strategy here. So Bill Decoste, Ryan and some of the other Red Hat team on hand today. After a discussion with Bill it sounds like there are some possibilities to get Riak running via the OpenShift Origin Cartridges.

The Strategy

The plan now is to get a cartridge setup so that the cartridge can launch a single Riak instance. That instance, then with post-launch scripts can then join itself to the overall Riak cluster. The routing can be done via the internal routing and some other capabilities that are inherent to what is in OpenShift itself. It sounds like it’ll take a little more tweaking, but the possibility is there for the near future.

At this point I sat down and read up on the Cartridge a little more before taking off for the day. Overall a good start and interesting to get an overview of the latest around OpenShift.

Thanks to the Red Hat Team, have a great time at the OpenStack Conference and I’ll be hacking on this Cartridge strategy!

References

Distributed Coding Prefunc: Rebar Multinode Riak Core

Before diving into this entry, you might want to check out some of my other getting Erlang installed with appropriate testing frameworks entries. Moving on…

At Basho we’re are always trying to make it easier to do big things. A short time ago we pushed forward on Rebar, Riak Core and getting things put together to make it simpler to get kick started working on distributed systems like the Riak Database & distributed system itself. There’s way more that is possible, which I’ll get into in just a minute. Before diving into some of those things, here’s a few quick links & context of what exactly Rebar and Riak Core are.

Riak Core
Github: https://github.com/basho/riak_core

Riak Core has been available for quite some time. We’ve also been hustling for a while getting together a robust array of material around Riak Core. One excellent place to get started on learning about Riak Core is the “Introducing Riak Core” blog article published on the Basho blog a while back. To describe Riak Core, or riak_core, it is the underpinnings of what Riak is built on. It provides many features to get you started building distributed systems. A few of the key features are being able to track and manage the nodes, clusters and related pieces of the distributed architecture within a system.

Rebar
Github: https://github.com/basho/rebar
Wiki: https://github.com/basho/rebar/wiki

Rebar is an Erlang build tool that helps you in putting together projects based on Riak Core.

Rebar Riak Core
Github: https://github.com/basho/rebar_riak_core

The Rebar Riak Core project repository template helps you start writing things like the Riak Database itself. It’s based on setting up Riak Core via template scripting an N Node Cluster devrel, vnodes, etc. Once you’re up and running it can be used to help develop distributed, scalable and fault tolerant applications.

For more on the Rebar Riak Core check out the README.md in the github repository. There are some great examples of how to get a multinode devrel running in a few steps.

Rebar Riak Core Quick Start

The quickest way to get started using the Riak Core and Rebar scripts is to get the prebuilt binaries or you can just clone and install the Rebar scripts if you’d like all the things. To get the binaries and executables you can download and have them ready by wget (or use your preferred method to download).

[sourcecode language=”bash”]
wget http://cloud.github.com/downloads/basho/rebar/rebar && chmod u+x rebar
[/sourcecode]

To get the cloned repository and ready for use.

[sourcecode language=”bash”]
$ git clone git://github.com/rebar/rebar.git
$ cd rebar
$ ./bootstrap
[/sourcecode]

Now the easiest way possible is to use the Riak Core Templates with a quick git clone. After cloning the repo, copy them to the rebar templates directory (note that you’ll need to create this initially) and then create a working directory to put the project in and navigate into that directory.

[sourcecode language=”bash”]
git clone git://github.com/rzezeski/rebar_riak_core.git
mkdir -p ~/.rebar/templates
cp rebar_riak_core/* ~/.rebar/templates
mkdir projectNameHere
cd projectNameHere
[/sourcecode]

Now that a template is available, run the following command to create the Erlang Project.

[sourcecode language=”bash”]
rebar create template=riak_core_multinode appid=rabbits nodeid=rabbits
[/sourcecode]

You’re now ready to go to work using Rebar and the template you’ve created. I followed the try-try-try example repo in the example above to get started, check it out for a great walk through that dives in deeper to Riak Core, each small element of the project and files created, and a multi-node project as the sample.

So what to do now?

This is where it is time to throw around some creativity to get real solutions to real problems. Building distributed systems is becoming more and more paramount to effective usage of infrastructure and systems. Using Riak Core to get started building out your distributed system is an ideal place to start. These are a few ideas that the team was brainstorming on. Over the coming weeks we’ll be putting together material to outline ways to not only get started, but to implement systems like this.

Distributed Web Caching Tier

Caching tiers often come up in conversations, whether related to distributed systems or not, and often end up on the distributed topic. The question resounds, “how do I create a caching tier that can be distributed and provide real session, state management, cached elements, live data and other needs?” Well Riak Core is a great place to start developing a custom distributed caching tier that could even extend to use Riak KV (the Riak Database implemented on Riak Core), Redis, Rabbit MQ or many other solutions by pulling them together to provide appropriate cache at the appropriate tiers of an application architecture.

In House Cluster Monitoring & Smart Resolver

One of the things that the Riak Core would be used to great effect for is a multi-node, clustered and geographically dispersed monitoring system for any multi-data center application. This could be built out and used for almost any actual environment, with custom specifics or a completely generic situation of pizza box servers. Because fo the distributed concepts behind Riak Core it would provide an ideal basis for monitoring – and re-launching or otherwise dealing with systems that need high uptime and recovered as fast as possible if they go down.

Logging, Web, Server, and Business Analytics

In any situation where analytics are collected there are often dozens if not thousands of servers, various systems and even numerous devices that may be emitting data via services or other mediums. Riak Core is a great place to lay the groundwork for a distributed system that could maintain a massive store of managed data for fast searching of analytics. This could be the groundwork for biotech research analytics, analysis of market data or a dozen other things that need highly available systems storing vast data with map reduction or other search capabilities. Think Business Intelligence (BI) with serious technological power.

Multi-node Project

Of course, as the example I used to create the first sample above, dive into the try-try-try tutorial for some great multi-node how to. If you have any questions please jump in ping me on twitter @adron or ping @basho, join the mailing list, the IRC #riak channel on freenode.

Light up a Riak Cluster with AWS, A Few Notes…

I wanted to write up an intro to getting Riak installed on AWS, even though the steps are absurdly simple and already available on the Basho Docs site, there’s a few extra notes that can be very helpful for a few specific points during the process.

Start off by logging into AWS. At this point you can take two different paths that are almost identical. You can follow the path of using the pre-built AWS Marketplace image of Riak, or just start form scratch. The difference is a total of about 2 steps; installing & setting some security port connections. I’m going to step through without using the prebuilt image in these instructions.

Security Group

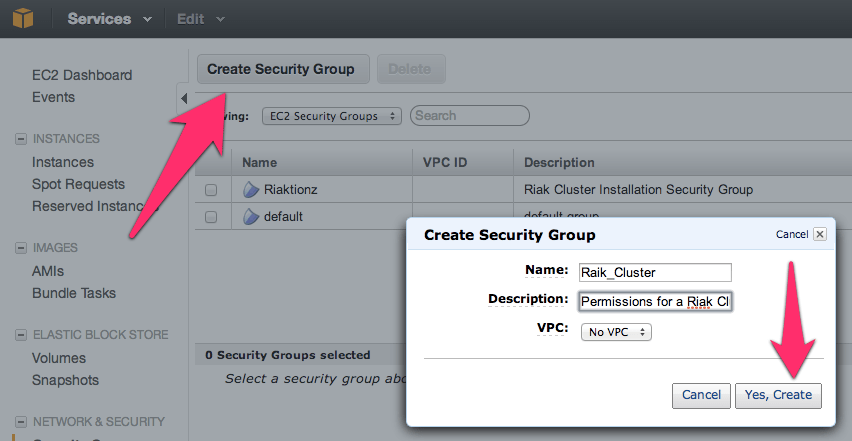
First thing you’ll need to get a security group with the correct permissions setup. For that, you’ll need to make a security group.

NOTE: No, I didn’t mean to misspell Riak, but it’s in there now.  😉

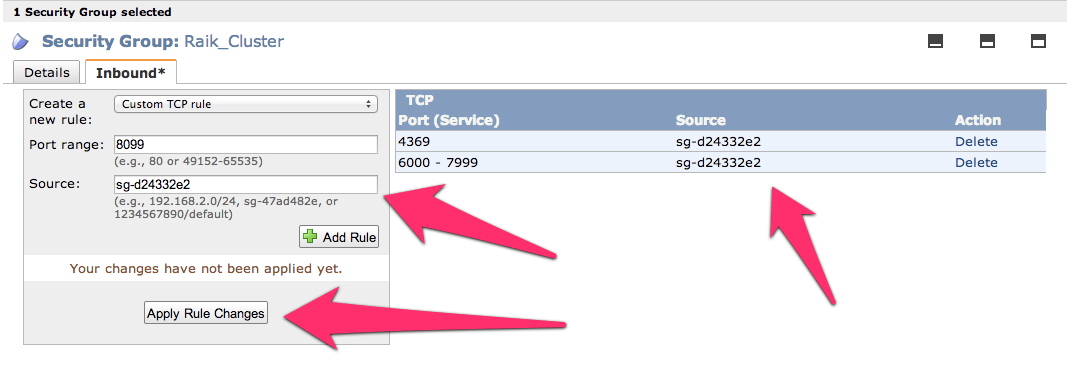
Before adding the ports, go to the security group details tab and copy the security group id. I’ve pointed it out in the image above.

Now add the following three and assign the security group to the ports; 4369, 8099 & 6000-7999. For the source set it to the security group id. Once you get all three added the list should look like this (below). For each rule click the Add Rule button and remember to click the Apply Rule Changes. I often forget this because the screen on some of the machines I use only shows to the bottom of the Add Rule button, so you’ll have to scroll down to find the Apple Rule Changes button.

Now add the standard port 22 for SSH. Next get the final two of 8087 and 8098 setup and we’re ready for moving on to creating the virtual machines.

Server Virtual Machines

For creating virtual machines I just clicked on Launch Instance and used the classic wizard. From there you get a selection of items. I’ve used the AWS image to do this, but would actually suggest using a CentOS image of your choice or Red Hat Enterprise Linux (RHEL). Another great option is to use the Ubuntu 12.04 LTS. Really though, use whatever Linux version or distro you like, there are 1-2 step instructions for installing Riak on almost every distro out.

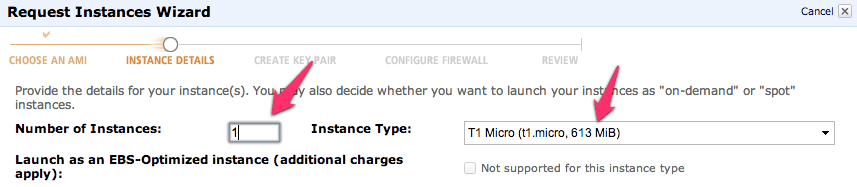
Next just launch a single instance. We’ll be able to launch duplicates of these further along in the process. I’ve selected a “Micro” here but I’m not intending to do anything with a remotely heavy load right now. At some point, I’ll upgrade this cluster to larger instances when I start putting it under a real load. I’ll have another blog entry to describe exactly how I do this too.

Keep hitting continue until you get to the key pair selection. Pick the key pair you want, either making a new one for this cluster or use one you already have. Either way works fine.

Continue again until you can select the security group that we created above.

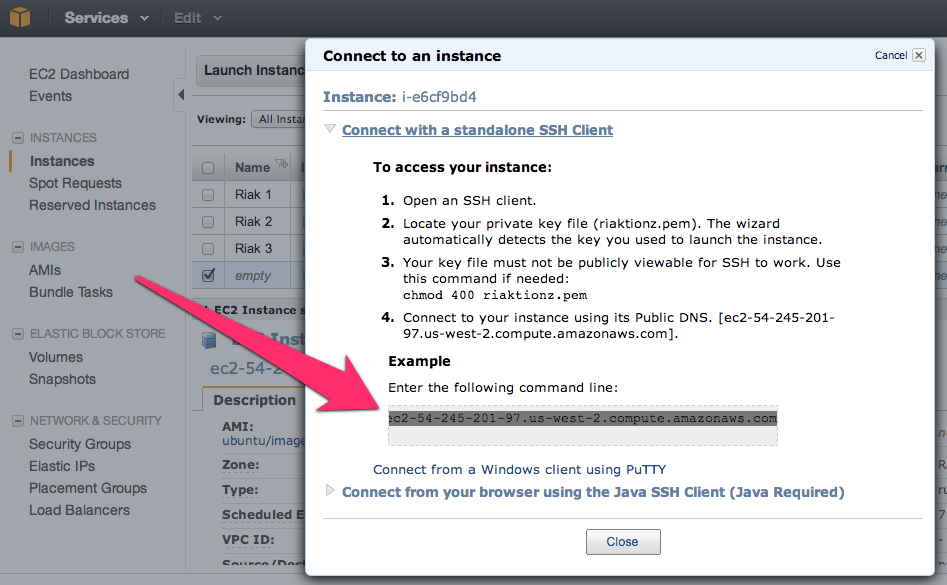
Now keep hitting that continue button, until you get to launch, and launch this thing. Once the instance is launched launch your preferred SSH connection tooling. The easiest way I’ve found for getting the most current private IP to connect to with the appropriate command is to right click on the instance in the AWS Console and click on Connect. There you’ll find the command to connect via SSH.

Paste that in and hit enter in your SSH App, you’ll see something akin to this.

[sourcecode language=”bash”]
$ cd Codez/working-content/
$ ssh -i riaktionz.pem root@ec2-54-245-201-97.us-west-2.compute.amazonaws.com
The authenticity of host ‘ec2-54-245-201-97.us-west-2.compute.amazonaws.com (54.245.201.97)’ can’t be established.
RSA key fingerprint is 31:18:ac:1a:ac:fc:6e:6d:55:e8:8a:83:9a:8f:c7:5f.
Are you sure you want to continue connecting (yes/no)? yes
Warning: Permanently added ‘ec2-54-245-201-97.us-west-2.compute.amazonaws.com,54.245.201.97′ (RSA) to the list of known hosts.
Please login as the user "ubuntu" rather than the user "root".
[/sourcecode]

Enter yes to continue connecting. For some instance types, like Ubuntu you’ll have to do some teaks to log into as “ubuntu” vs. “root” and the same goes for the AWS image or others. I’ll leave that to you, dear reader to get connected via ole’ SSH.

One of the other things, that you may have to do some tweaking about and googling, is figuring out the firewall setups on the various virtual machine images. For the RHEL you’ll want to turn off the firewall or open up the specific connection ports and such. Since the AWS firewall does this, it isn’t particularly important for the OS to continue running its firewall service. In this case, I’ve turned off the OS firewall and just rely on the AWS firewall. To turn off the RHEL firewall, execute the following commands.

[sourcecode language=”bash”]
[root@ip-x-x-x-x]# service iptables save
iptables: Saving firewall rules to /etc/sysconfig/iptables:[ OK ]
[root@ip-x-x-x-x]# service iptables stop
iptables: Flushing firewall rules: [ OK ]
iptables: Setting chains to policy ACCEPT: filter [ OK ]
iptables: Unloading modules: [ OK ]
[root@ip-x-x-x-x]# chkconfig iptables off
[root@ip-x-x-x-x]#
[/sourcecode]

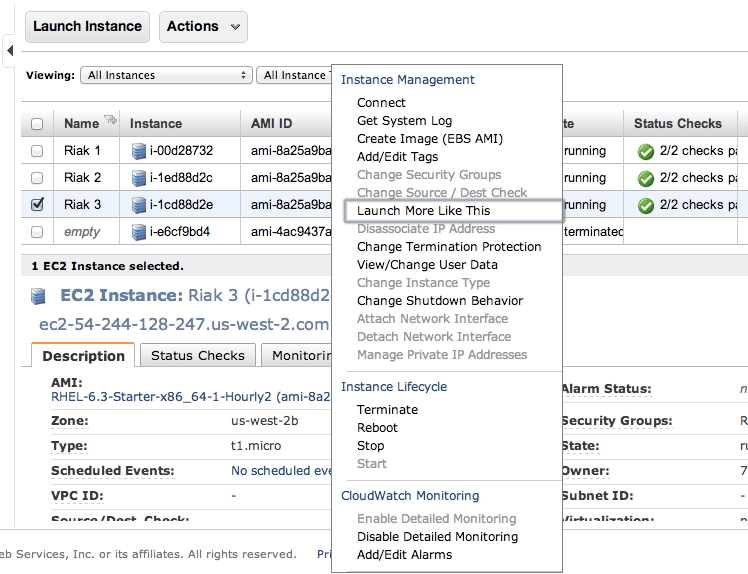
Now is a perfect time to start those other instances. Navigate into the AWS Console again and right click on the virtual machine instance you’ve created. On that menu select Launch More Like This.

Go through and check the configuration on each of these, make sure the firewall is turned off, etc. Then move on to the next step and install Riak and cluster them. So it’s time to get to the distributed, massively complex, extensive list of steps to install & cluster Riak. Ok, so that’s sarcasm.  😉

Step 1: Install Riak

Install Riak on each of the instances.

[sourcecode language=”bash”]
package=basho-release-6-1.noarch.rpm && \
wget http://yum.basho.com/gpg/$package -O /tmp/$package && \
sudo rpm -ivh /tmp/$package
sudo yum install riak
[/sourcecode]

NOTE: For other installation methods, such as directly downloading the RPM or other Linux OSes, check out the http://docs.basho.com/riak/latest/tutorials/installation/Installing-on-RHEL-and-CentOS/.

Step 2: Setup the Cluster

On the first instance, get the IP. You won’t need to do anything to this instance, just keep the IP handy. Then move on to the second instance and run the cluster command.

[sourcecode language=”bash”]
sudo riak-admin cluster join riak@<ip_of_the_first_node>
[/sourcecode]

Do this on each of the instances you’ve added, using that first node. When you’ve added them all, on that last instance (or really any of them) then run the plan. This will get you a display plan of what will take place when the cluster is committed.

[sourcecode language=”bash”]
sudo riak-admin cluster plan
[/sourcecode]

If that looks all cool. Commit the plan.

[sourcecode language=”bash”]
sudo riak-admin cluster commit
[/sourcecode]

Get a check of the cluster.

[sourcecode language=”bash”]
sudo riak-admin member_status
[/sourcecode]

That’s it all done. You know have a Riak Cluster. For more operations to try out your cluster, check out this list of base API Operations.

RICON Hits the Airwaves

This last week has been a bit more exciting for a number of reasons than I expected and dragged out for a few other reasons. (shakes fist in air with frustration!)

RICON|East lands in New York City!

Last year, well before I was working for Basho, I signed up for RICON in San Francisco. RICON is a conference with the key intellects behind distributed computing, such as Eric Brewer (he’s slightly involved with that CAP Theorem) and many others. You can even get a taste of the conference since the presentations are online and available to watch anytime you’d like to. For this year in New York City we already have some great speakers lined up and more to come!

2013 Speakers as of now…  (stay tuned for more)

Camille Fournier @skamille – VP of Technical Architecture at Rent The Runway blogs at Elided Branches

Camille is going to provide attendees with some serious Apache ZooKeeper knowledge. She’s, as stated, VP of Technical Architecture at Rent the Runway. Rent the Runway is a NYC-based eCommerce startup that rents designer dresses and accessories. They operate systems that support a business with a unique combination of challenges, from those related to product discovery, to those related to reservation booking and pricing, to a warehouse fulfillment system that handles 100% returns.

The ZooKeeper topic I’ll leave entirely for her to fill you in on! So, among all the others, another talk you’ll want to come to RICON to hear!

Sean Cribbs @seancribbs – Software Engineer at Basho Technologies

Sean blogs at seancribbs, which sounds a bit redundant, but hey… he gets down to the business of writing about some really insightful things. We’re fortunate at Basho to have him hacking away on projects, and super stoked to be working along side him! One of his latest posts “Property Driven Grammer Development” is seriously worth a read. Be sure to check out Sean’s Github and come gain gray matter activity while Sean lays down some brain power.

Kyle Kingsbury @aphyr – Member of Technical Set => {A | A ∉ A}, blogs at Aphyr

Riot starter Kyle is coming back to RICON East. Last year Kyle brought some fire to the RICON Conference and this time he’ll bring some fire in full presentation format this time. I’m looking forward to hearing about whatever he’s going to enlighten us about. Cheers Kyle, welcome to the speaker line up!

Neha Nerula @neha – blog at Transient Neha

Neha is currently a PhD Student at MIT, but has serious cred from working at Digg & Google. She’ll have some content you’ll want to give an attentive listen to! Even though she’s not so transient, she’s been to more than a few cities to work in. Currently she’s at MIT and has worked on the Intelligence Initiative, BFlow, Intrusion Recovery for Database-backed Web Application, and a host of other papers and other projects.

The team is moving so fast, there’s more speakers announced already, and I’ll be giving a portfolio to each of them as they’re announced and as fast as I can type!

As for an example of what RICON is like, here’s a few of the videos from 2012 that I really enjoyed…

2012 Talks

Pattern of Innovation: Riak Usage at BestBuy.com – Joel Crabb, RICON2012 from Basho Technologies on Vimeo.

Keep CALM and Query On – Joe Hellerstein, RICON2012 from Basho Technologies on Vimeo.

Advancing Distributed Systems – Eric Brewer, RICON2012 from Basho Technologies on Vimeo.

Riak in the Cloud – Ines Sombra and Michael Brodhead, RICON2012 from Basho Technologies on Vimeo.

Distributed Coding Prefunc: Ubuntu Erlang Dev & EUnit

Erlang LogoAfter installing Erlang on OS-X and then getting QuickCheck installing via Erlang, I wanted to expand the OS options I’m using to Ubuntu (i.e. Linux). So in this entry I’m going to cover the Erlang install, a quick eunit bit, and then a QuickCheck install and sample. The first step in geting Erlang installed is deciding how you want to install it. So far, it isn’t like Rails where it is pretty important which method you pick to how well it will work for you on Ubuntu. For Erlang all methods get you started with a good version that is working. The method I used was simply to install with apt-get.

[sourcecode language=”bash”]
sudo apt-get install erlang erlang-doc
[/sourcecode]

After installing, always a good idea to run things and make sure they’re all content and happy with your machine. Startup the erlang shell.

[sourcecode language=”bash”]
erl
[/sourcecode]

Then run some of the commands. Some I’ve found that will present you with useful and interesting information ist he erlang:system_info function with appropriate parameter passed. The otp_release parameter will get the version of erlang, the cpu_topology shows you the processor outlay for you machine (or in this case my virtual machine, with a single processor core allocated to it), and allocated_areas shows a bit about system memory allocations.

[sourcecode language=”erlang”]
Eshell V5.9.1 (abort with ^G)
1> erlang:system_info(otp_release).
"R15B01"
2> erlang:system_info(cpu_topology).
[{processor,{logical,0}}]
3> erlang:system_info(allocated_areas).
[{sys_misc,80748},
{static,1007616},
{atom_space,98328,73387},
{atom_table,95961},
{module_table,9084},
{export_table,50316},
{export_list,240960},
{register_table,180},
{fun_table,3266},
{module_refs,2048},
{loaded_code,3437028},
{dist_table,403},
{node_table,227},
{bits_bufs_size,0},
{bif_timer,80200},
{link_lh,0},
{process_table,262144},
{ets_misc,52504}]
[{processor,{logical,0}}]
[/sourcecode]

Now that erlang is effectively installed we can write a little sample code. To do this I created a directory called “TestingErlang” and in it placed an Erlang code file called “eunit_tests.erl”. Note: I’m using Sublime 2 on Ubuntu, so exchange that for whatever text editor you’re using for your Erlang coding.

[sourcecode language=”bash”]
adron@ubuntu:~/Codez$ mkdir TestingErlang
adron@ubuntu:~/Codez$ cd TestingErlang
adron@ubuntu:~/Codez/TestingErlang$ sublime eunit_tests.erl
[/sourcecode]

Add the header file include.

[sourcecode language=”erlang”]
-define(NOTEST, true).
-include_lib("eunit/include/eunit.hrl").
[/sourcecode]

Adding the header file include will cause all the function with _test() or _test_() to automatically be exported. An exported function of test() is created that can be used for running all of the unit tests. This also will include the preprocessor macros of EUnit for writing tests. So now throw a super simple test into the file.

You may want to, amid the automatic export of the methods ending in _test() or _test_() not name them this, and you’ll then need to add a line at the top of your code file like this.

[sourcecode language=”erlang”]
-export([reverse_test/0]).
[/sourcecode]

After this, add the function test as shown below.

[sourcecode language=”erlang”]
reverse_test() -> lists:reverse([1,2,3]).
[/sourcecode]

The complete code file should look like this.

[sourcecode language=”erlang”]
-module(eunit_test).
-define(NOTEST, true).
-include_lib("eunit/include/eunit.hrl").
-export([reverse_test/0]).

reverse_test() -> lists:reverse([1,2,3]).
[/sourcecode]

Build it and call the function.

[sourcecode language=”bash”]
Eshell V5.9.1 (abort with ^G)
1> c(eunit_test).
{ok,eunit_test}
2> eunit_test:reverse_test().
[3,2,1]
3>
[/sourcecode]

BOOM! Passing. So now we know we have a good Erlang install and eunit is setup and usable. In the following blog entries I have in the works, we’ll dive deeper into what and how Erlang works from an extremely basic level all the way to diving into some of the more complex features.