 I wanted to write up an intro to getting Riak installed on AWS, even though the steps are absurdly simple and already available on the Basho Docs site, there’s a few extra notes that can be very helpful for a few specific points during the process.
Start off by logging into AWS. At this point you can take two different paths that are almost identical. You can follow the path of using the pre-built AWS Marketplace image of Riak, or just start form scratch. The difference is a total of about 2 steps; installing & setting some security port connections. I’m going to step through without using the prebuilt image in these instructions.
Security Group
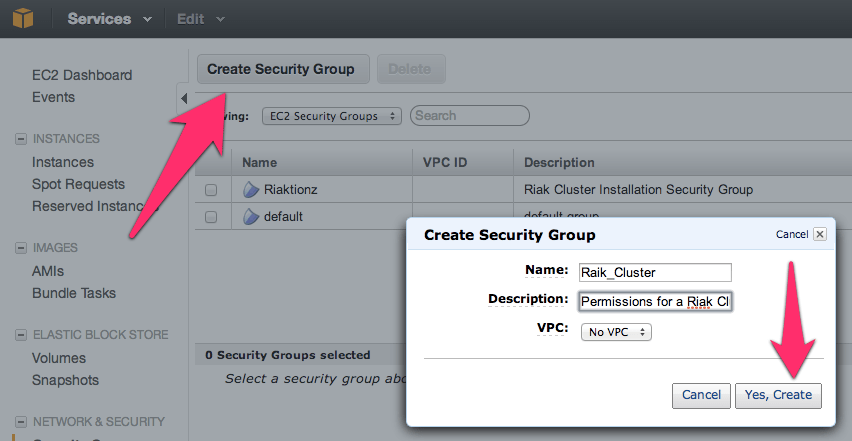
First thing you’ll need to get a security group with the correct permissions setup. For that, you’ll need to make a security group.
NOTE: No, I didn’t mean to misspell Riak, but it’s in there now. 😉

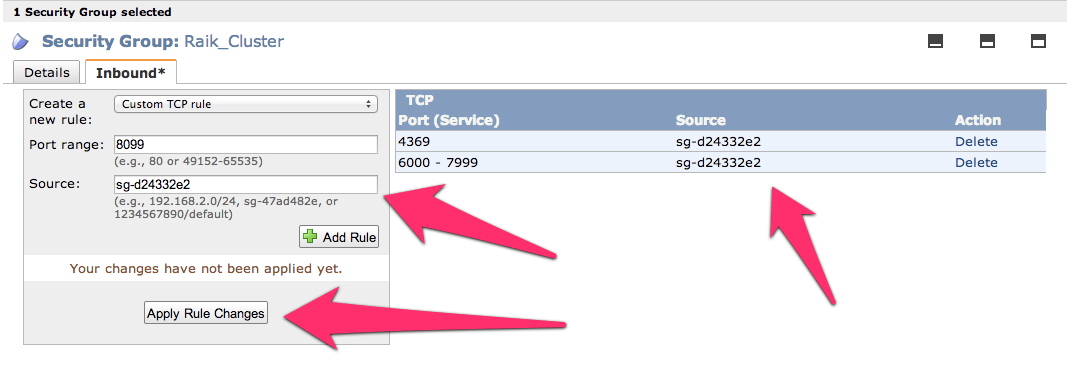
Before adding the ports, go to the security group details tab and copy the security group id. I’ve pointed it out in the image above.
Now add the following three and assign the security group to the ports; 4369, 8099 & 6000-7999. For the source set it to the security group id. Once you get all three added the list should look like this (below). For each rule click the Add Rule button and remember to click the Apply Rule Changes. I often forget this because the screen on some of the machines I use only shows to the bottom of the Add Rule button, so you’ll have to scroll down to find the Apple Rule Changes button.
Now add the standard port 22 for SSH. Next get the final two of 8087 and 8098 setup and we’re ready for moving on to creating the virtual machines.

Server Virtual Machines
For creating virtual machines I just clicked on Launch Instance and used the classic wizard. From there you get a selection of items. I’ve used the AWS image to do this, but would actually suggest using a CentOS image of your choice or Red Hat Enterprise Linux (RHEL). Another great option is to use the Ubuntu 12.04 LTS. Really though, use whatever Linux version or distro you like, there are 1-2 step instructions for installing Riak on almost every distro out.

Next just launch a single instance. We’ll be able to launch duplicates of these further along in the process. I’ve selected a “Micro” here but I’m not intending to do anything with a remotely heavy load right now. At some point, I’ll upgrade this cluster to larger instances when I start putting it under a real load. I’ll have another blog entry to describe exactly how I do this too.

Keep hitting continue until you get to the key pair selection. Pick the key pair you want, either making a new one for this cluster or use one you already have. Either way works fine.

Continue again until you can select the security group that we created above.

Now keep hitting that continue button, until you get to launch, and launch this thing. Once the instance is launched launch your preferred SSH connection tooling. The easiest way I’ve found for getting the most current private IP to connect to with the appropriate command is to right click on the instance in the AWS Console and click on Connect. There you’ll find the command to connect via SSH.
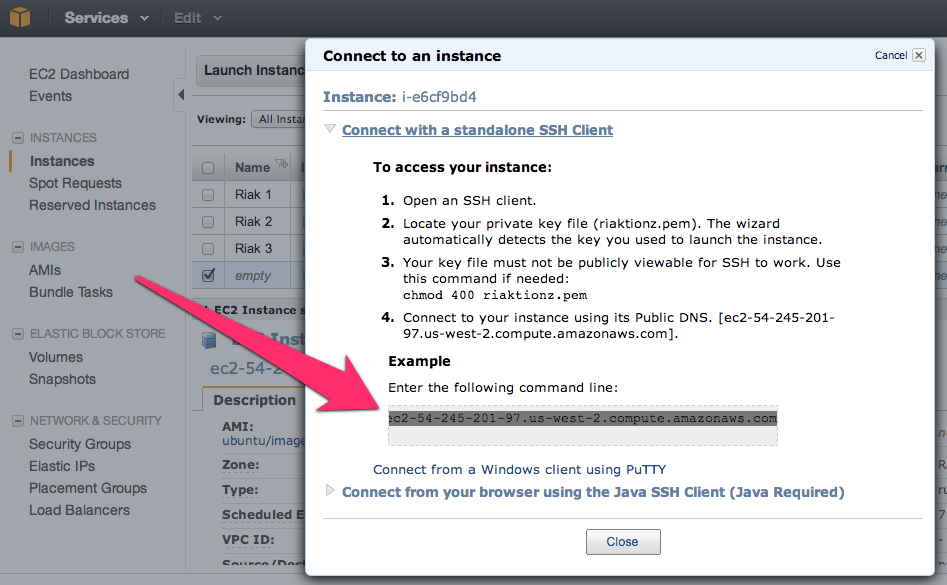
Paste that in and hit enter in your SSH App, you’ll see something akin to this.
[sourcecode language=”bash”]
$ cd Codez/working-content/
$ ssh -i riaktionz.pem root@ec2-54-245-201-97.us-west-2.compute.amazonaws.com
The authenticity of host ‘ec2-54-245-201-97.us-west-2.compute.amazonaws.com (54.245.201.97)’ can’t be established.
RSA key fingerprint is 31:18:ac:1a:ac:fc:6e:6d:55:e8:8a:83:9a:8f:c7:5f.
Are you sure you want to continue connecting (yes/no)? yes
Warning: Permanently added ‘ec2-54-245-201-97.us-west-2.compute.amazonaws.com,54.245.201.97′ (RSA) to the list of known hosts.
Please login as the user "ubuntu" rather than the user "root".
[/sourcecode]
Enter yes to continue connecting. For some instance types, like Ubuntu you’ll have to do some teaks to log into as “ubuntu” vs. “root” and the same goes for the AWS image or others. I’ll leave that to you, dear reader to get connected via ole’ SSH.
One of the other things, that you may have to do some tweaking about and googling, is figuring out the firewall setups on the various virtual machine images. For the RHEL you’ll want to turn off the firewall or open up the specific connection ports and such. Since the AWS firewall does this, it isn’t particularly important for the OS to continue running its firewall service. In this case, I’ve turned off the OS firewall and just rely on the AWS firewall. To turn off the RHEL firewall, execute the following commands.
[sourcecode language=”bash”]
[root@ip-x-x-x-x]# service iptables save
iptables: Saving firewall rules to /etc/sysconfig/iptables:[ OK ]
[root@ip-x-x-x-x]# service iptables stop
iptables: Flushing firewall rules: [ OK ]
iptables: Setting chains to policy ACCEPT: filter [ OK ]
iptables: Unloading modules: [ OK ]
[root@ip-x-x-x-x]# chkconfig iptables off
[root@ip-x-x-x-x]#
[/sourcecode]
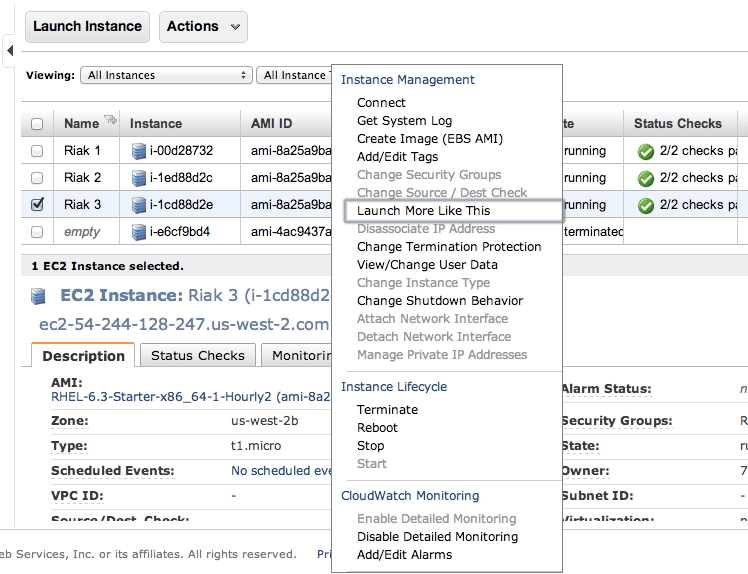
Now is a perfect time to start those other instances. Navigate into the AWS Console again and right click on the virtual machine instance you’ve created. On that menu select Launch More Like This.
Go through and check the configuration on each of these, make sure the firewall is turned off, etc. Then move on to the next step and install Riak and cluster them. So it’s time to get to the distributed, massively complex, extensive list of steps to install & cluster Riak. Ok, so that’s sarcasm. 😉
Step 1: Install Riak
Install Riak on each of the instances.
[sourcecode language=”bash”]
package=basho-release-6-1.noarch.rpm && \
wget http://yum.basho.com/gpg/$package -O /tmp/$package && \
sudo rpm -ivh /tmp/$package
sudo yum install riak
[/sourcecode]
NOTE: For other installation methods, such as directly downloading the RPM or other Linux OSes, check out the http://docs.basho.com/riak/latest/tutorials/installation/Installing-on-RHEL-and-CentOS/.
Step 2: Setup the Cluster
On the first instance, get the IP. You won’t need to do anything to this instance, just keep the IP handy. Then move on to the second instance and run the cluster command.
[sourcecode language=”bash”]
sudo riak-admin cluster join riak@<ip_of_the_first_node>
[/sourcecode]
Do this on each of the instances you’ve added, using that first node. When you’ve added them all, on that last instance (or really any of them) then run the plan. This will get you a display plan of what will take place when the cluster is committed.
[sourcecode language=”bash”]
sudo riak-admin cluster plan
[/sourcecode]
If that looks all cool. Commit the plan.
[sourcecode language=”bash”]
sudo riak-admin cluster commit
[/sourcecode]
Get a check of the cluster.
[sourcecode language=”bash”]
sudo riak-admin member_status
[/sourcecode]
That’s it all done. You know have a Riak Cluster. For more operations to try out your cluster, check out this list of base API Operations.
One thought on “Light up a Riak Cluster with AWS, A Few Notes…”
Comments are closed.