
No cruft, let’s just start.
Continue reading “A Shiny New Vuejs v3 Web App Using & Deployed to Amplify/AppSync/Cognito”Tag: amazon web services
Mapping Domain Names with name.com, Elastic Beanstalk, Elastic Load Balancer and AWS Route 53

I finally wrapped up my name server and DNS mapping needs with Name.com, Route 53 and Elastic Beanstalk. Since this was a little confusing I thought a short write up was in order. Thanks to Evan @evandbrown for helping out!
The first thing needed is a delegation set of name servers for your DNS and name server provider. These can be found by creating a hosted zone. The way to do this is open up the AWS Management Console and navigate into the Route 53 management area. The Route 53 icon is under the Compute & Networking section on the management console.

Upon navigating to the Route 53 console area click on the Create Hosted Zones button.

When the zone is created then the delegation set can be found under the Hosted Zone Details. This delegation set now needs setup as the name servers for whoever, in this case name.com, is the domain provider.

Open up the management console for the name server administration.
…
Upon adding them the list should look something like this.

Once the name servers are setup, those will need time to propagate. Likely this could take a good solid chunk of time, somewhere in the hours range likely, and don’t be surprised if it takes a little bit more than a day.
While the propagation starts navigate back to the AWS Management Console and open up the EC2 section of the console. On the right hand side of the Resources list there is a Load Balancers section. Click it.

In this section there is a listing of all load balancers that have been created manually or by Elastic Beanstalk.

Make note of the Load Balancer Name for selection in Route 53. This is what Route 53 needs in order to point an alias at for incoming traffic to that particular Elastic Beanstalk application. In this particular image above there are 4 load balancers listed, the easiest way to prevent confusion is to take note of the load balancer name at the time of creation, but this is the easiest way to find them otherwise.

Now when going back to the hosted zone to set it up with the appropriate information, create a new record with the appropriate name, in this case I was setting up the admin.deconstructed.io (no it isn’t live yet, I just set it up to test it out) to point to an alias target. Just leave the Type set to A – IPv4 address and click the radio control so that Alias is set to Yes. In the alias target select the appropriate load balancer for the Elastic Beanstalk (or whatever it points to) application.
That’s it, give it a few hours (or a day) and eventually the domain or subdomain will be pointed appropriately at the Elastic Beanstalk load balanced application.
Using Bosh to Bootstrap Cloud Foundry via Stark & Wayne Consulting
I finally sat down and really started to take a stab at Cloud Foundry Bosh. Here’s the quick lowdown on installing the necessary bits and getting an initial environment built. Big thanks out to Dr Nic @drnic, Luke Bakken & Brain McClain @brianmmcclain for initial pointers to where the good content is. With their guidance and help I’ve put together this how-to. Enjoy… boshing.
 Prerequisites
Step: Get an instance/machine up and running.
To make sure I had a totally clean starting point I started out with an AWS EC2 Instance to work from. I chose a micro instance loaded with Ubuntu. You can use your local workstation if you want to or whatever, it really doesn’t matter. The one catch, of course is you’ll have to have a supported *nix based operating system.
Step: Get things updated for Ubuntu.
[sourcecode language=”bash”]
sudo apt-get update
[/sourcecode]
Step: Get cURL to make life easy.
[sourcecode language=”bash”]
sudo apt-get install curl
[/sourcecode]
Step: Get Ruby, in a proper way.
[sourcecode language=”bash”]
\curl -L https://get.rvm.io | bash -s stable
source ~/.rvm/scripts/rvm
rvm autolibs enable
rvm requirements
[/sourcecode]
 Enabling autolibs sets up so that rvm will install all the requirements with the ‘rvm requirements’ command. It used to just show you what you needed, then you’d have to go through and install them. This requirements phase includes some specifics, such as git, gcc, sqlite, and other tools needed to build, execute and work with Ruby via rvm. Really helpful things overall, which will come in handy later when using this instance for whatever purposes.
Finish up the Ruby install and set it as our default ruby to use.
[sourcecode language=”bash”]
rvm install 1.9.3
rvm use 1.9.3 –default
rvm rubygems current
[/sourcecode]
Step: Get bosh-bootstrap.
bosh-bootstrap is the easiest way to get started with a sample bosh deployment. For more information check out Dr Nic’s Stark and Wayne repo on Github. (also check out the Cloud Foundry Bosh repo.)
[sourcecode language=”bash”]
gem install bosh-bootstrap
gem update –system
[/sourcecode]
Git was installed a little earlier in the process, so now set the default user name and email so that when we use bosh it will know what to use for cloning repositories it uses.
[sourcecode language=”bash”]
git config –global user.name "Adron Hall"
git config –global user.email plzdont@spamme.bro
[/sourcecode]
Step: Launch a bosh deploy with the bootstrap.
[sourcecode language=”bash”]
bosh-bootstrap deploy
[/sourcecode]
You’ll receive a prompt, and here’s what to hit to get a good first deploy.
Stage 1: I select AWS, simply as I’ve no OpenStack environment. One day maybe I can try out the other option. Until then I went with the tried and true AWS. Here you’ll need to enter your access & secret key from the AWS security settings for your AWS account.
For the region, I selected #7, which is west 2. That translates to the data center in Oregon. Why did I select Oregon? Because I live in Portland and that data center is about 50 miles away. Otherwise it doesn’t matter which region you select, any region can spool up almost any type of bosh environment.
Stage 2: In this stage, select default by hitting enter. This will choose the default bosh settings. The default uses a medium instance to spool up a good default Cloud Foundry environment. It also sets up a security group specifically for Cloud Foundry.
Stage 3: At this point you’ll be prompted to select what to do, choose to create an inception virtual machine. After a while, sometimes a few minutes, sometimes an hour or two – depending on internal and external connections – you should receive the “Stage 6: Setup bosh” results.
Stage 6: Setup bosh
setup bosh user
uploading /tmp/remote_script_setup_bosh_user to Inception VM
Initially targeting micro-bosh…
Target set to `microbosh-aws-us-west-2′
Creating initial user adron…
Logged in as `admin’
User `adron’ has been created
Login as adron…
Logged in as `adron’
Successfully setup bosh user
cleanup permissions
uploading /tmp/remote_script_cleanup_permissions to Inception VM
Successfully cleanup permissions
Locally targeting and login to new BOSH…
bosh -u adron -p cheesewhiz target 54.214.0.15
Target set to `microbosh-aws-us-west-2′
bosh login adron cheesewhiz
Logged in as `adron’
Confirming: You are now targeting and logged in to your BOSHubuntu@ip-yz-xyz-xx-yy:~$
If you look in your AWS Console you should also see a box with a key pair named “inception” and one that is under the “microbosh-aws-us-west-2” name. The inception instance is a m1.small while the microbosh instance is an m1.medium.
That should get you going with bosh. In my next entry around bosh I’ll dive into some of Dr Nic & Brian McClain’s work before diving into what exactly Bosh actually is. As one may expect, from Stark & Wayne we can expect some pretty cool stuff, so keep an eye over there on Stark & Wayne.
Light up a Riak Cluster with AWS, A Few Notes…
 I wanted to write up an intro to getting Riak installed on AWS, even though the steps are absurdly simple and already available on the Basho Docs site, there’s a few extra notes that can be very helpful for a few specific points during the process.
Start off by logging into AWS. At this point you can take two different paths that are almost identical. You can follow the path of using the pre-built AWS Marketplace image of Riak, or just start form scratch. The difference is a total of about 2 steps; installing & setting some security port connections. I’m going to step through without using the prebuilt image in these instructions.
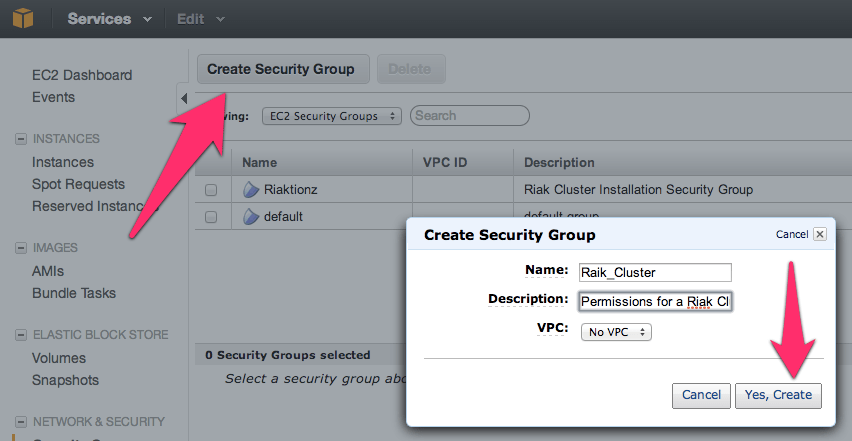
Security Group
First thing you’ll need to get a security group with the correct permissions setup. For that, you’ll need to make a security group.
NOTE: No, I didn’t mean to misspell Riak, but it’s in there now. 😉

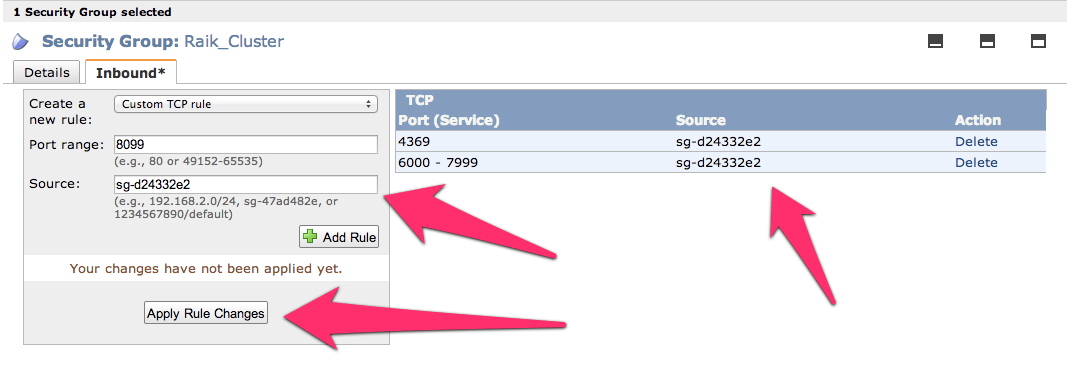
Before adding the ports, go to the security group details tab and copy the security group id. I’ve pointed it out in the image above.
Now add the following three and assign the security group to the ports; 4369, 8099 & 6000-7999. For the source set it to the security group id. Once you get all three added the list should look like this (below). For each rule click the Add Rule button and remember to click the Apply Rule Changes. I often forget this because the screen on some of the machines I use only shows to the bottom of the Add Rule button, so you’ll have to scroll down to find the Apple Rule Changes button.
Now add the standard port 22 for SSH. Next get the final two of 8087 and 8098 setup and we’re ready for moving on to creating the virtual machines.

Server Virtual Machines
For creating virtual machines I just clicked on Launch Instance and used the classic wizard. From there you get a selection of items. I’ve used the AWS image to do this, but would actually suggest using a CentOS image of your choice or Red Hat Enterprise Linux (RHEL). Another great option is to use the Ubuntu 12.04 LTS. Really though, use whatever Linux version or distro you like, there are 1-2 step instructions for installing Riak on almost every distro out.

Next just launch a single instance. We’ll be able to launch duplicates of these further along in the process. I’ve selected a “Micro” here but I’m not intending to do anything with a remotely heavy load right now. At some point, I’ll upgrade this cluster to larger instances when I start putting it under a real load. I’ll have another blog entry to describe exactly how I do this too.

Keep hitting continue until you get to the key pair selection. Pick the key pair you want, either making a new one for this cluster or use one you already have. Either way works fine.

Continue again until you can select the security group that we created above.

Now keep hitting that continue button, until you get to launch, and launch this thing. Once the instance is launched launch your preferred SSH connection tooling. The easiest way I’ve found for getting the most current private IP to connect to with the appropriate command is to right click on the instance in the AWS Console and click on Connect. There you’ll find the command to connect via SSH.
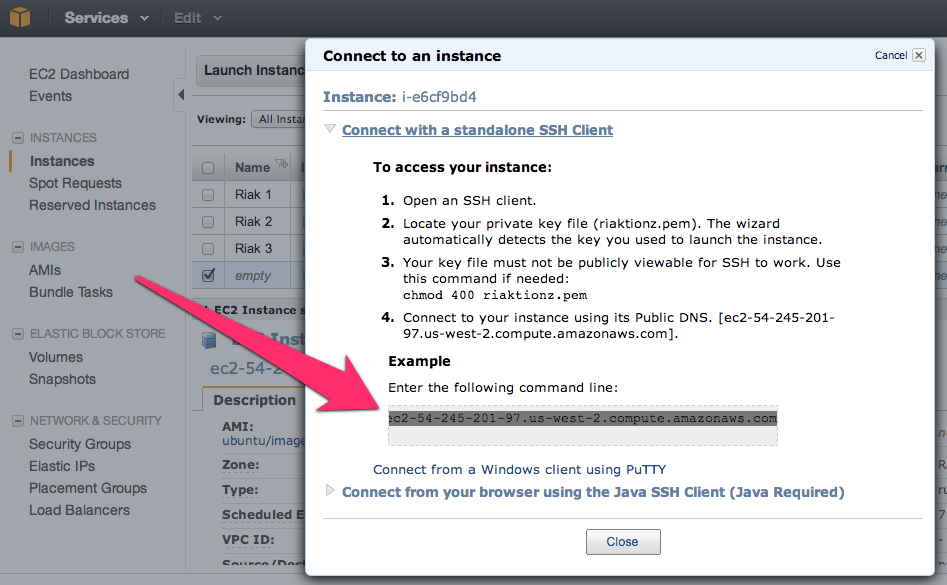
Paste that in and hit enter in your SSH App, you’ll see something akin to this.
[sourcecode language=”bash”]
$ cd Codez/working-content/
$ ssh -i riaktionz.pem root@ec2-54-245-201-97.us-west-2.compute.amazonaws.com
The authenticity of host ‘ec2-54-245-201-97.us-west-2.compute.amazonaws.com (54.245.201.97)’ can’t be established.
RSA key fingerprint is 31:18:ac:1a:ac:fc:6e:6d:55:e8:8a:83:9a:8f:c7:5f.
Are you sure you want to continue connecting (yes/no)? yes
Warning: Permanently added ‘ec2-54-245-201-97.us-west-2.compute.amazonaws.com,54.245.201.97′ (RSA) to the list of known hosts.
Please login as the user "ubuntu" rather than the user "root".
[/sourcecode]
Enter yes to continue connecting. For some instance types, like Ubuntu you’ll have to do some teaks to log into as “ubuntu” vs. “root” and the same goes for the AWS image or others. I’ll leave that to you, dear reader to get connected via ole’ SSH.
One of the other things, that you may have to do some tweaking about and googling, is figuring out the firewall setups on the various virtual machine images. For the RHEL you’ll want to turn off the firewall or open up the specific connection ports and such. Since the AWS firewall does this, it isn’t particularly important for the OS to continue running its firewall service. In this case, I’ve turned off the OS firewall and just rely on the AWS firewall. To turn off the RHEL firewall, execute the following commands.
[sourcecode language=”bash”]
[root@ip-x-x-x-x]# service iptables save
iptables: Saving firewall rules to /etc/sysconfig/iptables:[ OK ]
[root@ip-x-x-x-x]# service iptables stop
iptables: Flushing firewall rules: [ OK ]
iptables: Setting chains to policy ACCEPT: filter [ OK ]
iptables: Unloading modules: [ OK ]
[root@ip-x-x-x-x]# chkconfig iptables off
[root@ip-x-x-x-x]#
[/sourcecode]
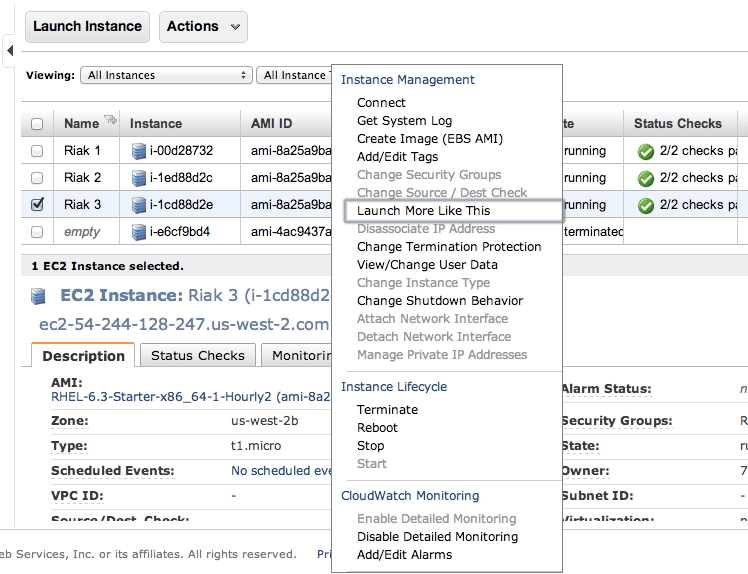
Now is a perfect time to start those other instances. Navigate into the AWS Console again and right click on the virtual machine instance you’ve created. On that menu select Launch More Like This.
Go through and check the configuration on each of these, make sure the firewall is turned off, etc. Then move on to the next step and install Riak and cluster them. So it’s time to get to the distributed, massively complex, extensive list of steps to install & cluster Riak. Ok, so that’s sarcasm. 😉
Step 1: Install Riak
Install Riak on each of the instances.
[sourcecode language=”bash”]
package=basho-release-6-1.noarch.rpm && \
wget http://yum.basho.com/gpg/$package -O /tmp/$package && \
sudo rpm -ivh /tmp/$package
sudo yum install riak
[/sourcecode]
NOTE: For other installation methods, such as directly downloading the RPM or other Linux OSes, check out the http://docs.basho.com/riak/latest/tutorials/installation/Installing-on-RHEL-and-CentOS/.
Step 2: Setup the Cluster
On the first instance, get the IP. You won’t need to do anything to this instance, just keep the IP handy. Then move on to the second instance and run the cluster command.
[sourcecode language=”bash”]
sudo riak-admin cluster join riak@<ip_of_the_first_node>
[/sourcecode]
Do this on each of the instances you’ve added, using that first node. When you’ve added them all, on that last instance (or really any of them) then run the plan. This will get you a display plan of what will take place when the cluster is committed.
[sourcecode language=”bash”]
sudo riak-admin cluster plan
[/sourcecode]
If that looks all cool. Commit the plan.
[sourcecode language=”bash”]
sudo riak-admin cluster commit
[/sourcecode]
Get a check of the cluster.
[sourcecode language=”bash”]
sudo riak-admin member_status
[/sourcecode]
That’s it all done. You know have a Riak Cluster. For more operations to try out your cluster, check out this list of base API Operations.
First Looks @ AWS Toolkit for Visual Studio 2010
I’ll be presenting on the AWS Toolkit for Visual Studio 2010 in the very near future (Check out the SAWSUG Meetup on October 12th, that’s this Wednesday). I’ll be covering a number of things about the new AWS Toolkit for Visual Studio. My slides are available below (with links to the Google Docs and Slideshare Versions).
Direct link to Google Docs Presentation or the SlideShare Presentation.
The code for the presentation is available on Github under AWS-Toolkit-Samples. Beware, this code will be changing over time, the core will stay the same though.

You must be logged in to post a comment.