I’ve got more than a few series in the queue, so why not another one eh! The intent is, I’ll grab a specific topic to break down and add details to related to distributed systems, primarily around Riak. I will however diverge into other distributed databases too, but I’ll primarily be sticking to Riak. Without more introduction, the first topic is…
Backing Up and Recovery of Riak (Nodes)
I’ve been asked approximately 423,983,321.7 zillion times how this is done. So here’s a quick summary and respective links to the best ways to backup Riak, how to recover nodes.
When backing up Riak there are two key things that need copied to the backup storage; the ring and data directories. Each of these things are specific based on the backend used with Riak. In addition to the core backup containing the ring and data, another good thing to backup is the configuration directory. When recovering this comes in useful.
For the locations of data, it depends slightly based on the operating system being used. The two big variances are OS-X and Linux Distros. On OS-X the data path, ring data and configuration are located at the locations listed below:
Bitcask data: ./data/bitcask
LevelDB data: ./data/leveldb
Ring data: ./data/riak/ring
Configuration: ./etc
For each specific distro, there are slight variations on where the locations are, for a full list check out the Basho Riak docs on backups. But on Linux distros the paths are as follows:
Debian and Ubuntu
Bitcask data: /var/lib/riak/bitcask
LevelDB data: /var/lib/riak/leveldb
Ring data: /var/lib/riak/ring
Configuration: /etc/riak
Fedora and RHEL
Bitcask data: /var/lib/riak/bitcask
LevelDB data: /var/lib/riak/leveldb
Ring data: /var/lib/riak/ring
Configuration: /etc/riak
Other Operating System Paths
Freebsd
Bitcask data: /var/db/riak/bitcask
LevelDB data: /var/db/riak/leveldb
Ring data: /var/db/riak/ring
Configuration: /usr/local/etc/riak
SmartOS
Bitcask data: /var/db/riak/bitcask
LevelDB data: /var/db/riak/leveldb
Ring data: /var/db/riak/ring
Configuration: /opt/local/etc/riak
Solaris
Bitcask data: /opt/riak/data/bitcask
LevelDB data: /opt/riak/data/leveldb
Ring data: /opt/riak/ring
Configuration: /opt/riak/etc
When backing things up, it’s important to note that each node could have slightly inconsistent data. The data however is rebuilt by the Riak read-repair system once it is recovered and brought into use.
Backup Jobs
One of the easiest ways to backup Riak is to setup a cron job with your choice of cp, rsync or tar. Then just get those files onto whatever your choice of backup medium. An example tar cron job to backup a Bitcask backend is shown below (snagged from the documentation) just to give you an idea of where to start.
For a leveldb back end the most important thing to note is that the node must be stopped. The basic workflow of backing up a node in this manner is to stop the node, backup the data, ring and configuration and then start the node back up.
Backup Recovery / Restoring
When recovering data on a node that is replacing an existing node that has the same name (fully qualified or IP) then follow the steps below:
Install Riak
Restore the old node’s configuration, data & ring.
Start the node
Once you’ve got the node started back up it’s a good idea to do a ping or status against the node to verify it is in a good state.
If node names have been changed there are additional steps.
Mark the original instance down[sourcecode language=”bash”]riak-admin down [/sourcecode]
Join the restored cluster [sourcecode language=”bash”]riak-admin join [/sourcecode]
Replace the original with [sourcecode language=”bash”]riak-admin cluster force-replcae [/sourcecode]
Get the cluster plan built [sourcecode language=”bash”]riak-admin cluster plan[/sourcecode]
Commit the changes [sourcecode language=”bash”]riak-admin cluster commit[/sourcecode]
Change the -name setting in the vm.args configuration file to match the new name.
Change & verify that the IP reflects the instances IP in the app.config for http and protocol buffer interfaces.
Cluster Backups via Riak Enterprise Multi-Data Center (MDC)
In the above sections I wrote about the traditional backup approaches. This is very similar to the way RDBMS are backed up. However, with a distributed system like Riak there is another great alternative if you’re utilizing multiple datacenters and Enterprise Riak. In this version of Riak, which is basically Riak with additional features and capabilities, one of the possible backup scenarios is to use the Multi-Data Center, or MDC, to replicate a duplicate cluster and use it as an active, real-time and always ready backup.
One workflow that is an exceptionally effective way to provide backups is to setup the “backup” cluster beside the current operative cluster. As an example, if your cluster is operational in AWS and it is running in X region and Y zone then you’d want to put the backup cluster in that same region and zone. Once you’ve setup Riak Enterprise and MDC, then just setup a full sync. Once the full sync is done you can then remove the backup cluster and it provides a point in time backup of the data.
The variations on backing up data with Riak Enterprise and MDC are pretty expansive. Doing a point in time, maintaining a secondary live copy of the data, using the replication as a data dump to another cluster or even just using the MDC replication to dump all of the data to a single instance.
File System Snapshots
One other technique that is extremely efficient, fast and thorough is snapshotting the file system. The backup workflow for snapshots is extremely easy. First stop Riak, then snapshot, then start Riak again. Of all the methods, snapshotting is one of the easiest of the options. Just like setting up a cron job, automating snapshots based on some pre-defined schedule and meshing that with automated start and stop of Riak provides a very thorough backup.
With these options, have fun strategizing your stratagems into strategies for backups.
Diskettes
One of the oldest, tried and true backups is the old diskette. The bestest way to backup with diskettes is to backup each node on three diskettes each. The send one of each diskettes to a geographically dispersed to a bank lock box or other secure facility. Do this for each node, and if need be use as many diskettes for each node as needed. A particularly useful method is to use the sharded zip strategy to stripe a backup across many diskettes. Once each lock box has a copy of the node for each node in the cluster, you’ll have one of the most secure backups in existence. Nothing compares to the diskette backup!
With that quick delete of the hidden vagrant directory I gave it a shot again with the provider flagh.
[sourcecode language=”bash”]
rm -rf .vagrant/
$ vagrant up –provider=vmware_fusionBringing machine ‘default’ up with ‘vmware_fusion’ provider…
[default] VMware requires root privileges to make many of the changes
necessary for Vagrant to control it. In a moment, Vagrant will ask for
your administrator password in order to install a helper that will have
permissions to make these changes. Note that Vagrant itself continues
to run without administrative privileges.
Password:
[default] Box ‘bosh-solo-0.6.4’ was not found. Fetching box from specified URL for
the provider ‘vmware_fusion’. Note that if the URL does not have
a box for this provider, you should interrupt Vagrant now and add
the box yourself. Otherwise Vagrant will attempt to download the
full box prior to discovering this error.
Downloading or copying the box…
[/sourcecode]
Which this seemed to work. Downloading the helpers and such started and I waited patiently.
A Few Thoughts…
Needing to delete a hidden file struck me as one of those completely arbitrary and random solutions. It worked, which is awesome, but it working is a completely counter intuitive solution. I did a ‘destroy’ previously along with a number of things that were somewhat not intuitive. At this point the steps were fine, I had to ask for help, and I got help really fast. That’s awesome, but needing to go through those steps was unfortunate and ties back around to @jeffsussna‘s tweet earlier.
Anyway, as soon as I did this I decided Virtual Box it is. As it went through a 40 minute download of an image (??) it finished and displayed…
[sourcecode language=”bash”]
$ vagrant up –provider=vmware_fusionBringing machine ‘default’ up with ‘vmware_fusion’ provider…
[default] VMware requires root privileges to make many of the changes
necessary for Vagrant to control it. In a moment, Vagrant will ask for
your administrator password in order to install a helper that will have
permissions to make these changes. Note that Vagrant itself continues
to run without administrative privileges.
Password:
[default] Box ‘bosh-solo-0.6.4’ was not found. Fetching box from specified URL for
the provider ‘vmware_fusion’. Note that if the URL does not have
a box for this provider, you should interrupt Vagrant now and add
the box yourself. Otherwise Vagrant will attempt to download the
full box prior to discovering this error.
Downloading or copying the box…
Extracting box…te: 119k/s, Estimated time remaining: –:–:–)
The box you attempted to add doesn’t match the provider you specified.
Provider expected: vmware_fusion
Provider of box: virtualbox
[/sourcecode]
… because the image isn’t available for vmware according to Vagrant, so for now, with some solutions and more questions I’m just going to go with the Virtual Box Solution and get back on track with the larger picture blog entry I’m writing. Thanks to @brianmmclain, @mitchelh, @jeffsussna and @thoward37.
I’ve started using Vagrant pretty regularly. I downloaded Virtual Box and been tinkering away with some of the vagrant packages. The one huge bummer was that I was under the delusion that it only worked with Vagrant. Then, I was told by a fellow coder that I needed to check out the VMware Fusion plugin. I immediately was stoked! Simply, have you…
[sourcecode language=”bash”]
$ vagrant plugin install vagrant-vmware-fusion
Installing the ‘vagrant-vmware-fusion’ plugin. This can take a few minutes…
Installed the plugin ‘vagrant-vmware-fusion (0.6.1)’!
$ vagrant plugin license vagrant-vmware-fusion license.lic
Installing license for ‘vagrant-vmware-fusion’…
The license for ‘vagrant-vmware-fusion’ was successfully installed!
$
[/sourcecode]
Now mind you, you’ll need to go out and buy the VMware Fusion Plugin from Hashi Corp. From my perspective I was happy with this purchase just to get the stability improvements of VMware Fusion.
Vagrant & Riak
For my first example of the new plugin I forked and then cloned the Bosh Riak Repository. Once that was cloned I simply opened a terminal and navigated to the path of the repository and tried…
[sourcecode language=”bash”]
vagrant up
[/sourcecode]
…and immediately got the message, “Failed to load the “vagrant-vmware-fusion” plugin. View logs for more details.” Noooooooooooooooez! 🙁 I was sad. But dove into the logs by executing vagrant up with…
[sourcecode language=”bash”]
VAGRANT_LOG=INFO vagrant up
[/sourcecode]
…and there was the error amid the log was something about the VMware Plugin requiring Vagrant the latest version.
Doh! I’d forgotten to upgrade first. I installed the upgrade via the downloads for 1.2.2. Once I upgrade I ran into the same error. A quick ‘vagrant -v’ to check the version showed 1.2.2 was installed. Not knowing the special secret sauce at this point, I figured I’d just reboot. It had been about 20-30 days since I had, so who knew what weird service or something needed to be restarted. I guessed correctly and after a restart vagrant kicked off the download of the vagrant image for the Bosh Riak deploy. It went by fast, and since it didn’t spit out an error about not loading the plugin I thought everything had worked…
[sourcecode language=”bash”]
$ vagrant up
Bringing machine ‘default’ up with ‘virtualbox’ provider…
[default] Setting the name of the VM…
[default] Clearing any previously set forwarded ports…
[default] Creating shared folders metadata…
[default] Clearing any previously set network interfaces…
[default] Preparing network interfaces based on configuration…
[default] Forwarding ports…
[default] — 22 => 2222 (adapter 1)
[default] Booting VM…
[default] Waiting for VM to boot. This can take a few minutes.
…more stuff here…
[/sourcecode]
…or so I had thought. Scrolling back up through the log I realized Vagrant had NOT used the plugin for VMware Fusion. I was still stuck with VirtualBox. I went through the plugin install again to see if it just needed re-applied. At this point, since I’d already installed Virtual Box previously I figured maybe I’d just keep plunging forward and mess with the vmware plugin later, however I’d REALLY like to have all my virtualized images running via Fusion. Not sure what I missed I decided to give it one more try…
[sourcecode language=”bash”]
$ vagrant plugin install vagrant-vmware-fusion
Installing the ‘vagrant-vmware-fusion’ plugin. This can take a few minutes…
Installed the plugin ‘vagrant-vmware-fusion (0.6.1)’!
Adrons-MacBook-Air-3:Downloads adronhall$ vagrant plugin license vagrant-vmware-fusion license.lic
Installing license for ‘vagrant-vmware-fusion’…
The license for ‘vagrant-vmware-fusion’ was successfully installed!
$ cd ~/Codez/riak-release/
$ vagrant up
Bringing machine ‘default’ up with ‘virtualbox’ provider…
[/sourcecode]
Ugh… so I almost give up at this point. I read this, it seems ironic.
Being this isn’t the best user experience I stumble forward trying something else. I get a suggestion from a fellow coder (thx Brian) to try this.
[sourcecode language=”bash”]
$ vagrant up –provider=vmware_fusionAn active machine was found with a different provider. Vagrant
currently allows each machine to be brought up with only a single
provider at a time. A future version will remove this limitation.
Until then, please destroy the existing machine to up with a new
provider.
Well, that didn’t work either. It looks like maybe if I just blew away my VirtualBox images it would work? Well, funny, being I don’t have any VirtualBox images running or installed. Well, just to make sure I checked the VirtualBox directory. Nothing. I went ahead and deleted the entire VirtualBox Application. Tried again.
[sourcecode language=”bash”]
$ vagrant up –provider=vmware_fusionAn active machine was found with a different provider. Vagrant
currently allows each machine to be brought up with only a single
provider at a time. A future version will remove this limitation.
Until then, please destroy the existing machine to up with a new
provider.
Ok, I’ve no idea now. Any help would be greatly appreciated! This same thing appears to work fine under VirtualBox, but with the plugin added and VirtualBox removed I’m still not able to get this to work. Help!
Starting with Github, Automatic Page Generation & Jekyll
It’s time for another blog series! This is a series I’m starting to outline that crazy complex site I’m building to prove out all sorts of things, all located at http://adron.me. So far it’s just a site that hold portfolio information for my coding, biking and related information about me. However I’m using this as a base template, that anybody can use via the github repo I’ve created simply titled Me, to start and scale their own personal site. But beyond that, I’ll be using practices and technology that can be used to truly scale large sites with lots of users. If you have any questions, comments or suggestions about this series please ping me on Twitter @adron or leave a comment on this blog itself.
Creating a new github project, setting it up with a default Node.js readme file and .gitignore. (Click for full size image)
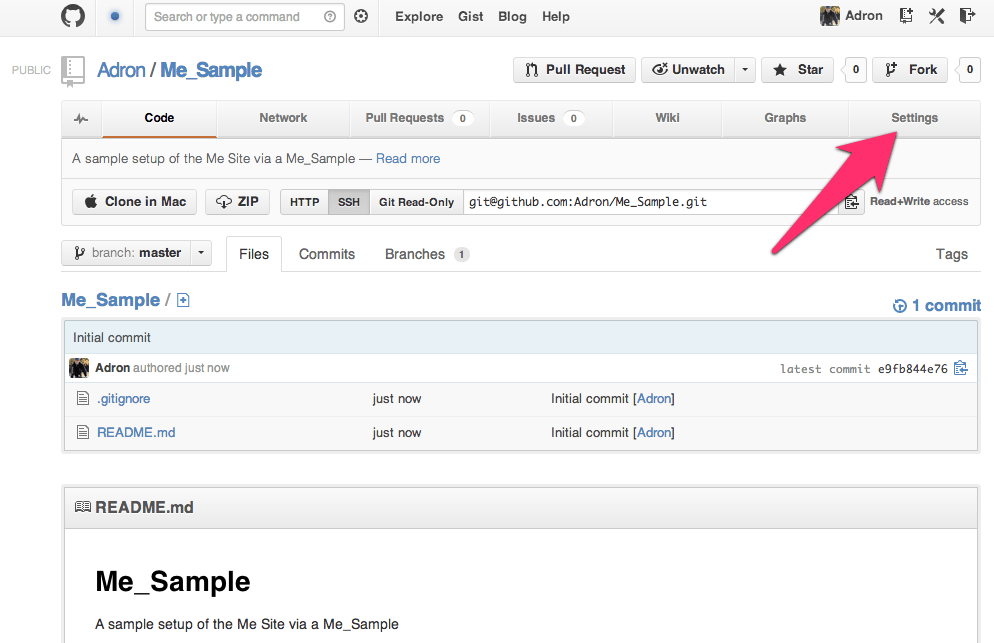
Next we’ll have the site created and github will display the repository page. On this page you can see that the README.md and .gitignore file have been created with some basic defaults for a Node.js Project. At the top right click on the Settings button to navigate to the settings page.
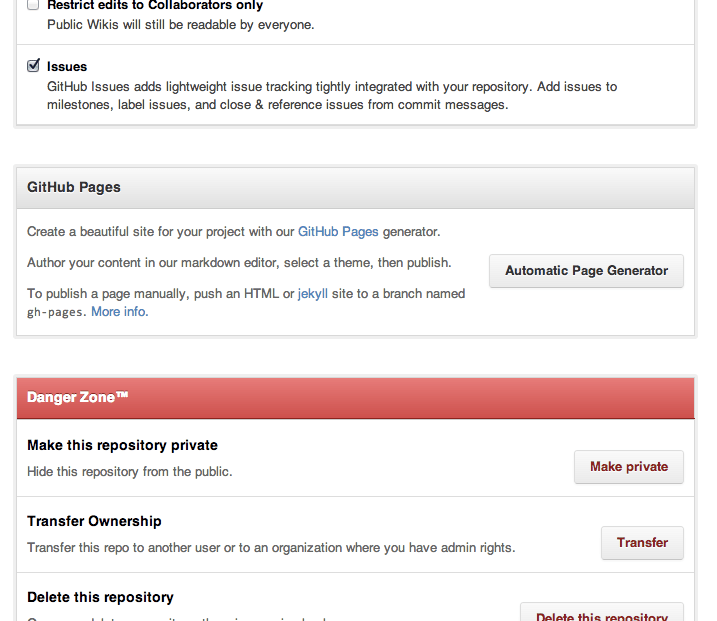
Settings, get there. (Click on image for full size)
On the settings page scroll down until you see the section for Github Pages with the Automatic Page Generator button. Click that button.
Github Pages Automatic Page Generator. (Click for full size image)
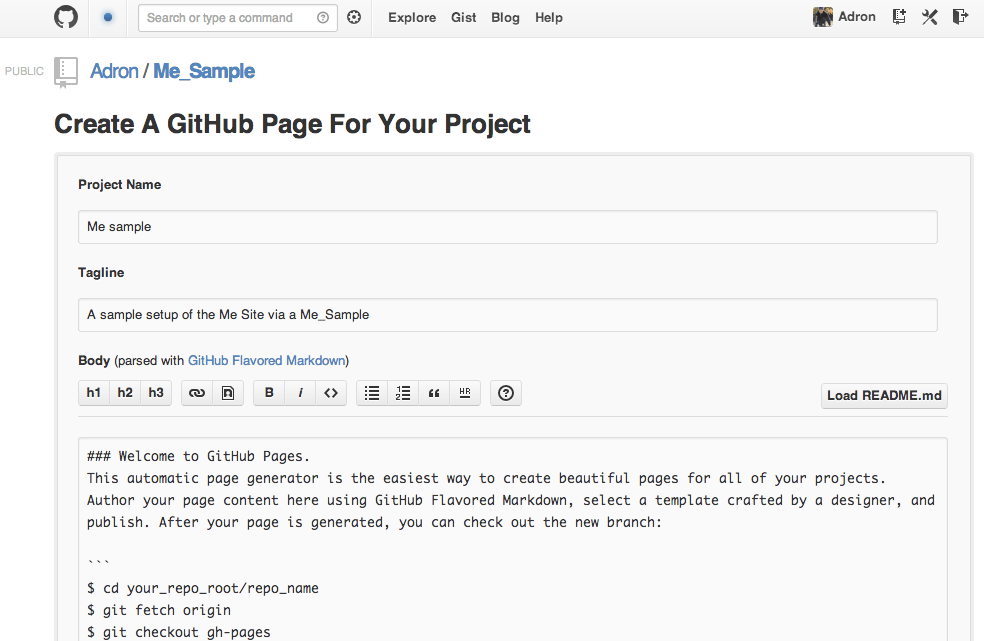
You’ll be directed to create a page, with default data as shown below.
Default Github Pages Project Page. (Click for full size image)
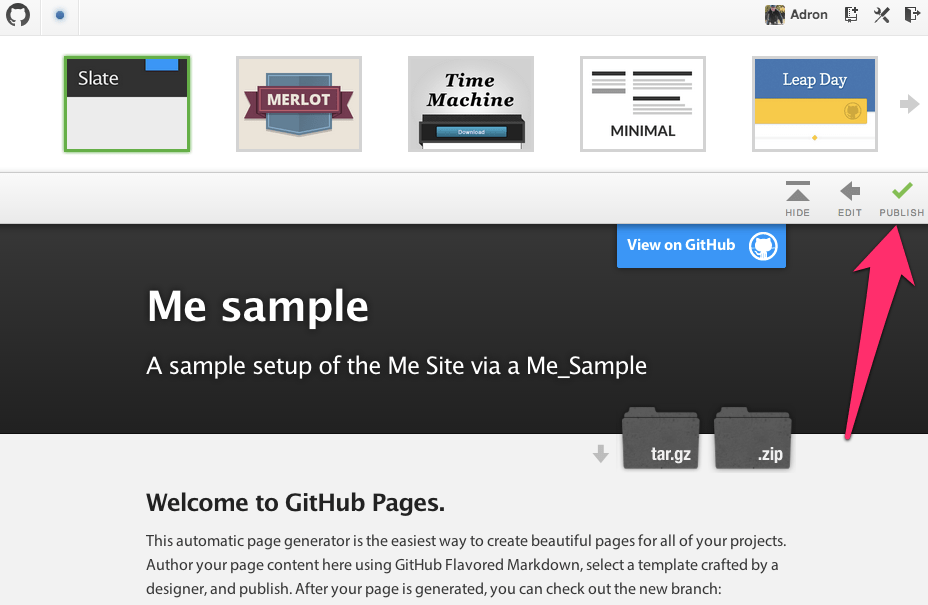
Scroll down on this page and click to create the automatically generated page. You’ll be sent to the page to select a theme. I just went with the default since I’ll delete it later to create the Jeckyll project page instead. Click on publish on this screen.
Default Template Selection for Github Pages. (Click for full size image)
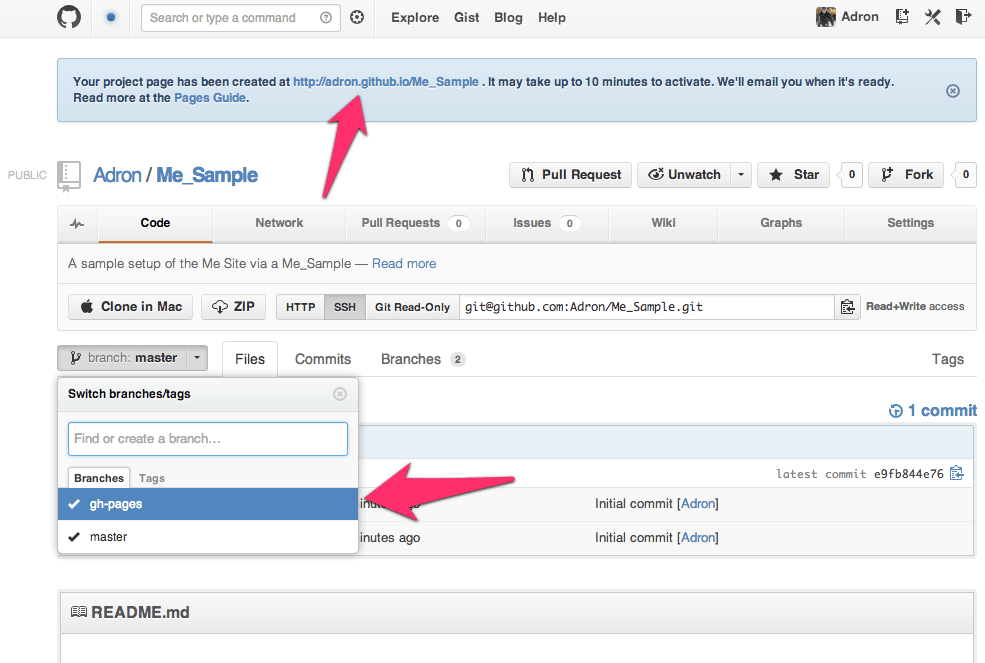
Once this page generates you’ll be directed back to the github repository again. At the top of the page there will be a link to the newly generated page. You can click on this to navigate to it and see what it looks like. Also note that the new repository branch which is named gh-pages is not displayed. This new branch includes all of the files for this Github Pages project page.
Github Pages Automatic Page Generator generated a branch for the new page. (Click for a full size image)
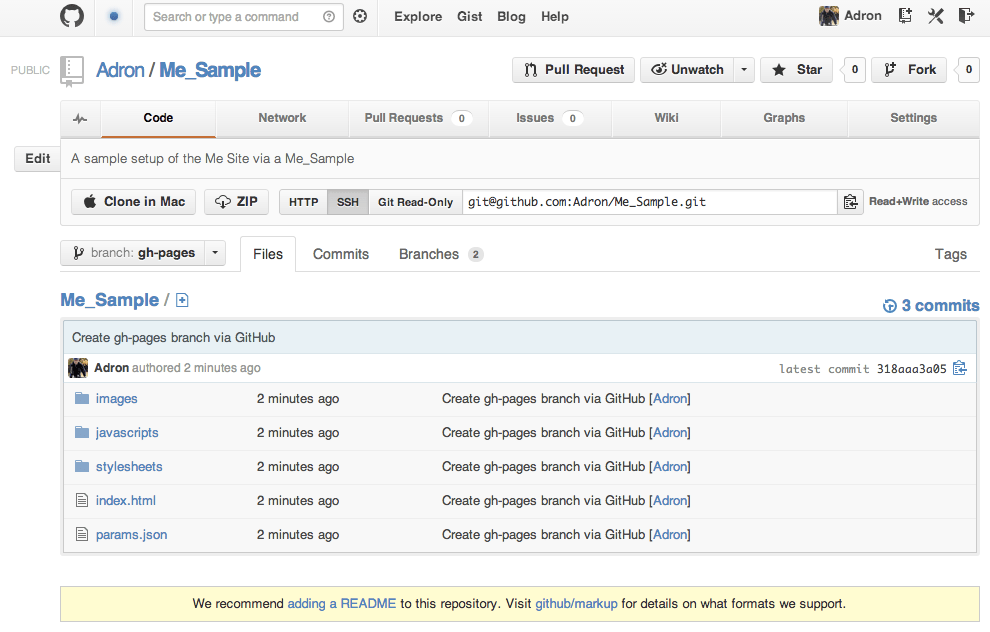
Change the branch to the gh-pages branch and you’ll see that the branch has entirely different files than the master branch.
The default files created in an automatically generated Github Pages site. (Click for full size image)
If you click on the link at the top of the page, you’ll see where the current automatically generated page is and where the future jekyll site we’ll build will be located at. This page that was generated (unless you chose another theme) will look like this.
Github Pages default page with a default theme. (Click for full size image)
Now we have an appropriate branch and we’re ready to toss a jeckyll project in its place. However, if a default template and related content works for your project, that’s a great way to go with it. However some projects may want a blog or other content, just a bit more the default generated page, and this is what we’ll create with this jeckyll site. It’s also very easy to create a jeckyll site and create an image portfolio or a host of other types of sites, all backed by a git repository on github. I’ll keep moving now, on to the jeckyll site!
A Github Jeckyll Site
First get a clone of the site that was generated in the above instructions.
Now we have a good working directory where this is cloned at. First switch branches to the gh-pages branch. Get a list of all branches (the -a switch shows all branches, even the remote branches).
[sourcecode language=”bash”]
git branch -a
[/sourcecode]
The results will display with the full branch names for the remote branches.
The asterisks shows the current active branch. The branch that needs edited is the remotes/origin/gh-pages branch. Check it out with the following command.
[sourcecode language=”bash”]
Note: checking out ‘remotes/origin/gh-pages’.
You are in ‘detached HEAD’ state. You can look around, make experimental
changes and commit them, and you can discard any commits you make in this
state without impacting any branches by performing another checkout.
If you want to create a new branch to retain commits you create, you may
do so (now or later) by using -b with the checkout command again. Example:
git checkout -b new_branch_name
HEAD is now at d430b0c… … etc. etc…
[/sourcecode]
What this basically means is, we have a branch that is disconnected and not attached to the repository in any way. To fix this we’ll create a working local branch to work with the remotes/origin/gh-pages branch. Do this with the following command.
Now delete all those files in that directory that github automatically created. In their place add a README.md and .gitignore file. In the commands below I’m using Sublime Text 2 command line tooling to open up the files into memory with Sublime Text 2.
For your specific OS you may want to check out the actual jeckyll repository installation instructions. There is more of a break down of various operating system needs for use.
Once it is installed, we’re now ready to use jeckyll to generate static content and even run the jeckyll server to view what our site looks like locally. Now let’s get some content together that jeckyll will know how to statically generate for viewing.
Create a folder called “_layouts” in the local repository. With the “_” at the beginning of the directory, it will not be generated into the static content by jekyll, but the convention is for the _layouts directory to include the templates for creating a standard layout for the rest of the pages in the site.
In the above HTML the {{ page.title }} item is a template variable that will display the title of the page when it is generated into static content by jekyll. Once this is created add an index.html page to the root path of the repository.
Now add the following content to the index.html page and save it.
[sourcecode language=”html”]
—
layout: default
—
<section role="banner">
The banner will go here eventually.
</section>
<section class="content">
<p>
Welcome to Adron Hall’s Github Project Pages all manually created with jekyll!! Please, check out the blog at <a href="http://compositecode.com">Composite Code</a>!
</p>
</section>
[/sourcecode]
Now create a stylesheet and respective static directory for it.
Create a styles.css file and add the following content that Dave Gamache created. I’ve included it below with all the appropriate licensing information and related content. Save this file when done.
/* #Links
================================================== */
a, a:visited { color: #f35f2a; text-decoration: none; outline: 0; }
a:hover, a:focus { color: #FFF; }
p a, p a:visited { line-height: inherit; }
/* #Lists
================================================== */
ul, ol { margin-bottom: 20px; }
ul { list-style: none outside; }
ol { list-style: decimal; }
ol, ul.square, ul.circle, ul.disc { margin-left: 30px; }
ul.square { list-style: square outside; }
ul.circle { list-style: circle outside; }
ul.disc { list-style: disc outside; }
ul ul, ul ol,
ol ol, ol ul { margin: 4px 0 5px 30px; font-size: 90%; }
ul ul li, ul ol li,
ol ol li, ol ul li { margin-bottom: 6px; }
li { line-height: 18px; margin-bottom: 12px; }
ul.large li { line-height: 21px; }
li p { line-height: 21px; }
Now we can use the jekyll command to generate the static content and review it. In a subsequent post I’ll cover how to run this via the server to test out what the page would look like with all relative links.
[sourcecode language=”bash”]
jekyll
[/sourcecode]
…and after execution the following message will display at the command line.
[sourcecode language=”bash”]
WARNING: Could not read configuration. Using defaults (and options).
No such file or directory – /Users/adronhall/Codez/Me/_config.yml
Building site: /Users/adronhall/Codez/Me -> /Users/adronhall/Codez/Me/_site
Successfully generated site: /Users/adronhall/Codez/Me -> /Users/adronhall/Codez/Me/_site
[/sourcecode]
This warning isn’t super relevant just yet. We’ve got a basic generated jekyll site localted at /Users/adronhall/Codez/Me/_site where that path is your path to the _static directory within your git repository. Once the content is verified via the _static directory the site is ready to post.
[sourcecode language=”bash”]
git add -A
git commit -m ‘Adding the index.html and basic layouts template for a starter jekyll site.’
git push origin gh-pages
[/sourcecode]
After it pushes, it may take up to 10 minutes before it displays properly. This is likely because Github has to queue the jekyll command to run to statically generate your content for the gh-pages branch. To view the newly created site and see if the generation has occurred navigate to http://yourusername.github.io/Me/. In the case of my personal site, it’s http://adron.github.io/Me/. Also note, at this stage the page and CSS look pretty bad. But work with me here, we’re going to add elements that will align the theme with the actual project as things come together. This css page however will be a core base for everything we’ll work through.
This concludes part 1. I’ve covered created the Github Pages automatically created templates pages, how to delete those and setup a manually created jekyll site. This gives a huge amount of control to the site, to edit, add blogs or other jekyll and of course JavaScript capable site features.
In subsequent parts of this blog series I’ll cover diving into deployment to AWS (Amazon Web Services), how to setup beanstalk via AWS, setting up Riak for a data back end and how to distribute this web application and Riak to offer a massively scalable site architecture (because you never know when you’ll get slammed with page hits on your personal site righ!) Among all these massive distributed how-to topics I’ll also dive into how exactly I’ve got a template and node.js application up and running via AWS and using Riak. So lots of material and information coming in the subsequent parts of this blog series.
🙂 Please subscribe (see upper right follow link to get emails, and no, you’ll get NO spam from me, just blog entries), comment below if you have any questions & let me know if you’d like me to add in any other how-to articles. Thanks & Enjoy!
Today I participated in the OpenShift Community Day here in Portland at the Doubletree Hotel. One of the things I wanted to research was the possibility of putting together a OpenShift Origin Cartridge for Riak. As with most PaaS Systems this isn’t the most straight forward process. The reason is simple, OpenShift and CloudFoundry have a deployment model based around certain conventions that don’t fit with the multi-node deployment of a distributed database. But there are ways around this and my intent was to create or come up with a plan for a Cartridge to commit these work-arounds.
After reading the “New OpenShift Cartridge Format – Part 1” by Mike McGrath @Michael_Mcgrath I set out to get a Red Hat Enterprise Linux image up and running. The quickest route to that was to spool up an AWS EC2 instance. 30 seconds later I had exactly that up and running. The next goal was to get Riak installed and running on this instance. I wasn’t going to actually build a cluster right off, but I wanted at least a single running Riak node to use for trying this out.
In the article “New OpenShift Cartridge Format – Part 1” Mike skips the specifics of the cartridge and focuses on getting a service up and running that will be turned into a Cartridge. As Mike writes,
What do we really need to do to create an new cartridge? Step one is to pick something to create a cartridge for.
…to which my answer is, “alright, creating a Cartridge for Riak!” 😉
However, even though I have the RHEL instance up and running already, with Riak installed, I decided I’d follow along with his exactly example too. So I dove in with
to install Apache. With that done I now have Riak & Apache installed on the RHEL EC2 instance. The goal with both of these services is to get them running as the regular local Unix user in a home directory.
With both Riak and Apache installed, time to create a local user directory for each of the respective tools. However, before that, with this version of Linux on AWS we’ll need to create a local user account.
Changing password for user adron.
New password:
Retype new password:
passwd: all authentication tokens updated successfully.
[/sourcecode]
Next I switched to the user I created ‘su adron’ and created the following directories in the home path for attempting to get Apache and Riak up and running locally like this. I reviewed the rest of the steps in making the Cartridge w/ Apache and then immediately started running into a few issues with getting Riak setup just like I need it to be able to build a cartridge around it. At least, with my first idea of how I should build a cartridge.
At this point I decided we need to have a conversation around the strategy here. So Bill Decoste, Ryan and some of the other Red Hat team on hand today. After a discussion with Bill it sounds like there are some possibilities to get Riak running via the OpenShift Origin Cartridges.
The Strategy
The plan now is to get a cartridge setup so that the cartridge can launch a single Riak instance. That instance, then with post-launch scripts can then join itself to the overall Riak cluster. The routing can be done via the internal routing and some other capabilities that are inherent to what is in OpenShift itself. It sounds like it’ll take a little more tweaking, but the possibility is there for the near future.
At this point I sat down and read up on the Cartridge a little more before taking off for the day. Overall a good start and interesting to get an overview of the latest around OpenShift.
Thanks to the Red Hat Team, have a great time at the OpenStack Conference and I’ll be hacking on this Cartridge strategy!
 One of the oldest, tried and true backups is the old diskette. The bestest way to backup with diskettes is to backup each node on three diskettes each. The send one of each diskettes to a geographically dispersed to a bank lock box or other secure facility. Do this for each node, and if need be use as many diskettes for each node as needed. A particularly useful method is to use the sharded zip strategy to stripe a backup across many diskettes. Once each lock box has a copy of the node for each node in the cluster, you’ll have one of the most secure backups in existence. Nothing compares to the diskette backup!

You must be logged in to post a comment.