Starting with Github, Automatic Page Generation & Jekyll
It’s time for another blog series! This is a series I’m starting to outline that crazy complex site I’m building to prove out all sorts of things, all located at http://adron.me. So far it’s just a site that hold portfolio information for my coding, biking and related information about me. However I’m using this as a base template, that anybody can use via the github repo I’ve created simply titled Me, to start and scale their own personal site. But beyond that, I’ll be using practices and technology that can be used to truly scale large sites with lots of users. If you have any questions, comments or suggestions about this series please ping me on Twitter @adron or leave a comment on this blog itself.
First things first, let’s get our git repository setup on github with the appropriate issues list, and project page via gh-pages (jekyll).
Create a new github project.

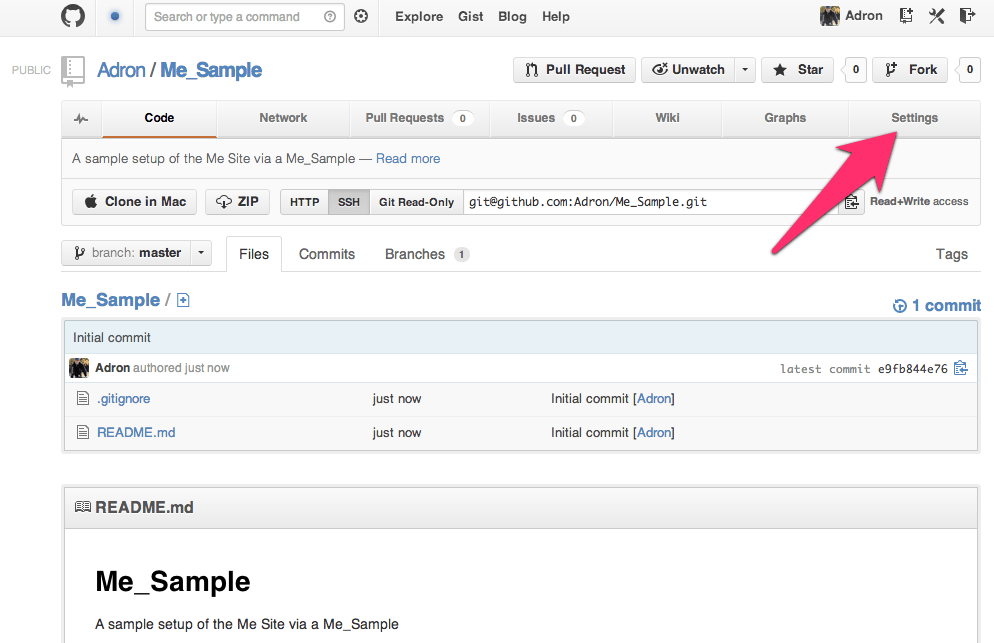
Next we’ll have the site created and github will display the repository page. On this page you can see that the README.md and .gitignore file have been created with some basic defaults for a Node.js Project. At the top right click on the Settings button to navigate to the settings page.
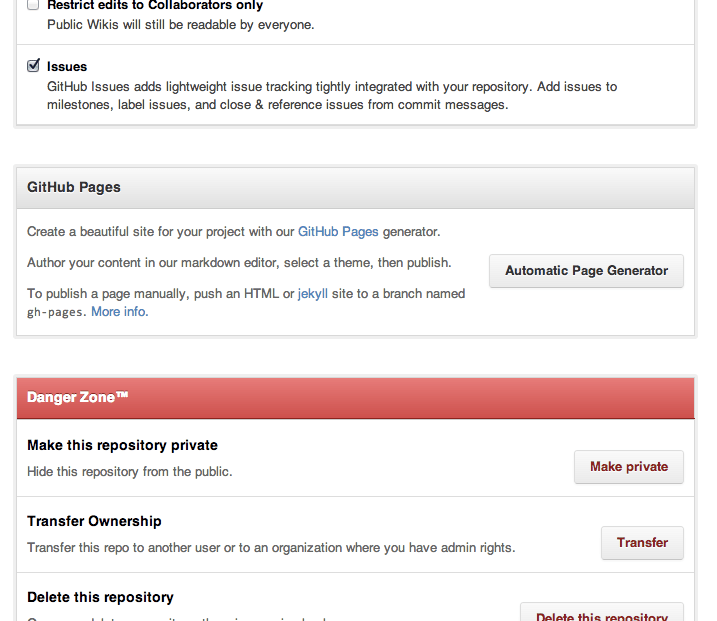
On the settings page scroll down until you see the section for Github Pages with the Automatic Page Generator button. Click that button.
You’ll be directed to create a page, with default data as shown below.
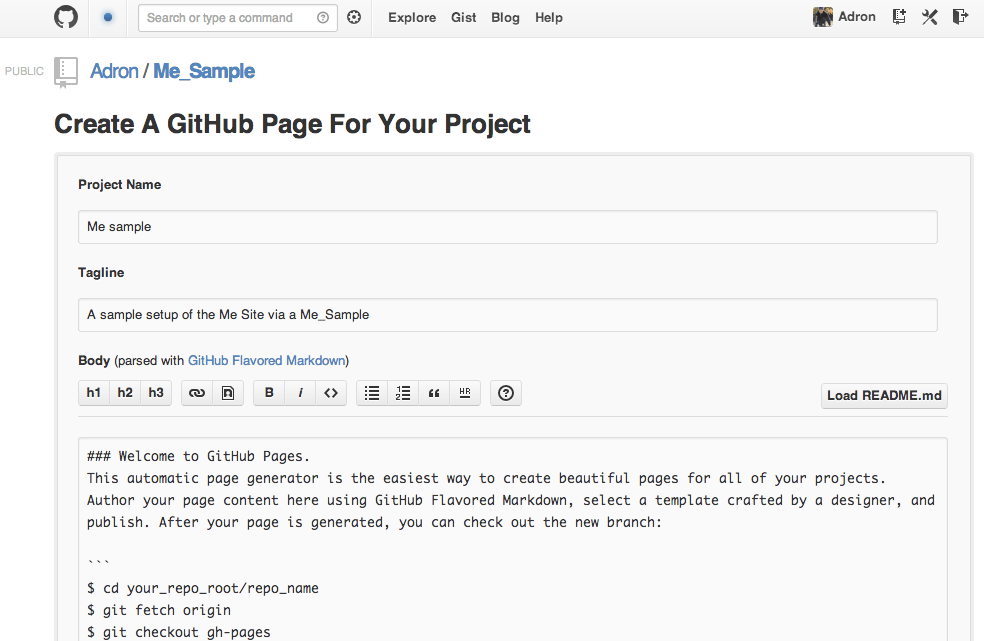
Scroll down on this page and click to create the automatically generated page. You’ll be sent to the page to select a theme. I just went with the default since I’ll delete it later to create the Jeckyll project page instead. Click on publish on this screen.
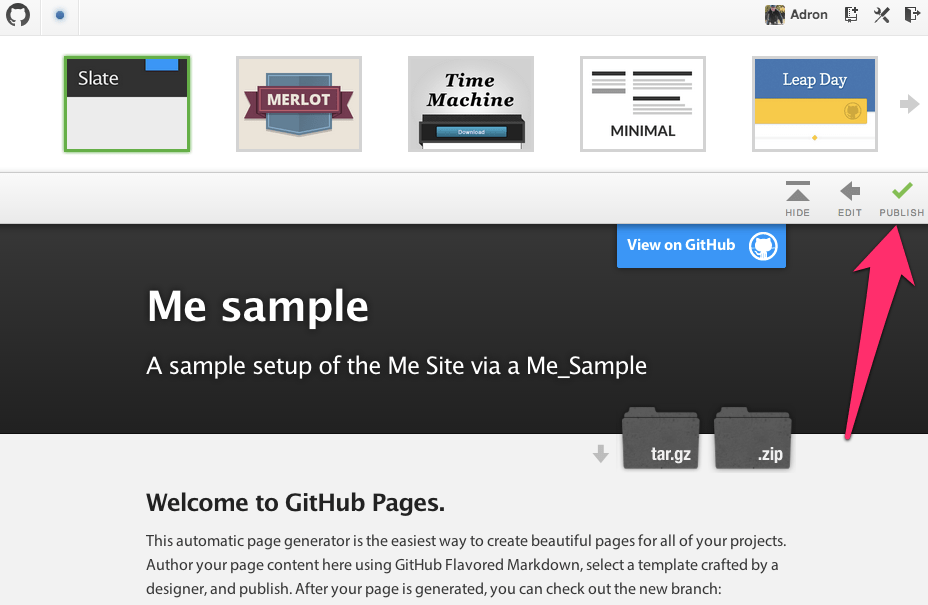
Once this page generates you’ll be directed back to the github repository again. At the top of the page there will be a link to the newly generated page. You can click on this to navigate to it and see what it looks like. Also note that the new repository branch which is named gh-pages is not displayed. This new branch includes all of the files for this Github Pages project page.
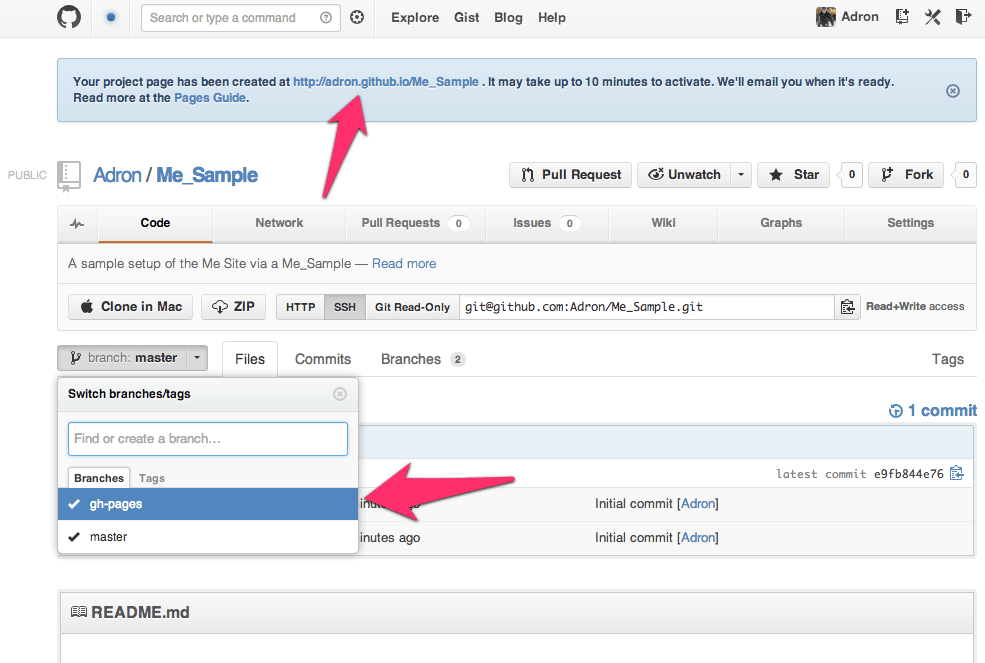
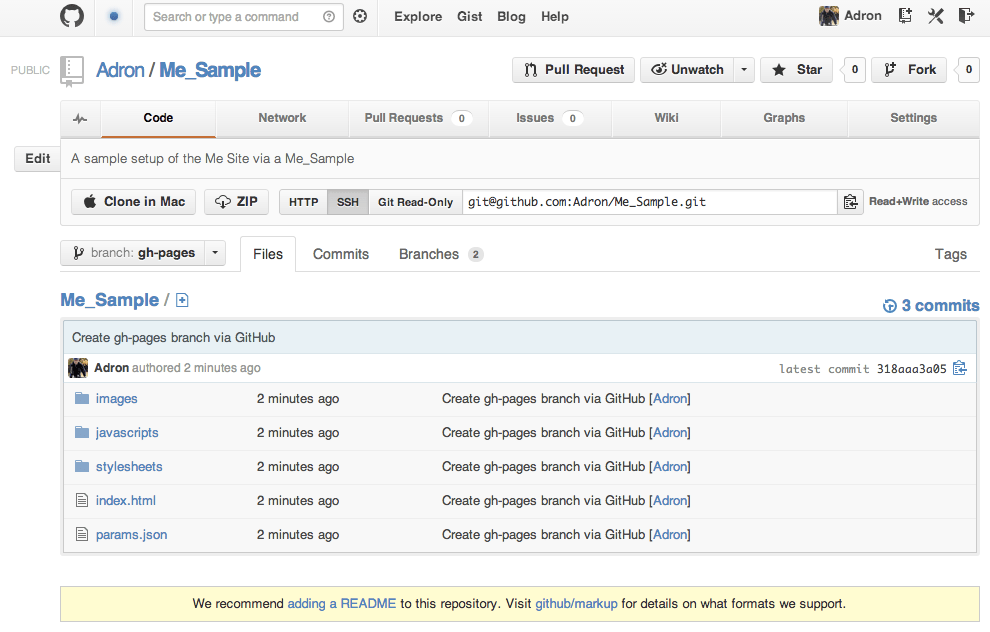
Change the branch to the gh-pages branch and you’ll see that the branch has entirely different files than the master branch.
If you click on the link at the top of the page, you’ll see where the current automatically generated page is and where the future jekyll site we’ll build will be located at. This page that was generated (unless you chose another theme) will look like this.

Now we have an appropriate branch and we’re ready to toss a jeckyll project in its place. However, if a default template and related content works for your project, that’s a great way to go with it. However some projects may want a blog or other content, just a bit more the default generated page, and this is what we’ll create with this jeckyll site. It’s also very easy to create a jeckyll site and create an image portfolio or a host of other types of sites, all backed by a git repository on github. I’ll keep moving now, on to the jeckyll site!
A Github Jeckyll Site
First get a clone of the site that was generated in the above instructions.
[sourcecode language=”bash”]
git clone git@github.com:Adron/Me.git
[/sourcecode]
Now we have a good working directory where this is cloned at. First switch branches to the gh-pages branch. Get a list of all branches (the -a switch shows all branches, even the remote branches).
[sourcecode language=”bash”]
git branch -a
[/sourcecode]
The results will display with the full branch names for the remote branches.
[sourcecode language=”bash”]
git branch -a
* master
remotes/origin/HEAD -> origin/master
remotes/origin/gh-pages
remotes/origin/master
remotes/origin/theme-all-by-itself
[/sourcecode]
The asterisks shows the current active branch. The branch that needs edited is the remotes/origin/gh-pages branch. Check it out with the following command.
[sourcecode language=”bash”]
git checkout remotes/origin/gh-pages
[/sourcecode]
Which will then print out the following content.
[sourcecode language=”bash”]
Note: checking out ‘remotes/origin/gh-pages’.
You are in ‘detached HEAD’ state. You can look around, make experimental
changes and commit them, and you can discard any commits you make in this
state without impacting any branches by performing another checkout.
If you want to create a new branch to retain commits you create, you may
do so (now or later) by using -b with the checkout command again. Example:
git checkout -b new_branch_name
HEAD is now at d430b0c… … etc. etc…
[/sourcecode]
What this basically means is, we have a branch that is disconnected and not attached to the repository in any way. To fix this we’ll create a working local branch to work with the remotes/origin/gh-pages branch. Do this with the following command.
[sourcecode language=”bash”]
git branch gh-pages
[/sourcecode]
Then if you get a list of the existing local branches the master and gh-pages branches will be available locally.
[sourcecode language=”bash”]
git branch
* (no branch)
gh-pages
master
[/sourcecode]
Now switch to that branch. Since we’re currently on (No branch) this content will be switched to the local gh-pages branch wit the following command.
[sourcecode language=”bash”]
git checkout gh-pages
[/sourcecode]
Now delete all those files in that directory that github automatically created. In their place add a README.md and .gitignore file. In the commands below I’m using Sublime Text 2 command line tooling to open up the files into memory with Sublime Text 2.
[sourcecode language=”bash”]
subl .gitignore
[/sourcecode]
Add the following content to the .gitignore file.
[sourcecode language=”bash”]
_site/
*.DS_Store
.DS_Store
[/sourcecode]
Save that file. Create the README.md and…
[sourcecode language=”bash”]
subl README.md
[/sourcecode]
…add some content to it.
[sourcecode language=”bash”]
My Awesome Header
===
Description: An appropriate description.
Documentation
—
Dammit, WRITE YOUR DOCUMENTATION!!!!
[/sourcecode]
I added a little mark down for that README.md example just so there is something more than just text displaying.
Add these files to the local repository, committing and then pushing them up to the remote gh-pages repository.
[sourcecode language=”bash”]
git add -A
git commit -m ‘Adding initial .gitignore and README.md content.’
git push origin gh-pages
[/sourcecode]
Now in this directory we’re about to get things kicking for Jeckyll. First, get Jeckyll.
[sourcecode language=”bash”]
sudo gem install jeckyll
[/sourcecode]
For your specific OS you may want to check out the actual jeckyll repository installation instructions. There is more of a break down of various operating system needs for use.
Once it is installed, we’re now ready to use jeckyll to generate static content and even run the jeckyll server to view what our site looks like locally. Now let’s get some content together that jeckyll will know how to statically generate for viewing.
Create a folder called “_layouts” in the local repository. With the “_” at the beginning of the directory, it will not be generated into the static content by jekyll, but the convention is for the _layouts directory to include the templates for creating a standard layout for the rest of the pages in the site.
[sourcecode language=”bash”]
mkdir _layouts
[/sourcecode]
After creating the new folder, create a default.html inside the folder.
[sourcecode language=”html”]
<!DOCTYPE html>
<html>
<head>
<meta charset=utf-8 />
<title> {% if page.title %} {{ page.title }} | {% endif %} Adron Hall</title>
<link rel="stylesheet" href="css/styles.css" />
</head>
<body>
<div id="main">
<header>
<h1> Adron’s Github Project Pages </h1>
<header>
<nav role="navigation">
<ul>
<li><a href="/">Home</a></li>
<li><a href="/about">About</a></li>
<li><a href="/contact">Contact</a></li>
</ul>
</nav>
{{ content }}
<footer>
<p>© Adron’s Github Project Pages 2013 | All Rights Reserved. </p>
</footer>
</div>
</body>
</html>
[/sourcecode]
In the above HTML the {{ page.title }} item is a template variable that will display the title of the page when it is generated into static content by jekyll. Once this is created add an index.html page to the root path of the repository.
[sourcecode language=”bash”]
subl index.html
[/sourcecode]
Now add the following content to the index.html page and save it.
[sourcecode language=”html”]
—
layout: default
—
<section role="banner">
The banner will go here eventually.
</section>
<section class="content">
<p>
Welcome to Adron Hall’s Github Project Pages all manually created with jekyll!! Please, check out the blog at <a href="http://compositecode.com">Composite Code</a>!
</p>
</section>
[/sourcecode]
Now create a stylesheet and respective static directory for it.
[sourcecode language=”bash”]
mkdir css
[/sourcecode]
Create a styles.css file and add the following content that Dave Gamache created. I’ve included it below with all the appropriate licensing information and related content. Save this file when done.
[sourcecode language=”HTML”]
/*
* Skeleton V1.1
* Copyright 2011, Dave Gamache
* http://www.getskeleton.com
* Free to use under the MIT license.
* http://www.opensource.org/licenses/mit-license.php
* 8/17/2011
*/
/* Table of Content
==================================================
#Reset & Basics
#Basic Styles
#Site Styles
#Typography
#Links
#Lists
#Images
#Buttons
#Tabs
#Forms
#Misc */
/* #Reset & Basics (Inspired by E. Meyers)
================================================== */
html, body, div, span, applet, object, iframe, h1, h2, h3, h4, h5, h6, p, blockquote, pre, a, abbr, acronym, address, big, cite, code, del, dfn, em, img, ins, kbd, q, s, samp, small, strike, strong, sub, sup, tt, var, b, u, i, center, dl, dt, dd, ol, ul, li, fieldset, form, label, legend, table, caption, tbody, tfoot, thead, tr, th, td, article, aside, canvas, details, embed, figure, figcaption, footer, header, hgroup, menu, nav, output, ruby, section, summary, time, mark, audio, video {
border: 0 none;
font: inherit;
margin: 0;
padding: 0;
vertical-align: baseline;
}
article, aside, details, figcaption, figure, footer, header, hgroup, menu, nav, section {
display: block;
}
body {
line-height: 18px;
}
ol, ul {
list-style: none; }
blockquote, q {
quotes: none; }
blockquote:before, blockquote:after,
q:before, q:after {
content: ”;
content: none; }
table {
border-collapse: collapse;
border-spacing: 0; }
/* #Basic Styles
================================================== */
body {
background: url(../images/body_bg.png) repeat;
font-family: ‘Dosis’, sans-serif;
font-size:14px;
font-weight:500;
color:#E8E8E8;
text-shadow:0 1px 0 rgba(0, 0, 0, 0.7);
-webkit-font-smoothing: antialiased; /* Fix for webkit rendering */
-webkit-text-size-adjust: 100%;
}
.max-image { width:100%; height:auto; }
/* #Typography
================================================== */
h1, h2, h3, h4, h5, h6 {font-weight: normal;}
h1 a, h2 a, h3 a, h4 a, h5 a, h6 a { font-weight: inherit; }
h1 { font-size: 26px; line-height: 22px; margin-bottom: 14px; color:#FFCC00;}
h2 { font-size: 20px; line-height: 24px; margin-bottom: 10px; color:#FFF; font-weight:600; }
h3 { font-size: 16px; line-height: 22px; margin-bottom: 10px; color:#FFF; }
h4 { font-size: 15px; line-height: 20px; margin-bottom: 4px; color:#bc4444; }
h5 { font-size: 14px; line-height: 24px; }
h6 { font-size: 14px; line-height: 21px; }
.subheader { color: #777; }
p { margin: 0 0 20px 0; }
p img { margin: 0; }
p.lead { font-size: 21px; line-height: 27px; color: #777; }
em { font-style: italic; }
strong { font-weight: bold; color: #333; }
small { font-size: 80%; }
/* Blockquotes */
blockquote, blockquote p { font-size: 18px; line-height: 24px; color: #333; }
blockquote { margin: 0; padding: 0 20px 0 20px; border-left: 2px solid #F87536; }
blockquote cite { display: block; color: #ff8a00; }
blockquote cite:before { content: "\2014 \0020"; }
blockquote cite a, blockquote cite a:visited, blockquote cite a:visited { color: #555; }
hr { border: solid #ddd; border-width: 1px 0 0; clear: both; margin: 10px 0 30px; height: 0; }
/* #Links
================================================== */
a, a:visited { color: #f35f2a; text-decoration: none; outline: 0; }
a:hover, a:focus { color: #FFF; }
p a, p a:visited { line-height: inherit; }
/* #Lists
================================================== */
ul, ol { margin-bottom: 20px; }
ul { list-style: none outside; }
ol { list-style: decimal; }
ol, ul.square, ul.circle, ul.disc { margin-left: 30px; }
ul.square { list-style: square outside; }
ul.circle { list-style: circle outside; }
ul.disc { list-style: disc outside; }
ul ul, ul ol,
ol ol, ol ul { margin: 4px 0 5px 30px; font-size: 90%; }
ul ul li, ul ol li,
ol ol li, ol ul li { margin-bottom: 6px; }
li { line-height: 18px; margin-bottom: 12px; }
ul.large li { line-height: 21px; }
li p { line-height: 21px; }
/* #Images
================================================== */
img.scale-with-grid {
max-width: 100%;
height: auto; }
/* #Buttons
================================================== */
/*.button,
button,
input[type="submit"],
input[type="reset"],
input[type="button"] {
background: #3973a6; Old browsers
background: #3973a6 -moz-linear-gradient(top, rgba(255,255,255,.2) 0%, rgba(0,0,0,.2) 100%); FF3.6+
background: #3973a6 -webkit-gradient(linear, left top, left bottom, color-stop(0%,rgba(255,255,255,.2)), color-stop(100%,rgba(0,0,0,.2))); Chrome,Safari4+
background: #3973a6 -webkit-linear-gradient(top, rgba(255,255,255,.2) 0%,rgba(0,0,0,.2) 100%); Chrome10+,Safari5.1+
background: #3973a6 -o-linear-gradient(top, rgba(255,255,255,.2) 0%,rgba(0,0,0,.2) 100%); Opera11.10+
background: #3973a6 -ms-linear-gradient(top, rgba(255,255,255,.2) 0%,rgba(0,0,0,.2) 100%); IE10+
background: #3973a6 linear-gradient(top, rgba(255,255,255,.2) 0%,rgba(0,0,0,.2) 100%); W3C
border: 1px solid #3973a6;
border-top: 1px solid #3973a6;
border-left: 1px solid #3973a6;
color: #FFF;
display: inline-block;
font-size: 12px;
font-weight: bold;
text-decoration: none;
text-shadow: 0 1px rgba(33, 77, 121, .75);
cursor: pointer;
margin-bottom: 20px;
line-height: normal;
padding: 8px 10px; }
.button:hover,
button:hover,
input[type="submit"]:hover,
input[type="reset"]:hover,
input[type="button"]:hover {
color: #222;
background: #FF8A00; Old browsers
background: #FF8A00 -moz-linear-gradient(top, rgba(255,255,255,.3) 0%, rgba(0,0,0,.3) 100%); FF3.6+
background: #FF8A00 -webkit-gradient(linear, left top, left bottom, color-stop(0%,rgba(255,255,255,.3)), color-stop(100%,rgba(0,0,0,.3))); Chrome,Safari4+
background: #FF8A00 -webkit-linear-gradient(top, rgba(255,255,255,.3) 0%,rgba(0,0,0,.3) 100%); Chrome10+,Safari5.1+
background: #FF8A00 -o-linear-gradient(top, rgba(255,255,255,.3) 0%,rgba(0,0,0,.3) 100%); Opera11.10+
background: #FF8A00 -ms-linear-gradient(top, rgba(255,255,255,.3) 0%,rgba(0,0,0,.3) 100%); IE10+
background: #FF8A00 linear-gradient(top, rgba(255,255,255,.3) 0%,rgba(0,0,0,.3) 100%); W3C
border: 1px solid #888;
border-top: 1px solid #aaa;
border-left: 1px solid #aaa; }
.button:active,
button:active,
input[type="submit"]:active,
input[type="reset"]:active,
input[type="button"]:active {
border: 1px solid #666;
background: #ccc; Old browsers
background: #ccc -moz-linear-gradient(top, rgba(255,255,255,.35) 0%, rgba(10,10,10,.4) 100%); FF3.6+
background: #ccc -webkit-gradient(linear, left top, left bottom, color-stop(0%,rgba(255,255,255,.35)), color-stop(100%,rgba(10,10,10,.4))); Chrome,Safari4+
background: #ccc -webkit-linear-gradient(top, rgba(255,255,255,.35) 0%,rgba(10,10,10,.4) 100%); Chrome10+,Safari5.1+
background: #ccc -o-linear-gradient(top, rgba(255,255,255,.35) 0%,rgba(10,10,10,.4) 100%); Opera11.10+
background: #ccc -ms-linear-gradient(top, rgba(255,255,255,.35) 0%,rgba(10,10,10,.4) 100%); IE10+
background: #ccc linear-gradient(top, rgba(255,255,255,.35) 0%,rgba(10,10,10,.4) 100%); W3C }
.button.full-width,
button.full-width,
input[type="submit"].full-width,
input[type="reset"].full-width,
input[type="button"].full-width {
width: 100%;
padding-left: 0 !important;
padding-right: 0 !important;
text-align: center; }
Fix for odd Mozilla border & padding issues
button::-moz-focus-inner,
input::-moz-focus-inner {
border: 0;
padding: 0;
}*/
/* #Tabs (activate in tabs.js)
================================================== */
/*ul.tabs {
display: block;
margin: 0 0 20px 0;
padding: 0;
border-bottom: solid 1px #ddd; }
ul.tabs li {
display: block;
width: auto;
height: 30px;
padding: 0;
float: left;
margin-bottom: 0; }
ul.tabs li a {
display: block;
text-decoration: none;
width: auto;
height: 29px;
padding: 0px 20px;
line-height: 30px;
border: solid 1px #ddd;
border-width: 1px 1px 0 0;
margin: 0;
background: #f5f5f5;
font-size: 13px; }
ul.tabs li a.active {
background: #fff;
height: 30px;
position: relative;
top: -4px;
padding-top: 4px;
border-left-width: 1px;
margin: 0 0 0 -1px;
color: #111;
-moz-border-radius-topleft: 2px;
-webkit-border-top-left-radius: 2px;
border-top-left-radius: 2px;
-moz-border-radius-topright: 2px;
-webkit-border-top-right-radius: 2px;
border-top-right-radius: 2px; }
ul.tabs li:first-child a.active {
margin-left: 0; }
ul.tabs li:first-child a {
border-width: 1px 1px 0 1px;
-moz-border-radius-topleft: 2px;
-webkit-border-top-left-radius: 2px;
border-top-left-radius: 2px; }
ul.tabs li:last-child a {
-moz-border-radius-topright: 2px;
-webkit-border-top-right-radius: 2px;
border-top-right-radius: 2px; }
ul.tabs-content { margin: 0; display: block; }
ul.tabs-content > li { display:none; }
ul.tabs-content > li.active { display: block; }
/* Clearfixing tabs for beautiful stacking */
/*ul.tabs:before,
ul.tabs:after {
content: ‘\0020’;
display: block;
overflow: hidden;
visibility: hidden;
width: 0;
height: 0; }
ul.tabs:after {
clear: both; }
ul.tabs {
zoom: 1; }*/*/
/* #Forms
================================================== */
form {
margin-bottom: 20px; }
fieldset {
margin-bottom: 20px; }
input[type="text"],
input[type="password"],
input[type="email"],
textarea,
select {
border: 1px solid #ccc;
padding: 6px 4px;
outline: none;
-moz-border-radius: 2px;
-webkit-border-radius: 2px;
border-radius: 2px;
font: 13px "HelveticaNeue", "Helvetica Neue", Helvetica, Arial, sans-serif;
color: #777;
margin: 0;
width: 210px;
max-width: 100%;
display: block;
margin-bottom: 20px;
background: #fff; }
select {
padding: 0; }
input[type="text"]:focus,
input[type="password"]:focus,
input[type="email"]:focus,
textarea:focus {
border: 1px solid #aaa;
color: #ffcc00;
-moz-box-shadow: 0 0 3px rgba(0,0,0,.2);
-webkit-box-shadow: 0 0 3px rgba(0,0,0,.2);
box-shadow: 0 0 3px rgba(0,0,0,.2); }
textarea {
min-height: 60px; }
label,
legend {
display: block;
font-weight: bold;
font-size: 13px; }
select {
width: 220px; }
input[type="checkbox"] {
display: inline; }
label span,
legend span {
font-weight: normal;
font-size: 13px;
color: #444; }
/* #Misc
================================================== */
.remove-bottom { margin-bottom: 0 !important; }
.half-bottom { margin-bottom: 10px !important; }
.add-bottom { margin-bottom: 20px !important; }
[/sourcecode]
Now we can use the jekyll command to generate the static content and review it. In a subsequent post I’ll cover how to run this via the server to test out what the page would look like with all relative links.
[sourcecode language=”bash”]
jekyll
[/sourcecode]
…and after execution the following message will display at the command line.
[sourcecode language=”bash”]
WARNING: Could not read configuration. Using defaults (and options).
No such file or directory – /Users/adronhall/Codez/Me/_config.yml
Building site: /Users/adronhall/Codez/Me -> /Users/adronhall/Codez/Me/_site
Successfully generated site: /Users/adronhall/Codez/Me -> /Users/adronhall/Codez/Me/_site
[/sourcecode]
This warning isn’t super relevant just yet. We’ve got a basic generated jekyll site localted at /Users/adronhall/Codez/Me/_site where that path is your path to the _static directory within your git repository. Once the content is verified via the _static directory the site is ready to post.
[sourcecode language=”bash”]
git add -A
git commit -m ‘Adding the index.html and basic layouts template for a starter jekyll site.’
git push origin gh-pages
[/sourcecode]
After it pushes, it may take up to 10 minutes before it displays properly. This is likely because Github has to queue the jekyll command to run to statically generate your content for the gh-pages branch. To view the newly created site and see if the generation has occurred navigate to http://yourusername.github.io/Me/. In the case of my personal site, it’s http://adron.github.io/Me/. Also note, at this stage the page and CSS look pretty bad. But work with me here, we’re going to add elements that will align the theme with the actual project as things come together. This css page however will be a core base for everything we’ll work through.
This concludes part 1. I’ve covered created the Github Pages automatically created templates pages, how to delete those and setup a manually created jekyll site. This gives a huge amount of control to the site, to edit, add blogs or other jekyll and of course JavaScript capable site features.
In subsequent parts of this blog series I’ll cover diving into deployment to AWS (Amazon Web Services), how to setup beanstalk via AWS, setting up Riak for a data back end and how to distribute this web application and Riak to offer a massively scalable site architecture (because you never know when you’ll get slammed with page hits on your personal site righ!) Among all these massive distributed how-to topics I’ll also dive into how exactly I’ve got a template and node.js application up and running via AWS and using Riak. So lots of material and information coming in the subsequent parts of this blog series.
🙂 Please subscribe (see upper right follow link to get emails, and no, you’ll get NO spam from me, just blog entries), comment below if you have any questions & let me know if you’d like me to add in any other how-to articles. Thanks & Enjoy!
2 thoughts on “Bringing to Life an Open Source Software Project via Github & Jekyll – Part 1”
Comments are closed.