VS Code & Copilot: The Chat-First Spec Definition Method

My initial review of CoPilot and getting started is available here.

(What it does well – and why it’s not magic, but almost!)

Let me be clear: the Copilot Chat feature in VS Code can feel like a miracle until it’s not. When it’s working, you fire off a multi-line prompt defining what you want: “Build a function for X, validate Y, return Z…” and boom VS Code’s inline chat generates a draft that is scary good.

  • What actually wins: It interprets your specification in context – your open file, project imports, naming conventions – and spits out runnable sample code. That’s not trivial; reputable models often lose context threading. Here, the chat lives in your editor, not detached, and that nuance matters. It’s like sketching the spec in natural language, then having VS Code autocomplete not just code but entire behavior.
  • What you have to still do: Take a breath, a le sigh, and read it. Always. Control flow, edge cases, off-by-one errors Copilot doesn’t care. Security? Data leakage? All on you. Copilot doesn’t own the logic; it just stitches together patterns it’s seen. You own the correctness.
  • Trick that matters: Iterate. Ask follow-up: “Okay, now handle invalid inputs by throwing InvalidArgumentException,” or “Refactor this to async/await.” Having a chat continuum in the editor is powerful but don’t forget it’s your spec, not the AI’s.

Technique 2: Prompt With Skeleton First

Skip blindly describing behavior. Instead, scaffold it:

// Function: validateUserInput
// Takes { name: string, age: number }
// Returns { valid: boolean, errors: string[] }
// Edge cases: missing name, non-numeric age

function validateUserInput(input) {
  // ...
}

Then let Copilot fill in the body. Why this rocks:

  • You’re giving structure; types, return shapes, edge conditions.
  • The code auto-generated fits into your skeleton, adhering to your naming, your data model.
  • You retain control over boundaries, types, and structure even before Copilot chimes in.

Downside? If your skeleton is misleading or incomplete, Copilot will “fill in” confidently, in code that compiles but does the wrong thing. Again, your code review has to rule.

Technique 3: In-Context Refactoring Conversations (AKA “Let me fix your mess, Copilot”)

Ever accepted a Copilot suggestion, then hated it? Instead of discarding, turn on Copilot Chat:

  • Ask it: “Refactor this to reduce nesting and improve readability,” or “Convert this to use .reduce() instead of .forEach().”
  • Watch it rewrite within the same context not tangential code thrown at you.

That’s one of its massive values – context-aware surgical refactoring – not blanket “clean this up” that ends in a different variable naming scheme or method order from your repo.

The catch: refactor prompts depend on Copilot’s parsing of your style. If your code is sloppy, it’s going to be sloppily refactored. So yes you still have to keep code clean, comment clearly, and limit complexity. Copilot is the editor version of duct tape not a refactor wizard.

The Brutal Truth

  • VS Code + Copilot isn’t a magical co-developer. It’s a smart auto-completer with chat, living in your IDE, context-aware but utterly obedient to your prompts.
  • The trick is not the AI it’s how you lead it. The better your spec, skeleton, or prompt, the better your code.
  • Your style skeptical, questioning, pragmatic fits perfectly. You don’t let it ride; you interrogate. And that’s exactly how it should be.

TL;DR Summary

Technique What Works What Fails Without You
Chat-first spec Detailed natural-language spec → meaningful code No spec clarity → garbage logic
Skeleton prompts Provides structure, types, expectations Bad skeleton = bad code, fast
In-editor refactoring chat Context-preserving improvements Messy code → messy refactor

If you want more details on how you integrate Copilot into CI, or your personal prompt templates drop me the demand below, and I’ll tackle it head-on next time.

GitHub Copilot: A Getting Started Guide to GitHub Copilot

Note: I’ve decided to start writing up the multitude of AI tools/tooling and this is the first of many posts on this topic. This post is effectively a baseline of what one should be familiar with to get rolling with Github Copilot. As I add posts, I’ll add them at the bottom of this post to reference the different tools, as well as back reference them to this post, etc, so that they’re all easily findable. With that, let’s roll…

Intro

GitHub Copilot is thoroughly changing how developers write code, serving as a kind of industry standard – almost – for AI-powered code completion and generation. As someone who’s been in software development for over two decades, I’ve seen many tools come and go, but the modern variant of Copilot represents a fundamental shift in how we approach coding – it’s not just a tool, it’s a new paradigm for human-AI collaboration in software development.

In this comprehensive guide, I’ll walk you through everything you need to know to get started with GitHub Copilot, from basic setup to advanced features that will transform your development workflow.

What is GitHub Copilot?

GitHub Copilot is an AI-powered code completion tool that acts as your virtual pair programmer. It’s built on OpenAI’s Codex model and trained on billions of lines of public code, making it incredibly adept at understanding context, suggesting completions, and even generating entire functions based on your comments and existing code.

Key Capabilities

  • Real-time code suggestions as you type
  • Comment-to-code generation from natural language descriptions
  • Multi-language support across 50+ programming languages
  • Context-aware completions that understand your project structure
  • IDE integration with VS Code, Visual Studio, Neovim, and JetBrains IDEs

Getting Started: Setup and Installation

Prerequisites

Installation Steps

1. Subscribe to GitHub Copilot

2. Install the Extension

  • VS Code: Search for “GitHub Copilot” in the Extensions marketplace
  • Visual Studio: Install from Visual Studio Marketplace
  • JetBrains IDEs: Install from JetBrains Marketplace
  • Neovim: Use copilot.vim or copilot.lua

3. Authenticate

  • Sign in to your GitHub account when prompted
  • Authorize the extension to access your account
  • Verify your Copilot subscription is active
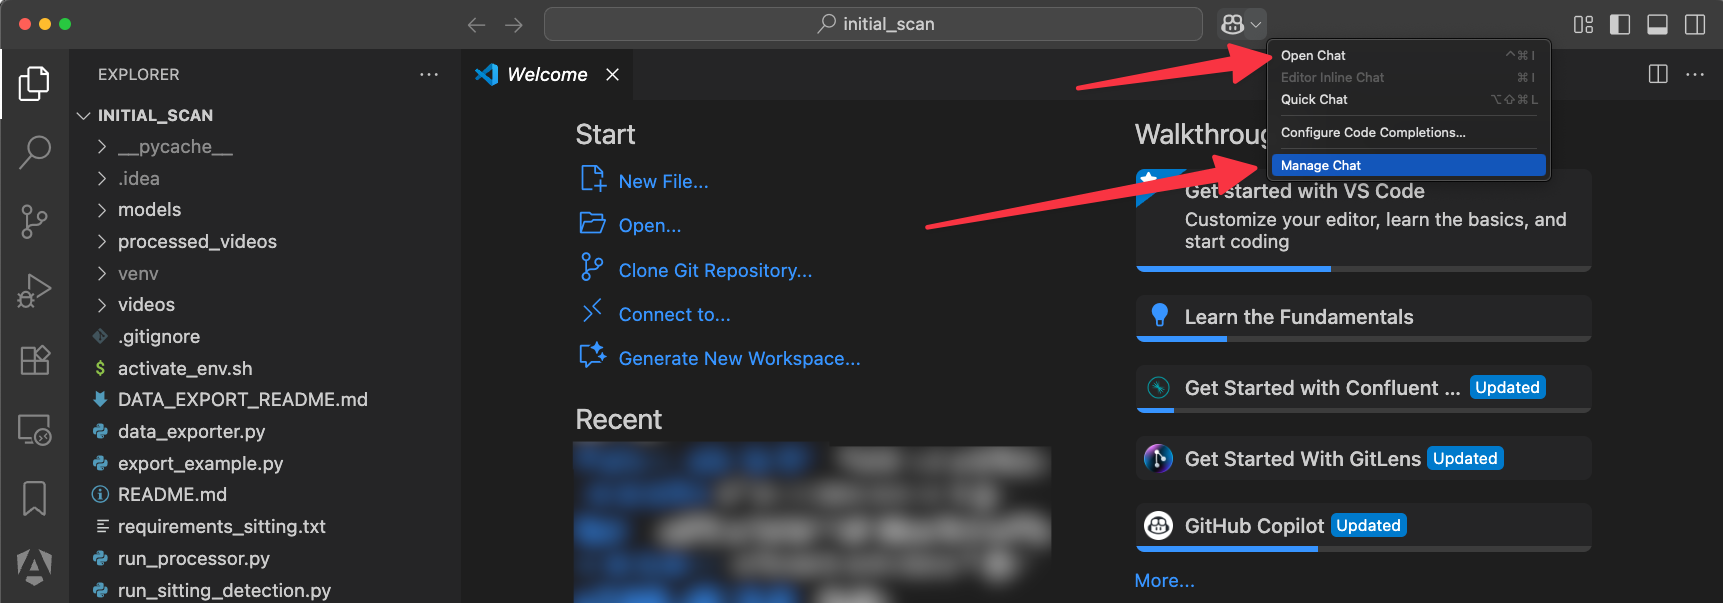
Screenshot of Visual Studio Code showing the welcome interface, including options for opening chat features, managing code completions, and accessing recent projects.

Core Features and How to Use Them

1. Inline Suggestions

Copilot provides real-time code suggestions as you type. These appear as gray text that you can accept by pressing Tab or Enter.

# Type this comment and Copilot will suggest the function
def calculate_compound_interest(principal, rate, time, compounds_per_year):
    # Copilot will suggest the complete implementation

2. Comment-to-Code Generation

One of Copilot’s most powerful features is generating code from natural language comments.

// Create a function that validates email addresses using regex
// Copilot will generate the complete function with proper validation

3. Function Completion

Start typing a function and let Copilot complete it based on context:

def process_user_data(user_input):
    # Start typing and Copilot will suggest the next lines
    if not user_input:
        return None

    # Continue with the implementation

4. Test Generation

Copilot can generate test cases for your functions:

def add_numbers(a, b):
    return a + b

# Type "test" or "def test_" and Copilot will suggest test functions

Advanced Features and Techniques

1. Multi-line Completions

Press Tab to accept suggestions line by line, or use Alt + ] to accept multiple lines at once.

2. Alternative Suggestions

When Copilot suggests code, press Alt + [ or Alt + ] to cycle through alternative suggestions.

3. Inline Chat (Copilot Chat)

The newer Copilot Chat feature allows you to have conversations about your code:

  • Press Ctrl + I (or Cmd + I on Mac) to open inline chat
  • Ask questions about your code
  • Request refactoring suggestions
  • Get explanations of complex code sections

4. Custom Prompts

Learn to write effective prompts for better code generation:

Good prompts:

# Create a REST API endpoint that accepts POST requests with JSON data,
# validates the input, and returns a success response with status code 201

Less effective prompts:

# Make an API endpoint

Best Practices for Effective Copilot Usage

1. Write Clear Comments

The quality of Copilot’s suggestions directly correlates with the clarity of your comments and context.

# Good: Clear, specific description
def parse_csv_file(file_path, delimiter=',', skip_header=True):
    """
    Parse a CSV file and return a list of dictionaries.

    Args:
        file_path (str): Path to the CSV file
        delimiter (str): Character used to separate fields
        skip_header (bool): Whether to skip the first row as header

    Returns:
        list: List of dictionaries where keys are column names
    """

2. Provide Context

Help Copilot understand your project structure and coding style:

# This function follows the project's error handling pattern
# and uses the standard logging configuration
def process_payment(payment_data):

3. Review Generated Code

Always review and test code generated by Copilot:

  • Check for security vulnerabilities
  • Ensure it follows your project’s coding standards
  • Verify the logic matches your requirements
  • Run tests to confirm functionality

4. Iterative Refinement

Use Copilot as a starting point, then refine the code:

  • Accept the initial suggestion
  • Modify it to match your specific needs
  • Ask Copilot to improve specific aspects
  • Iterate until you have the desired result

Language-Specific Tips

Python

  • Copilot excels at Python due to its extensive training data
  • Great for data science, web development, and automation scripts
  • Excellent at generating docstrings and type hints

JavaScript/TypeScript

  • Strong support for modern ES6+ features
  • Good at React, Node.js, and frontend development patterns
  • Effective at generating test files and API clients

Java

  • Good support for Spring Boot and enterprise patterns
  • Effective at generating boilerplate code and tests
  • Strong understanding of Java conventions

Go

  • Growing support with good understanding of Go idioms
  • Effective at generating HTTP handlers and data structures
  • Good at following Go best practices

Troubleshooting Common Issues

1. Suggestions Not Appearing

  • Verify your Copilot subscription is active
  • Check that you’re signed into the correct GitHub account
  • Restart your IDE after authentication
  • Ensure the extension is properly installed and enabled

2. Poor Quality Suggestions

  • Improve your comments and context
  • Check that your file has the correct language extension
  • Provide more context about your project structure
  • Use more specific prompts

3. Performance Issues

  • Disable other AI coding extensions that might conflict
  • Check your internet connection (Copilot requires online access)
  • Restart your IDE if suggestions become slow
  • Update to the latest version of the extension

4. Security Concerns

  • Never paste sensitive data or credentials into Copilot
  • Review generated code for security vulnerabilities
  • Use Copilot in private repositories when possible
  • Be cautious with code that handles user input or authentication

Integration with Development Workflows

1. Pair Programming

Copilot can act as a third member of your pair programming session:

  • Generate alternative implementations for discussion
  • Create test cases to explore edge cases
  • Suggest refactoring opportunities
  • Help with debugging by generating test scenarios

2. Code Review

Use Copilot to enhance your code review process:

  • Generate additional test cases
  • Suggest alternative implementations
  • Identify potential improvements
  • Create documentation for complex functions

3. Learning and Exploration

Copilot is excellent for learning new technologies:

  • Generate examples of new language features
  • Create sample projects to explore frameworks
  • Build reference implementations
  • Practice with different coding patterns

Enterprise and Team Features

1. GitHub Copilot Business

  • Cost: $19/user/month
  • Features: Advanced security, compliance, and team management
  • Use Cases: Enterprise development teams, compliance requirements

2. GitHub Copilot Enterprise

  • Cost: Custom pricing
  • Features: Advanced security, custom models, dedicated support
  • Use Cases: Large enterprises, government, highly regulated industries

3. Team Management

  • Centralized billing and user management
  • Usage analytics and reporting
  • Security and compliance features
  • Integration with enterprise identity providers

Resources and Further Learning

Official Resources

Third-Party Tutorials and Guides

Advanced Techniques and Pro Tips

1. Custom Snippets and Templates

Create custom snippets that work well with Copilot:

// VS Code snippets.json
{
  "API Endpoint": {
    "prefix": "api-endpoint",
    "body": [
      "app.post('/${1:endpoint}', async (req, res) => {",
      "  try {",
      "    const { ${2:params} } = req.body;",
      "    ${3:// Copilot will suggest validation and processing logic}",
      "    res.status(201).json({ success: true, data: result });",
      "  } catch (error) {",
      "    res.status(500).json({ success: false, error: error.message });",
      "  }",
      "});"
    ]
  }
}

2. Context-Aware Prompts

Learn to write prompts that leverage your project’s context:

# This function should follow the same pattern as the other API functions
# in this file, using the shared error handling and response formatting
def get_user_profile(user_id):

3. Testing Strategies

Use Copilot to generate comprehensive test suites:

# Generate tests that cover edge cases, error conditions, and normal operation
# Use the same testing patterns as the existing test files in this project
def test_user_authentication():

4. Documentation Generation

Let Copilot help with documentation:

# Generate comprehensive docstring following Google style
# Include examples, parameter descriptions, and return value details
def process_payment(payment_data, user_id, options=None):

Security and Privacy Considerations

1. Data Privacy

  • Copilot processes your code to provide suggestions
  • Avoid pasting sensitive information, credentials, or proprietary code
  • Use private repositories when working with confidential code
  • Review GitHub’s privacy policy and data handling practices

2. Code Security

  • Generated code may contain security vulnerabilities
  • Always review and test generated code
  • Use security scanning tools to identify potential issues
  • Follow security best practices for your specific domain

3. Compliance Requirements

  • Consider compliance requirements for your industry
  • Evaluate whether Copilot meets your security standards
    • Will the data going out and back be ok with the org?
    • Do additional SLAs or other requirements need put in place?
  • Consult with your security team before adoption
    • That in and out, being it is a service, could pose a significant number of risks for any org.
  • Document usage policies and guidelines

Performance Optimization

1. IDE Configuration

Optimize your IDE for better Copilot performance:

// VS Code settings.json
{
  "github.copilot.enable": {
    "*": true,
    "plaintext": false,
    "markdown": false,
    "scminput": false
  },
  "github.copilot.suggestions": {
    "enable": true,
    "showInlineSuggestions": true
  }
}

2. Network Optimization

  • Ensure stable internet connection
  • Use VPN if required by your organization
  • Consider enterprise deployment for better performance
  • Monitor network usage and optimize as needed

3. Resource Management

  • Disable other AI coding extensions
  • Monitor memory and CPU usage
  • Restart IDE periodically if performance degrades (?? I’ve seen this suggestion multiple places and it bothers me immensely)
  • Update extensions and IDE regularly

Conclusion

GitHub Copilot represents a fundamental shift in software development, moving us from manual coding to AI-assisted development. While it’s not a replacement for understanding programming fundamentals, it’s a powerful tool that can significantly enhance your productivity and code quality.

The key to success with Copilot is learning to work with it effectively writing clear prompts, providing good context, and always reviewing generated code. Start with the basics, practice regularly, and gradually incorporate more advanced features into your workflow.

As we move forward in this AI-augmented development era, developers who can effectively collaborate with AI tools like Copilot will have a significant advantage. The future of programming isn’t about replacing developers – albeit a whole lot of that might be happening right now – it’s more about augmenting their capabilities and enabling them to focus on higher-level problem solving and innovation.

Next Steps

  1. Set up your GitHub Copilot subscription and install the extension
  2. Practice with simple projects to get comfortable with the workflow
  3. Experiment with different prompting techniques to improve suggestion quality
  4. Integrate Copilot into your daily development routine
  5. Share your experiences and learn from the community

Remember, mastery of AI programming tools like GitHub Copilot is a journey, not a destination. Start today, practice consistently, and you’ll be amazed at how quickly it transforms your development experience.

Next up, more on getting started with the various tools and the baseline knowledge you should have around each.

Follow me on LinkedIn, Mastadon, or Blue Sky for more insights on AI programming and software development.

Personal Observations about The Principal Engineer in The Agentic Era

Context: What is a Principal Engineer?

A Principal Engineer is a senior software engineer who is responsible for the design and implementation of the company’s software architecture. They are also responsible for the technical direction of the company, or the team(s) they work with and the development of the company’s (or team(s)) software engineers.

Context: What is the Agentic Era?

The Agentic Era is a new era of software development where software is built by agents. Agents are software that can learn, reason, and act (to a degree). They are able to perform tasks autonomously (theoretically) and are able to learn from their environment.

Where I Am

Over the course of the last few years, we have seen the rise of AI agents. These agents are able to perform tasks autonomously and are able to learn from their environment. They are able to perform tasks that are typically performed by humans, such as coding, design, and problem solving. This of course, has dramatically changed the way we build software already.

What I’ve written here so far is an observation of the reality we live in. I’m not trying to make a judgement call or say agentic tooling is good or bad, just merely setting the baseline of where we are. Whether you love AI Tooling or hate it or are indifferent to it, it’s here. No matter how much we discover it makes you stupid and lazy over time or other horrid things, the reality is that it is here and it is causing significant changes.

My Observations & Experience as a Principal Engineer

My experience so far, as a principal engineer – or one who does the work of a principal engineer – regardless of role. Is that I’ve started doing more debuging, troubleshooting, and problem solving than any actual coding. Not to say I am not coding, I’m doing a ton of that, but just as much I need to bring my experience and knowledge into play to ensure the debugging, troubleshooting, and problems solving gets answers in a timely way. However, I have agentic systems build things for me that previously I’d have hired junior or mid level engineers to do. But the core of what a princpal engineer does is almost the same as it was 5 or 10 years ago, it just involves agentic systems taking care of probably 50% of the code I’d have hired juniors or mid-level engineers to knock out, that work is gone.

What does this change mean overall? My personal experience lately comes down to two specific things.

  1. We are now able to build software faster and cheaper than the before era. Cheaper also meaning with less staff for longer stretches of time.
  2. We are now able to build software that is more complex and more intelligent at a rate we couldn’t before.

Does it just help with these? No. Agentic systems can help us in many other ways too, this is just the specific two things I’ve seen occur. Let me dig into this more deeply.

One Scenario

In one scenario I was in, working on some project work I found the team used the tooling to effectively identify, debug, and resolve issues at a dramatically faster pace than these issues could have been dealt with before. The solutions were also more robust because of the skill and knowledge of the developers using the AI tooling. If it had been less experienced developers this could have created a catastrophic development debt that wouldn’t be recoverable from.

Which leads presciently into the next scenario.

Another Scenario

In another scenario I found myself in, as an observer, it wasn’t the particular project I was working on. I watched as a team started to build a greenfield project. In most scenarios you would think, if familiar with agentic coding, that this is the perfect scenario for agentic coding. However this team lacked the experience with the stack and the domain. They then found themselves building out a prototype, trying to take that and continue with it as a deployed production system. Not an entirely odd or shocking scenario.

But with the use of the agentic systems, skipping over key learning moments and not knowing the system they had built put the team in an unprepared situation upon the first issues that came up. Within weeks of deployment they realized their lack of familiarity with what they built had effectively made them unable to troubleshoot problems effectively.

It was literally the opposite of the first scenario. This scenario quickly became catastrophic and the project got abandoned, somewhat unceremoniously, and the team didn’t particularly learn good lessons from the experience. Sadly, since it should have been obvious what the overall issue was, it seemed to be more blamed on the agentic tooling. The fact is, the team should have realized they need to spend substantial time ensuring they read the generated docs, the generated code, and understood what they’d built. Instead the assumption was the agentic system would be able to keep up with all those aspects.

In the end, it failed.

In Closing, Observations at This Point in Time

First observation among everything is that agentic tooling when used effectively is a massive game changer. A Principal Engineer, setting precedent and direction, with 1-2 teams can easily take on what 2-4 teams could do previously. But the key to it is effective use and more experienced engineers (i.e. Principal and a few seniors sprinkled in) that can ensure bugs don’t become roadblocks, and that the agentic tooling is being wielded properly.

The second bit observation is that if a team isn’t going to use agentic tooling effectively, it’s going to be a massive detriment to the team. It’s going to slow down the team, it’s going to create a lot of technical debt, and very likely it could derail the project to the point of failure.

For now, that’s just a few of my many observations. More to come and maybe some paired agentic code slinging! In the meantime, happy thrashing code.

Go Concurrency Patterns(Resource Pooling Pattern)

Overview

The Resource Pooling pattern manages a pool of reusable resources (like database connections, HTTP clients, or file handles) to avoid the overhead of creating and destroying resources frequently. This pattern is essential for improving performance, managing resource limits, reducing overhead, and ensuring efficient resource utilization.

NOTE: For other posts on concurrency patterns, check out the index post to this series of concurrency patterns.

Implementation Details

Structure

The resource pooling implementation in examples/resource_pooling.go demonstrates two main examples:

  1. Database Connection Pool – Manages database connections with health checks
  2. HTTP Client Pool – Manages HTTP clients for making requests

Code Analysis

Let’s break down the main function and understand how each component works:

func RunResourcePooling() {
    // Example 1: Database connection pool
    fmt.Println("1. Database Connection Pool Example:")
    dbPool := newDBConnectionPool(3, 5*time.Second)
    defer dbPool.Close()

    var wg sync.WaitGroup
    for i := 1; i <= 5; i++ {
        wg.Add(1)
        go func(id int) {
            defer wg.Done()
            conn := dbPool.Get()
            defer dbPool.Put(conn)

            fmt.Printf("Worker %d: Using connection %s\n", id, conn.ID)
            time.Sleep(time.Duration(rand.Intn(1000)+500) * time.Millisecond)
        }(i)
    }
    wg.Wait()

    // Example 2: HTTP client pool
    fmt.Println("\n2. HTTP Client Pool Example:")
    clientPool := newHTTPClientPool(2, 3*time.Second)
    defer clientPool.Close()

    for i := 1; i <= 4; i++ {
        wg.Add(1)
        go func(id int) {
            defer wg.Done()
            client := clientPool.Get()
            defer clientPool.Put(client)

            fmt.Printf("Worker %d: Using HTTP client %s\n", id, client.ID)
            time.Sleep(time.Duration(rand.Intn(800)+300) * time.Millisecond)
        }(i)
    }
    wg.Wait()
}

Step-by-step breakdown:

  1. Database Connection Pool Setup:
    • dbPool := newDBConnectionPool(3, 5*time.Second) creates a pool with 3 connections and 5-second timeout
    • Pool size of 3 means only 3 workers can use connections simultaneously
    • 5-second timeout prevents workers from waiting indefinitely for connections
    • defer dbPool.Close() ensures proper cleanup when the function exits
  2. Database Pool Worker Launch:
    • var wg sync.WaitGroup tracks when all database workers complete
    • for i := 1; i <= 5; i++ launches 5 workers (more than pool size to demonstrate pooling)
    • Uses closure func(id int) { ... }(i) to capture the worker ID
    • wg.Add(1) increments the wait group before each worker
  3. Database Pool Worker Implementation:
    • defer wg.Done() ensures the worker signals completion when it exits
    • conn := dbPool.Get() acquires a connection from the pool (may block if none available)
    • defer dbPool.Put(conn) ensures the connection is returned to the pool
    • time.Sleep(time.Duration(rand.Intn(1000)+500) * time.Millisecond) simulates database work (500-1500ms)
  4. Database Pool Coordination:
    • wg.Wait() waits for all database workers to complete
    • Only 3 workers can use connections simultaneously due to pool size
    • Other workers will wait for connections to become available
  5. HTTP Client Pool Setup:
    • clientPool := newHTTPClientPool(2, 3*time.Second) creates a pool with 2 clients and 3-second timeout
    • Smaller pool size (2) demonstrates different resource constraints
    • Shorter timeout (3 seconds) shows different timeout requirements
    • defer clientPool.Close() ensures proper cleanup
  6. HTTP Client Pool Worker Launch:
    • for i := 1; i <= 4; i++ launches 4 workers (more than pool size)
    • Similar structure to database workers but with different resource type
    • wg.Add(1) tracks each HTTP client worker
  7. HTTP Client Pool Worker Implementation:
    • defer wg.Done() ensures proper cleanup
    • client := clientPool.Get() acquires an HTTP client from the pool
    • defer clientPool.Put(client) ensures the client is returned to the pool
    • time.Sleep(time.Duration(rand.Intn(800)+300) * time.Millisecond) simulates HTTP work (300-1100ms)
  8. HTTP Client Pool Coordination:
    • wg.Wait() waits for all HTTP client workers to complete
    • Only 2 workers can use clients simultaneously due to pool size
    • Demonstrates how pooling handles resource constraints

Database Connection Pool Implementation

type DBConnection struct {
    ID        string
    CreatedAt time.Time
    LastUsed  time.Time
}

type DBConnectionPool struct {
    connections chan *DBConnection
    maxSize     int
    timeout     time.Duration
    closed      bool
    mu          sync.Mutex
}

func newDBConnectionPool(maxSize int, timeout time.Duration) *DBConnectionPool {
    pool := &DBConnectionPool{
        connections: make(chan *DBConnection, maxSize),
        maxSize:     maxSize,
        timeout:     timeout,
    }

    // Pre-populate the pool
    for i := 0; i < maxSize; i++ {
        conn := &DBConnection{
            ID:        fmt.Sprintf("db-conn-%d", i+1),
            CreatedAt: time.Now(),
            LastUsed:  time.Now(),
        }
        pool.connections <- conn
    }

    return pool
}

func (p *DBConnectionPool) Get() *DBConnection {
    select {
    case conn := <-p.connections:
        conn.LastUsed = time.Now()
        fmt.Printf("  Acquired connection: %s\n", conn.ID)
        return conn
    case <-time.After(p.timeout):
        fmt.Println("  Timeout waiting for connection")
        return nil
    }
}

func (p *DBConnectionPool) Put(conn *DBConnection) {
    if conn == nil {
        return
    }

    p.mu.Lock()
    defer p.mu.Unlock()

    if p.closed {
        return
    }

    // Check if connection is still healthy
    if time.Since(conn.LastUsed) > p.timeout {
        fmt.Printf("  Discarding stale connection: %s\n", conn.ID)
        return
    }

    select {
    case p.connections <- conn:
        fmt.Printf("  Returned connection: %s\n", conn.ID)
    default:
        fmt.Printf("  Pool full, discarding connection: %s\n", conn.ID)
    }
}

func (p *DBConnectionPool) Close() {
    p.mu.Lock()
    defer p.mu.Unlock()
    p.closed = true
    close(p.connections)
}

Database connection pool breakdown:

  1. Connection Structure Design:
    • DBConnection struct represents a database connection
    • ID string provides unique identification for tracking and debugging
    • CreatedAt time.Time tracks when the connection was created
    • LastUsed time.Time tracks when the connection was last used for health checking
  2. Pool Structure Design:
    • DBConnectionPool struct manages the connection pool
    • connections chan *DBConnection uses a buffered channel for thread-safe resource management
    • maxSize int defines the maximum number of connections in the pool
    • timeout time.Duration defines the timeout for connection acquisition
    • closed bool tracks pool state for graceful shutdown
    • mu sync.Mutex protects pool state during concurrent operations
  3. Pool Constructor:
    • newDBConnectionPool(maxSize int, timeout time.Duration) creates a new pool
    • connections: make(chan *DBConnection, maxSize) creates a buffered channel with pool size
    • The channel buffer size matches the pool size for optimal performance
  4. Pool Pre-population:
    • for i := 0; i < maxSize; i++ creates the initial set of connections
    • conn := &DBConnection{...} creates each connection with unique ID and timestamps
    • pool.connections <- conn adds each connection to the pool
    • Pre-population ensures connections are immediately available
  5. Connection Acquisition (Get Method):
    • select statement handles both connection acquisition and timeout
    • case conn := <-p.connections: acquires a connection from the pool
    • conn.LastUsed = time.Now() updates the last used timestamp
    • case <-time.After(p.timeout): handles timeout when no connections are available
    • Returns nil on timeout to indicate failure
  6. Connection Return (Put Method):
    • if conn == nil { return } handles nil connections gracefully
    • p.mu.Lock() and defer p.mu.Unlock() protect pool state during return
    • if p.closed { return } prevents returning connections to a closed pool
  7. Health Checking:
    • if time.Since(conn.LastUsed) > p.timeout checks if connection is stale
    • Stale connections are discarded rather than returned to the pool
    • This ensures only healthy connections are reused
  8. Connection Return Logic:
    • select { case p.connections <- conn: ... default: ... } attempts to return connection
    • If pool is full, connection is discarded (default case)
    • This prevents pool overflow and memory leaks
  9. Pool Cleanup (Close Method):
    • p.mu.Lock() and defer p.mu.Unlock() protect pool state during shutdown
    • p.closed = true marks the pool as closed
    • close(p.connections) closes the channel to signal shutdown

HTTP Client Pool Implementation

type HTTPClient struct {
    ID        string
    CreatedAt time.Time
    LastUsed  time.Time
}

type HTTPClientPool struct {
    clients chan *HTTPClient
    maxSize int
    timeout time.Duration
    closed  bool
    mu      sync.Mutex
}

func newHTTPClientPool(maxSize int, timeout time.Duration) *HTTPClientPool {
    pool := &HTTPClientPool{
        clients: make(chan *HTTPClient, maxSize),
        maxSize: maxSize,
        timeout: timeout,
    }

    // Pre-populate the pool
    for i := 0; i < maxSize; i++ {
        client := &HTTPClient{
            ID:        fmt.Sprintf("http-client-%d", i+1),
            CreatedAt: time.Now(),
            LastUsed:  time.Now(),
        }
        pool.clients <- client
    }

    return pool
}

func (p *HTTPClientPool) Get() *HTTPClient {
    select {
    case client := <-p.clients:
        client.LastUsed = time.Now()
        fmt.Printf("  Acquired HTTP client: %s\n", client.ID)
        return client
    case <-time.After(p.timeout):
        fmt.Println("  Timeout waiting for HTTP client")
        return nil
    }
}

func (p *HTTPClientPool) Put(client *HTTPClient) {
    if client == nil {
        return
    }

    p.mu.Lock()
    defer p.mu.Unlock()

    if p.closed {
        return
    }

    // Check if client is still healthy
    if time.Since(client.LastUsed) > p.timeout {
        fmt.Printf("  Discarding stale HTTP client: %s\n", client.ID)
        return
    }

    select {
    case p.clients <- client:
        fmt.Printf("  Returned HTTP client: %s\n", client.ID)
    default:
        fmt.Printf("  Pool full, discarding HTTP client: %s\n", client.ID)
    }
}

func (p *HTTPClientPool) Close() {
    p.mu.Lock()
    defer p.mu.Unlock()
    p.closed = true
    close(p.clients)
}

HTTP client pool breakdown:

  1. Client Structure Design:
    • HTTPClient struct represents an HTTP client
    • Similar structure to database connections for consistency
    • ID string provides unique identification
    • CreatedAt and LastUsed timestamps for lifecycle tracking
  2. Pool Structure Design:
    • HTTPClientPool struct manages the HTTP client pool
    • Identical structure to database pool for consistency
    • Uses the same channel-based approach for resource management
  3. Pool Constructor and Pre-population:
    • newHTTPClientPool(maxSize int, timeout time.Duration) creates the pool
    • Pre-populates with maxSize HTTP clients
    • Each client gets a unique ID and initial timestamps
  4. Client Acquisition and Return:
    • Get() method identical to database pool with timeout handling
    • Put() method includes health checking and graceful handling
    • Same mutex protection and closed pool handling
  5. Health Checking and Cleanup:
    • Same health checking logic as database pool
    • Stale clients are discarded to maintain pool health
    • Close() method provides graceful shutdown

Key Design Patterns:

  1. Channel-based Resource Management: Uses buffered channels for thread-safe resource allocation and return.
  2. Pre-populated Pools: Creates all resources upfront for immediate availability and predictable performance.
  3. Health Checking: Validates resource health before reuse to ensure reliability.
  4. Timeout Handling: Prevents indefinite waiting with configurable timeouts.
  5. Graceful Shutdown: Proper cleanup prevents resource leaks during shutdown.
  6. Mutex Protection: Thread-safe state management for pool operations.
  7. Resource Tracking: Comprehensive tracking of resource lifecycle for monitoring and debugging.

How It Works

Database Connection Pool

  1. Pool Initialization: Creates a pool with pre-populated database connections
  2. Connection Acquisition: Workers request connections from the pool
  3. Connection Usage: Workers use connections for database operations
  4. Connection Return: Workers return connections to the pool when done
  5. Health Checking: Pool checks connection health and discards stale connections
  6. Resource Management: Pool manages connection lifecycle and cleanup

HTTP Client Pool

  1. Pool Initialization: Creates a pool with pre-populated HTTP clients
  2. Client Acquisition: Workers request HTTP clients from the pool
  3. Client Usage: Workers use clients for HTTP requests
  4. Client Return: Workers return clients to the pool when done
  5. Health Checking: Pool checks client health and discards stale clients
  6. Resource Management: Pool manages client lifecycle and cleanup

Why This Implementation?

Channel-based Pool Management

  • Thread Safety: Channels provide natural thread safety for pool operations
  • Blocking Semantics: Workers block when no resources are available
  • FIFO Order: Resources are distributed in first-in-first-out order
  • Simple Implementation: Straightforward resource management

Pre-populated Pools

  • Fast Startup: Resources are available immediately
  • Predictable Performance: No delay for resource creation
  • Resource Efficiency: Optimal resource utilization from start
  • Warm-up Avoidance: No cold start performance issues

Health Checking

  • Resource Validation: Ensures resources are still usable
  • Stale Detection: Detects and removes stale resources
  • Automatic Cleanup: Automatically manages resource lifecycle
  • Reliability: Ensures only healthy resources are used

Timeout Handling

  • Deadlock Prevention: Prevents workers from waiting indefinitely
  • Graceful Degradation: Handles resource exhaustion gracefully
  • User Experience: Provides feedback when resources are unavailable
  • System Stability: Prevents system-wide resource starvation

Mutex Protection

  • Thread Safety: Protects pool state during concurrent operations
  • Cleanup Coordination: Ensures proper cleanup during shutdown
  • State Consistency: Maintains consistent pool state
  • Resource Safety: Prevents resource leaks during shutdown

Key Design Decisions

  1. Two Different Pools: Demonstrates the pattern with different resource types
  2. Health Checking: Implements resource health validation
  3. Timeout Handling: Provides timeout mechanisms for resource acquisition
  4. Graceful Shutdown: Implements proper cleanup and shutdown
  5. Resource Tracking: Tracks resource usage and health metrics

Performance Characteristics

Throughput

  • Resource Reuse: Eliminates resource creation/destruction overhead
  • Connection Pooling: Reduces connection establishment time
  • Parallel Processing: Multiple workers can use resources concurrently
  • Efficient Allocation: Fast resource allocation from pool

Latency

  • Immediate Availability: Pre-populated resources are immediately available
  • Reduced Overhead: No resource creation overhead for each request
  • Predictable Performance: Consistent latency regardless of load
  • Connection Reuse: Reuses existing connections for better performance

Resource Usage

  • Controlled Memory: Fixed memory usage regardless of load
  • Efficient Utilization: Resources are used efficiently across workers
  • Automatic Cleanup: Stale resources are automatically removed
  • Scalability: Pool size can be tuned for optimal performance

Common Use Cases

Database Operations

  • Connection Pooling: Manage database connections efficiently
  • Query Optimization: Reuse connections for multiple queries
  • Connection Limits: Respect database connection limits
  • Health Monitoring: Monitor connection health and performance

HTTP Operations

  • HTTP Client Pooling: Reuse HTTP clients for multiple requests
  • API Calls: Efficiently manage API client connections
  • Load Balancing: Distribute requests across multiple clients
  • Connection Management: Handle connection limits and timeouts

File Operations

  • File Handle Pooling: Manage file handles efficiently
  • I/O Operations: Reuse file handles for multiple operations
  • Resource Limits: Respect system file handle limits
  • Performance Optimization: Reduce file open/close overhead

Network Operations

  • Socket Pooling: Manage network socket connections
  • Protocol Handlers: Reuse protocol handlers for multiple connections
  • Connection Limits: Handle connection limits and timeouts
  • Load Distribution: Distribute load across multiple connections

Memory Management

  • Object Pooling: Reuse expensive objects
  • Buffer Pooling: Manage memory buffers efficiently
  • Allocation Optimization: Reduce memory allocation overhead
  • Garbage Collection: Minimize garbage collection pressure

Thread Management

  • Thread Pooling: Manage worker threads efficiently
  • Task Distribution: Distribute tasks across worker threads
  • Resource Limits: Control thread usage and limits
  • Performance Optimization: Optimize thread creation/destruction

Advanced Patterns

Dynamic Pool Sizing

  • Adaptive Sizing: Adjust pool size based on load
  • Auto-scaling: Automatically scale pool size up or down
  • Load-based Allocation: Allocate resources based on current load
  • Performance Monitoring: Monitor and adjust based on performance metrics

Resource Health Monitoring

  • Health Checks: Regular health checks for pooled resources
  • Failure Detection: Detect and remove failed resources
  • Recovery Mechanisms: Implement recovery for failed resources
  • Metrics Collection: Collect health and performance metrics

Priority-based Pooling

  • Priority Queues: Prioritize resource allocation
  • Fair Distribution: Ensure fair resource distribution
  • Resource Reservation: Reserve resources for high-priority operations
  • Load Balancing: Balance load across different priority levels

Distributed Pooling

  • Multi-node Pools: Coordinate pools across multiple nodes
  • Shared Resources: Share resources across multiple nodes
  • Load Distribution: Distribute load across multiple pools
  • Fault Tolerance: Handle node failures gracefully

Best Practices

Pool Configuration

  • Appropriate Size: Set pool size based on system capacity and requirements
  • Timeout Values: Set appropriate timeouts for resource acquisition
  • Health Check Intervals: Regular health checks for resource validation
  • Monitoring: Monitor pool usage and performance metrics

Resource Management

  • Proper Cleanup: Ensure resources are properly cleaned up
  • Leak Prevention: Prevent resource leaks through proper management
  • Health Monitoring: Monitor resource health and performance
  • Error Handling: Handle resource failures gracefully

Performance Optimization

  • Pool Sizing: Optimize pool size for your workload
  • Resource Reuse: Maximize resource reuse for better performance
  • Connection Limits: Respect system and service connection limits
  • Load Testing: Test pool performance under various loads

Monitoring and Alerting

  • Pool Metrics: Track pool usage, health, and performance
  • Resource Metrics: Monitor individual resource health and performance
  • Alerting: Alert on pool exhaustion or resource failures
  • Capacity Planning: Use metrics for capacity planning

The resource pooling pattern is particularly effective when you have:

  • Expensive Resources: Resources that are costly to create and destroy
  • Resource Limits: Limited resources that need efficient management
  • High Concurrency: Multiple concurrent operations that need resources
  • Performance Requirements: Need for optimal performance and resource utilization
  • Resource Constraints: Limited system resources that need careful management

This pattern provides essential tools for building efficient, scalable systems that can handle high concurrency while optimizing resource usage and improving performance.

The final example implementation looks like this:

package examples

import (
	"fmt"
	"math/rand"
	"sync"
	"time"
)

// RunResourcePooling demonstrates the resource pooling pattern.
func RunResourcePooling() {
	fmt.Println("=== Resource Pooling Pattern Example ===")

	// Example 1: Database Connection Pool
	fmt.Println("\n1. Database Connection Pool Example:")
	dbPool := newDBConnectionPool(3, 5)

	var wg sync.WaitGroup
	for i := 1; i <= 8; i++ {
		wg.Add(1)
		go func(id int) {
			defer wg.Done()
			conn := dbPool.getConnection()
			fmt.Printf("Worker %d: Got DB connection %d\n", id, conn.id)

			// Simulate database operation
			time.Sleep(time.Duration(rand.Intn(500)+200) * time.Millisecond)
			fmt.Printf("Worker %d: Executing query on connection %d\n", id, conn.id)

			dbPool.releaseConnection(conn)
			fmt.Printf("Worker %d: Released DB connection %d\n", id, conn.id)
		}(i)
	}
	wg.Wait()
	dbPool.close()

	// Example 2: HTTP Client Pool
	fmt.Println("\n2. HTTP Client Pool Example:")
	clientPool := newHTTPClientPool(2, 4)

	for i := 1; i <= 6; i++ {
		wg.Add(1)
		go func(id int) {
			defer wg.Done()
			client := clientPool.getClient()
			fmt.Printf("Worker %d: Got HTTP client %d\n", id, client.id)

			// Simulate API request
			time.Sleep(time.Duration(rand.Intn(300)+100) * time.Millisecond)
			fmt.Printf("Worker %d: Making API request with client %d\n", id, client.id)

			clientPool.releaseClient(client)
			fmt.Printf("Worker %d: Released HTTP client %d\n", id, client.id)
		}(i)
	}
	wg.Wait()
	clientPool.close()

	fmt.Println("\nResource Pooling example completed!")
}

// Database Connection Pool
type dbConnection struct {
	id       int
	lastUsed time.Time
}

type dbConnectionPool struct {
	connections chan *dbConnection
	maxSize     int
	created     int
	mu          sync.Mutex
}

func newDBConnectionPool(initial, maxSize int) *dbConnectionPool {
	pool := &dbConnectionPool{
		connections: make(chan *dbConnection, maxSize),
		maxSize:     maxSize,
	}

	// Pre-populate with initial connections
	for i := 0; i < initial; i++ {
		pool.connections <- &dbConnection{
			id:       i + 1,
			lastUsed: time.Now(),
		}
		pool.created++
	}

	return pool
}

func (p *dbConnectionPool) getConnection() *dbConnection {
	select {
	case conn := <-p.connections:
		conn.lastUsed = time.Now()
		return conn
	default:
		// Create new connection if pool is empty and under max size
		p.mu.Lock()
		if p.created < p.maxSize {
			p.created++
			p.mu.Unlock()
			return &dbConnection{
				id:       p.created,
				lastUsed: time.Now(),
			}
		}
		p.mu.Unlock()

		// Wait for available connection
		conn := <-p.connections
		conn.lastUsed = time.Now()
		return conn
	}
}

func (p *dbConnectionPool) releaseConnection(conn *dbConnection) {
	select {
	case p.connections <- conn:
		// Successfully returned to pool
	default:
		// Pool is full, discard connection
		fmt.Printf("Pool full, discarding connection %d\n", conn.id)
	}
}

func (p *dbConnectionPool) close() {
	close(p.connections)
	fmt.Printf("DB pool closed. Total connections created: %d\n", p.created)
}

// HTTP Client Pool
type httpClient struct {
	id       int
	lastUsed time.Time
}

type httpClientPool struct {
	clients chan *httpClient
	maxSize int
	created int
	mu      sync.Mutex
}

func newHTTPClientPool(initial, maxSize int) *httpClientPool {
	pool := &httpClientPool{
		clients: make(chan *httpClient, maxSize),
		maxSize: maxSize,
	}

	// Pre-populate with initial clients
	for i := 0; i < initial; i++ {
		pool.clients <- &httpClient{
			id:       i + 1,
			lastUsed: time.Now(),
		}
		pool.created++
	}

	return pool
}

func (p *httpClientPool) getClient() *httpClient {
	select {
	case client := <-p.clients:
		client.lastUsed = time.Now()
		return client
	default:
		// Create new client if pool is empty and under max size
		p.mu.Lock()
		if p.created < p.maxSize {
			p.created++
			p.mu.Unlock()
			return &httpClient{
				id:       p.created,
				lastUsed: time.Now(),
			}
		}
		p.mu.Unlock()

		// Wait for available client
		client := <-p.clients
		client.lastUsed = time.Now()
		return client
	}
}

func (p *httpClientPool) releaseClient(client *httpClient) {
	select {
	case p.clients <- client:
		// Successfully returned to pool
	default:
		// Pool is full, discard client
		fmt.Printf("Pool full, discarding HTTP client %d\n", client.id)
	}
}

func (p *httpClientPool) close() {
	close(p.clients)
	fmt.Printf("HTTP client pool closed. Total clients created: %d\n", p.created)
}

To run this example, and build the code yourself, check out this and other examples in the go-fluency-concurrency-model-patterns repo. That’s it for this topic. A new series will begin in a day or few! 🤘🏻 Happy thrashing code!

Go Concurrency Patterns(Event Loop Pattern)

Overview

The Event Loop pattern processes events from multiple sources in a single thread using a central event loop. This pattern is essential for handling multiple event sources efficiently, managing I/O operations, building reactive systems, and coordinating multiple concurrent operations in a controlled manner.

NOTE: For other posts on concurrency patterns, check out the index post to this series of concurrency patterns.

Implementation Details

Structure

The event loop implementation in examples/event_loop.go consists of three main components:

  1. Event Loop – Central coordinator that processes events from multiple channels
  2. Event Sources – Multiple goroutines that generate events
  3. Event Processing – Centralized event handling logic

Code Analysis

Let’s break down the main function and understand how each component works:

func RunEventLoop() {
    // Create event channels
    userEvents := make(chan string, 10)
    systemEvents := make(chan string, 10)
    timerEvents := make(chan string, 10)
    stop := make(chan struct{})

    // Start event sources
    go userEventSource(userEvents)
    go systemEventSource(systemEvents)
    go timerEventSource(timerEvents)

    // Start the event loop
    go eventLoop(userEvents, systemEvents, timerEvents, stop)

    // Let the event loop run for a while
    time.Sleep(5 * time.Second)
    close(stop)
    fmt.Println("Event loop stopped.")
}

Step-by-step breakdown:

  1. Event Channel Creation:
    • userEvents := make(chan string, 10) creates a buffered channel for user events
    • systemEvents := make(chan string, 10) creates a buffered channel for system events
    • timerEvents := make(chan string, 10) creates a buffered channel for timer events
    • stop := make(chan struct{}) creates a signal channel for graceful shutdown
    • Buffer size of 10 prevents blocking when event sources generate events faster than processing
  2. Event Source Launch:
    • go userEventSource(userEvents) launches the user event generator in background
    • go systemEventSource(systemEvents) launches the system event generator in background
    • go timerEventSource(timerEvents) launches the timer event generator in background
    • Each event source runs independently and continuously generates events
  3. Event Loop Launch:
    • go eventLoop(userEvents, systemEvents, timerEvents, stop) starts the central event loop
    • The event loop runs in its own goroutine to process events from all sources
    • This is the core coordinator that handles all events sequentially
  4. Demonstration Period:
    • time.Sleep(5 * time.Second) lets the event loop run for 5 seconds
    • This provides enough time to see the pattern in action
    • During this time, all event sources are generating events and the loop is processing them
  5. Graceful Shutdown:
    • close(stop) signals the event loop to stop processing
    • The event loop will receive this signal and exit gracefully
    • fmt.Println("Event loop stopped.") confirms the shutdown

Event Loop Implementation

func eventLoop(userEvents, systemEvents, timerEvents <-chan string, stop <-chan struct{}) {
    fmt.Println("Event loop started. Processing events...")

    for {
        select {
        case event := <-userEvents:
            fmt.Printf("Event Loop: Processing user event: %s\n", event)
            processUserEvent(event)

        case event := <-systemEvents:
            fmt.Printf("Event Loop: Processing system event: %s\n", event)
            processSystemEvent(event)

        case event := <-timerEvents:
            fmt.Printf("Event Loop: Processing timer event: %s\n", event)
            processTimerEvent(event)

        case <-stop:
            fmt.Println("Event Loop: Received stop signal, shutting down...")
            return
        }
    }
}

Event loop breakdown:

  1. Function Signature:
    • Takes read-only channels (<-chan string) for each event type
    • Takes a read-only stop channel (<-chan struct{}) for shutdown
    • Directional channels provide encapsulation and prevent accidental misuse
  2. Infinite Loop Structure:
    • for { ... } creates an infinite loop that continuously processes events
    • The loop will run until explicitly stopped by the stop signal
    • This ensures the event loop is always ready to handle events
  3. Select Statement:
    • select statement waits for events from any of the four channels
    • Non-blocking – if no events are available, it waits efficiently
    • Fair selection – all event sources have equal priority
    • Only one case executes at a time, ensuring sequential processing
  4. User Event Handling:
    • case event := <-userEvents: handles user events (clicks, keypresses, etc.)
    • fmt.Printf("Event Loop: Processing user event: %s\n", event) logs the event
    • processUserEvent(event) calls the appropriate handler function
    • User events typically need quick response for good UX
  5. System Event Handling:
    • case event := <-systemEvents: handles system events (file changes, network status, etc.)
    • fmt.Printf("Event Loop: Processing system event: %s\n", event) logs the event
    • processSystemEvent(event) calls the system event handler
    • System events may require more processing time
  6. Timer Event Handling:
    • case event := <-timerEvents: handles timer events (periodic ticks)
    • fmt.Printf("Event Loop: Processing timer event: %s\n", event) logs the event
    • processTimerEvent(event) calls the timer event handler
    • Timer events are typically lightweight and frequent
  7. Stop Signal Handling:
    • case <-stop: handles the shutdown signal
    • fmt.Println("Event Loop: Received stop signal, shutting down...") logs shutdown
    • return exits the event loop gracefully
    • This ensures clean termination without data loss

Event Source Implementations

func userEventSource(events chan<- string) {
    eventTypes := []string{"click", "keypress", "scroll", "hover", "submit"}
    for {
        event := eventTypes[rand.Intn(len(eventTypes))]
        events <- fmt.Sprintf("User %s", event)
        time.Sleep(time.Duration(rand.Intn(1000)+500) * time.Millisecond)
    }
}

func systemEventSource(events chan<- string) {
    eventTypes := []string{"file_change", "network_status", "memory_usage", "cpu_load", "disk_space"}
    for {
        event := eventTypes[rand.Intn(len(eventTypes))]
        events <- fmt.Sprintf("System %s", event)
        time.Sleep(time.Duration(rand.Intn(1500)+1000) * time.Millisecond)
    }
}

func timerEventSource(events chan<- string) {
    ticker := time.NewTicker(800 * time.Millisecond)
    defer ticker.Stop()

    for {
        select {
        case <-ticker.C:
            events <- fmt.Sprintf("Timer tick at %v", time.Now().Format("15:04:05.000"))
        }
    }
}

Event source breakdown:

  1. User Event Source:
    • eventTypes := []string{...} defines realistic user interaction events
    • for { ... } creates an infinite loop for continuous event generation
    • event := eventTypes[rand.Intn(len(eventTypes))] randomly selects an event type
    • events <- fmt.Sprintf("User %s", event) sends the formatted event to the channel
    • time.Sleep(time.Duration(rand.Intn(1000)+500) * time.Millisecond) simulates variable user interaction timing (500-1500ms)
  2. System Event Source:
    • eventTypes := []string{...} defines realistic system monitoring events
    • Similar structure to user events but with system-specific event types
    • time.Sleep(time.Duration(rand.Intn(1500)+1000) * time.Millisecond) simulates slower system event generation (1000-2500ms)
    • System events typically occur less frequently than user events
  3. Timer Event Source:
    • ticker := time.NewTicker(800 * time.Millisecond) creates a ticker for regular events
    • defer ticker.Stop() ensures the ticker is cleaned up when the function exits
    • for { select { case <-ticker.C: ... } } waits for ticker events
    • events <- fmt.Sprintf("Timer tick at %v", time.Now().Format("15:04:05.000")) sends timestamped timer events
    • Timer events occur at regular 800ms intervals, providing predictable timing

Event Processing Functions

func processUserEvent(event string) {
    // Simulate processing time
    time.Sleep(50 * time.Millisecond)
    fmt.Printf("  Processed user event: %s\n", event)
}

func processSystemEvent(event string) {
    // Simulate processing time
    time.Sleep(100 * time.Millisecond)
    fmt.Printf("  Processed system event: %s\n", event)
}

func processTimerEvent(event string) {
    // Simulate processing time
    time.Sleep(30 * time.Millisecond)
    fmt.Printf("  Processed timer event: %s\n", event)
}

Event processing breakdown:

  1. User Event Processing:
    • time.Sleep(50 * time.Millisecond) simulates quick user event processing
    • User events need fast response for good user experience
    • fmt.Printf(" Processed user event: %s\n", event) confirms processing completion
  2. System Event Processing:
    • time.Sleep(100 * time.Millisecond) simulates longer system event processing
    • System events may require more complex processing (file I/O, network calls, etc.)
    • fmt.Printf(" Processed system event: %s\n", event) confirms processing completion
  3. Timer Event Processing:
    • time.Sleep(30 * time.Millisecond) simulates lightweight timer event processing
    • Timer events are typically simple and fast to process
    • fmt.Printf(" Processed timer event: %s\n", event) confirms processing completion

Key Design Patterns:

  1. Single-threaded Event Processing: The event loop processes events sequentially in a single goroutine, preventing race conditions.
  2. Channel-based Communication: All event sources communicate with the event loop through channels, providing natural synchronization.
  3. Select Statement: The select statement provides non-blocking, fair event selection from multiple sources.
  4. Buffered Channels: Buffer size of 10 prevents event sources from blocking when the event loop is busy processing.
  5. Graceful Shutdown: The stop channel provides clean shutdown without data loss or resource leaks.
  6. Structured Events: Each event type has a clear structure and meaning, making the system easy to understand and extend.
  7. Simulated Processing: Random delays simulate real-world processing times and make the pattern’s behavior visible.

How It Works

  1. Event Sources: Multiple goroutines generate events and send them to channels
  2. Event Loop: A single goroutine runs the event loop, listening to all event channels
  3. Event Selection: The select statement waits for events from any source
  4. Event Processing: When an event arrives, it’s processed by the appropriate handler
  5. Non-blocking: The loop continues to process events from other sources while one is being processed
  6. Graceful Shutdown: The loop stops when it receives a stop signal

The pattern ensures that all events are processed in a controlled, sequential manner while maintaining responsiveness to multiple event sources.

Why This Implementation?

Single-threaded Event Processing

  • Sequential Processing: Events are processed one at a time, preventing race conditions
  • Predictable Behavior: Event processing order is deterministic
  • Resource Efficiency: No need for complex synchronization between event handlers
  • Debugging: Easier to debug and reason about event processing

Channel-based Event Sources

  • Asynchronous Generation: Event sources can generate events independently
  • Non-blocking: Event sources don’t block when the event loop is busy
  • Buffering: Buffered channels prevent event loss during processing delays
  • Scalability: Easy to add or remove event sources

Select Statement

  • Non-blocking Selection: Waits for events from any source without blocking
  • Fair Selection: All event sources have equal priority
  • Efficient Waiting: Efficiently waits for multiple channels
  • Clean Code: Provides clear, readable event handling logic

Centralized Event Handling

  • Single Point of Control: All events flow through one place
  • Consistent Processing: All events are processed with the same logic
  • Easy Monitoring: Easy to monitor and log all events
  • State Management: Centralized state management for event processing

Graceful Shutdown

  • Controlled Termination: Event loop can be stopped gracefully
  • Resource Cleanup: Proper cleanup of resources when stopping
  • Coordinated Shutdown: All event sources can be coordinated during shutdown
  • No Data Loss: Ensures no events are lost during shutdown

Key Design Decisions

  1. Multiple Event Types: Demonstrates handling different types of events
  2. Simulated Processing: Random delays simulate real event processing time
  3. Buffered Channels: Prevent blocking of event sources
  4. Structured Events: Events have clear structure and meaning
  5. Proper Cleanup: Graceful shutdown with proper resource cleanup

Performance Characteristics

Throughput

  • Sequential Processing: Throughput limited by processing time of individual events
  • Event Queuing: Events can queue in channels during processing delays
  • Fair Processing: All event sources are processed fairly
  • Predictable Performance: Performance is predictable and consistent

Latency

  • Processing Time: Latency depends on event processing time
  • Queue Time: Events may wait in channels if event loop is busy
  • Fair Scheduling: All event sources experience similar latency
  • Responsiveness: System remains responsive to all event sources

Memory Usage

  • Channel Buffering: Memory usage depends on channel buffer sizes
  • Event Queuing: Queued events consume memory
  • Efficient Storage: Minimal overhead for event storage
  • Scalability: Memory usage scales with number of event sources

Common Use Cases

User Interface Systems

  • GUI Applications: Handle mouse, keyboard, and window events
  • Web Applications: Process user interactions and DOM events
  • Game Engines: Handle input events and game state updates
  • Mobile Apps: Process touch, gesture, and sensor events

Network Applications

  • Web Servers: Handle HTTP requests and responses
  • Chat Applications: Process messages and connection events
  • API Gateways: Handle API requests and routing
  • Load Balancers: Process connection and health check events

System Monitoring

  • Process Monitoring: Handle process lifecycle events
  • Resource Monitoring: Process CPU, memory, and disk events
  • Network Monitoring: Handle network status and traffic events
  • Log Processing: Process log file and system log events

IoT Applications

  • Sensor Data: Process data from multiple sensors
  • Device Control: Handle device status and control events
  • Protocol Processing: Process various IoT protocol events
  • Gateway Management: Handle device registration and communication events

Financial Systems

  • Trading Systems: Process market data and order events
  • Risk Management: Handle risk calculation and alert events
  • Settlement Systems: Process transaction and settlement events
  • Compliance Monitoring: Handle regulatory and compliance events

Real-time Systems

  • Streaming Applications: Process media stream events
  • Real-time Analytics: Handle analytics and reporting events
  • Collaboration Tools: Process user collaboration events
  • Live Broadcasting: Handle broadcast and viewer events

Embedded Systems

  • Hardware Control: Process hardware interrupt events
  • Sensor Networks: Handle sensor data and network events
  • Control Systems: Process control and feedback events
  • Automation Systems: Handle automation and scheduling events

Advanced Patterns

Priority-based Event Processing

  • Event Priority: Process events based on priority levels
  • Priority Queues: Use priority queues for event ordering
  • Urgent Events: Handle urgent events with higher priority
  • Fair Scheduling: Ensure fair processing across priority levels

Event Filtering and Routing

  • Event Filtering: Filter events based on criteria
  • Event Routing: Route events to appropriate handlers
  • Event Transformation: Transform events before processing
  • Event Aggregation: Aggregate multiple events into single events

Event Persistence

  • Event Logging: Log all events for audit and debugging
  • Event Replay: Replay events for testing and recovery
  • Event Storage: Store events for later processing
  • Event Archiving: Archive old events for compliance

Distributed Event Loops

  • Multi-node Coordination: Coordinate event loops across multiple nodes
  • Event Distribution: Distribute events across multiple event loops
  • Load Balancing: Balance event processing load across nodes
  • Fault Tolerance: Handle failures in distributed event processing

Best Practices

Event Design

  • Structured Events: Use structured event types with clear meaning
  • Event Size: Keep events reasonably sized for performance
  • Event Immutability: Make events immutable to prevent side effects
  • Event Validation: Validate events before processing

Performance Optimization

  • Event Batching: Batch similar events for efficient processing
  • Async Processing: Use async processing for long-running operations
  • Event Pooling: Reuse event objects to reduce allocation overhead
  • Memory Management: Monitor and manage memory usage

Error Handling

  • Event Error Handling: Handle errors in event processing gracefully
  • Error Recovery: Implement recovery mechanisms for failed events
  • Error Reporting: Report errors for monitoring and debugging
  • Circuit Breaker: Implement circuit breakers for external dependencies

Monitoring and Observability

  • Event Metrics: Track event processing metrics
  • Performance Monitoring: Monitor event loop performance
  • Event Tracing: Trace events through the system
  • Alerting: Alert on unusual event patterns or failures

The event loop pattern is particularly effective when you have:

  • Multiple Event Sources: Multiple sources generating events
  • Sequential Processing: Need for sequential, controlled event processing
  • Resource Constraints: Limited resources that need efficient management
  • Real-time Requirements: Need for responsive event handling
  • State Management: Complex state that needs centralized management

This pattern provides a robust foundation for building responsive, efficient systems that can handle multiple event sources while maintaining control and predictability.

The final example implementation looks like this:

package examples

import (
	"fmt"
	"math/rand"
	"time"
)

// RunEventLoop demonstrates the event loop pattern.
func RunEventLoop() {
	fmt.Println("=== Event Loop Pattern Example ===")

	// Create event channels
	userEvents := make(chan string, 10)
	systemEvents := make(chan string, 10)
	timerEvents := make(chan string, 10)
	shutdown := make(chan struct{})

	// Start event producers
	go userEventProducer(userEvents)
	go systemEventProducer(systemEvents)
	go timerEventProducer(timerEvents)

	// Start the event loop
	go eventLoop(userEvents, systemEvents, timerEvents, shutdown)

	// Let the system run for a while
	time.Sleep(5 * time.Second)

	// Shutdown
	fmt.Println("Shutting down event loop...")
	close(shutdown)

	// Wait a bit for cleanup
	time.Sleep(500 * time.Millisecond)
	fmt.Println("Event loop example completed!")
}

// Event loop that processes events from multiple sources
func eventLoop(userEvents, systemEvents, timerEvents <-chan string, shutdown <-chan struct{}) {
	fmt.Println("Event loop started...")

	for {
		select {
		case event := <-userEvents:
			fmt.Printf("Event Loop: Processing user event: %s\n", event)
			processUserEvent(event)

		case event := <-systemEvents:
			fmt.Printf("Event Loop: Processing system event: %s\n", event)
			processSystemEvent(event)

		case event := <-timerEvents:
			fmt.Printf("Event Loop: Processing timer event: %s\n", event)
			processTimerEvent(event)

		case <-shutdown:
			fmt.Println("Event Loop: Shutdown signal received, cleaning up...")
			return
		}
	}
}

// Event producers
func userEventProducer(events chan<- string) {
	userActions := []string{"login", "logout", "click", "scroll", "submit"}
	for i := 0; i < 8; i++ {
		time.Sleep(time.Duration(rand.Intn(800)+200) * time.Millisecond)
		action := userActions[rand.Intn(len(userActions))]
		events <- fmt.Sprintf("%s (user_%d)", action, i+1)
	}
}

func systemEventProducer(events chan<- string) {
	systemEvents := []string{"backup", "update", "maintenance", "alert", "sync"}
	for i := 0; i < 6; i++ {
		time.Sleep(time.Duration(rand.Intn(1000)+500) * time.Millisecond)
		event := systemEvents[rand.Intn(len(systemEvents))]
		events <- fmt.Sprintf("%s (system_%d)", event, i+1)
	}
}

func timerEventProducer(events chan<- string) {
	ticker := time.NewTicker(1 * time.Second)
	defer ticker.Stop()

	count := 0
	for range ticker.C {
		if count >= 5 {
			break
		}
		events <- fmt.Sprintf("heartbeat (timer_%d)", count+1)
		count++
	}
}

// Event processors
func processUserEvent(event string) {
	// Simulate processing time
	time.Sleep(100 * time.Millisecond)
	fmt.Printf("  -> User event processed: %s\n", event)
}

func processSystemEvent(event string) {
	// Simulate processing time
	time.Sleep(150 * time.Millisecond)
	fmt.Printf("  -> System event processed: %s\n", event)
}

func processTimerEvent(event string) {
	// Simulate processing time
	time.Sleep(50 * time.Millisecond)
	fmt.Printf("  -> Timer event processed: %s\n", event)
}

To run this example, and build the code yourself, check out this and other examples in the go-fluency-concurrency-model-patterns repo. That’s it for this topic, tomorrow I’ll post on the resource pooling pattern.