What’s The Practice with Rider & .NET Solutions/Projects? How to resolve IDE errors?

Alright, I’ve fought with these kinds of things since the inception of .NET, the key difference now is that there are the variances in .NET versions and also IDEs. The question is, how should I setup my solution and respective projects?

First – .NET Solution

Usually what I do is create an empty solution. Name it, check the options accordingly to create a directory and make it a Git repository.

Then, as a kind of general practice I create a class library to build out logic and what not, and add a test project and then whatever the interface is going to be. That might be a web app, a GUI, or console as I’ve got selected here. Sometimes, if useful I go ahead and create a Dockerfile.

At this point, there are a few key problems I always bump into. Obviously, since I have a repo I need a .gitignore file, preferably a README.md, and maybe even a license file right? How does one add, so that the IDE is aware of them, any extra files at the solution level? What I usually do here, is use the terminal to just build out the solution level files, but then the IDE doesn’t know about them. Similar problems come up in the other .NET IDEs like Visual Studio and such.

Second – Open a Folder Solution

The second type of solution I find myself creating is started by opening a repo folder.

Empty, with nothing else that looks like this.

Creating a .gitignore and other respective files is easy at this point. As a right click will allow me to do just that. I’ve also added some projects.

At this point everything works great. As you can see below the runner is wired up, the IDE is aware of the tests, and runners are available for that.

One problem I’ve run into however with this technique, is sometimes I close this type of project – one started by merely opening the folder – and all this awareness just disappears. On the same machine, same folder, no deletion of the .idea folder or anything like that. It just loses all the awareness.

So my question is, which method do you use to start a project and how to do you, fellow .NET coders, work around these types of issues?

Using Multiple SSH Keys for Multiple Github Account

FIRST – Setup the Keys

If there is already a key, I can use this one to start with, but if there is no key to start with I’ll need to generate one. I can do this with the following command:

ssh-keygen -t rsa

When generating the keys, best to go with the default location, which is ~/.ssh/id_rsa. This will create two files, id_rsa and id_rsa.pub. The id_rsa file is the private key, and the id_rsa.pub file is the public key. The private key should be kept secret, and the public key can be shared with anyone.

For the next account, which I’ll just call the work account, I’ll generate another new key. This time I’ll hand off the following parameters to the key generation to provide the work account email and the file name:

ssh-keygen -t rsa -C "adron.account@work_mail.com" -f "work_account_one"

I’ve now got two keys, one for my personal account and one for my work account.

~/.ssh/id_rsa

~/.ssh/work_account_one

I’ll need to add these to the ssh-agent and the respect Github (or git whatever servers) so that I can use them.

SECOND – Add the Keys to Github

Adding the keys to Github. We’ll start with the personal account and then add the work account. Copy the public key using pbcopy < ~/.ssh/id_rsa.pub. With that copied log into the Github account that this key should be associated with.

1. Got to *settings*.
2. Select *SSH and GPG keys* from the account user menu.
3. Navigate into `New SSH Key`, give it a title, and paste the key into the key field.
4. Click *Add SSH Key*.

Now log out of that Github account and into the other account, the work account. Repeat the steps above, but this time use the work account email and the work account key.

THIRD

Register the new keys with ssh-agent. Start by checking that the ssh-agent is running with eval "$(ssh-agent -s)". In the past we would add the keys to the agent with ssh-add -K ~/.ssh/id_rsa and ssh-add -K ~/.ssh/work_account_one. Now the keys are registered with the agent with the following.

ssh-add --apple-use-keychain ~/.ssh/id_rsa
ssh-add --apple-use-keychain ~/.ssh/work_account_one

FOURTH

There is one last step, I need to tell the ssh client which key to use for which account. I can do this by adding the following to the ~/.ssh/config file.

# Account 1 - Primary
Host github.com
  HostName github.com
  User git
  IdentityFile ~/.ssh/id_rsa
  AddKeysToAgent yes
  UseKeychain yes

# Account 2 - Second Account
Host github.com-work_user_account_name
  HostName github.com
  User git
  IdentityFile ~/.ssh/work_account_one
  AddKeysToAgent yes
  UseKeychain yes

Note that work_user_account_name is the name of the work account, not the email address. I can now use the following commands to clone repositories from the respective accounts. This tells ssh-agent to use the id_rsa key for Git URLs starting with github.com and the work_account_one key for Git URLs starting with github-work_user_account_name.

FIFTH

One active SSH key per working session.

This is a good practice to follow. I can use the following command to start the ssh-agent and add the key to it.

eval "$(ssh-agent -s) ssh-add -K ~/.ssh/id_rsa ssh-add ~/.ssh/id_rsa

The same can then be done when the other key needs to be used.

A Quick Post on URL, URI, UDI, URN… Resources

URL, or Uniform Resource Locator, is often used as a blanket term for almost anything on the internet. A URI, or Uniform Resource Identifier, represents a unique resource on a server, located somewhere on the World Wide Web. Other abbreviations that are often confusingly related include UDI for Universal Document Identifier and URN for Universal Resource Name. All together we have the following abbreviations;

  • URL – Uniform Resource Locator
  • URI – Uniform Resource Identifier
  • UDI – Universal Document Identifier
  • URN – Uniform Resource Name

A URI can be either a URL or URN.

URI Syntax

scheme:[//authority]path[?query][#fragment]
  • Scheme – This is a non-empty sequence of characters followed by a colon, followed by any combo of digits, letters, periods, hyphens, or plus characters. The scheme is registered with the Internet Assigned Numbers Authority (IANA).
  • Authority – The authority is an optional field preceded by //. It has the following subfields.
    • Userinfo – A subcomponent which could contain username and password, or other user information data.
    • Host – A subcomponent containing either an IP address or a registered host or domain name.
    • Port – An optional subcomponent that is followed by a colon.
  • Path – Contains a sequence of segments separated by a slash characters. This could be something like /resources or /trains or similar.
  • Query – An optional component preceded by a question mark. The component contains a query string of non-hierarchical data, each parameter is separated by an ampersand in the query component and parameter values are assigned using an equals operator.
  • Fragment – An optional field and is preceded by a hash. The fragment includes a fragment identifier for a secondary resource.

Examples

  • mailto:myaddress@thrashingcode.com
  • telnet://10.20.0.1:23/
  • ldap://[2020:ba6:9:9]/c=ZAZA?objectClassOfDomain?objectOfDomain

The Differentiator

The URI examples above all could be called URLs, however the difference is that a URI is an identifier, where as a URL is an identifier and provides details on how to get to the identified resource.

URN AKA Uniform Resource Name

URNs are not used often. More specific details can be found in RFC 2141. For this quick post it’s safe to sort of ignore URNs, as the other abbreviations are the ones you will see out and about in the world, and specifically used in detailing REST APIs and the like.

Day 4 Studies – Web Related Things

Today I got into some studying Vue.js, but realized I wanted to cover some of the basics around things that Vue.js uses but I’d not really covered in the posts. Also before I got into some of the other core topics as outlined on Day 1 there were a number of things that just needed defined. This post, is about those things.

Virtual DOM – this is something you hear about that isn’t specifically Vue.js related. React uses a virtual DOM as do other frameworks. The DOM part stands for Document Object Model, and the Virtual DOM is a lightweight JavaScript representation of this model. This Virtual DOM is what is updated instead of the actual DOM, and when the Virtual DOM is ready for rendering to the actual DOM, a diff is done of the two and only the changes are rendered in the actual DOM. This generally makes changes render much faster than attempting to make the changes in the actual DOM only.

The frameworks that use a Virtual DOM include; React, Vue.js, and Elm. Other frameworks like Svelte created by Rich Harris does not, and Rich is also quoted as saying a Virtual DOM is pure overhead. A valid point, yet arguable whether this is an advantage or disadvantage, as it appears to depend entirely on the situation and type of page(s) being rendered.

There are other techniques like Angular or Ember.js’s incremental DOM that offer an alternate approach to DOM rendering.

Digging more closely into the Document Object Model, it is a cross-platform language independent interface that uses a tree structure to represent XML or HTML. Each branch of the DOM ends in a node, each node containing objects. This provides a way to programmatically traverse the model and gain access to various parts of the tree. The nodes within the DOM can also have event handlers attached to them, which provides a programmatic way to fire off events for execution.

The DOM technology is currently managed by WHATWG – Web Hypertext Application Technology Working Group.


Rendering Mechanism – This is the way, process, and flow of Vue.js’s rendering of a page for a Vue Application.

This all starts in Vue.js, with the above defined Virtual DOM, as defined in the docs as the VDOM. Remembering from above, that each branch ends in a node, a constant of the VDOM could be written up as shown.

const vnode = {
  type: 'div',
  props: {
    id: 'anIdentifierOfSorts'
  },
  children: [
    /* all the other nodes on down the tree. */
  ]
}

The Render Pipeline, at a high level compiles, mounts, and patches the VDOM. Vue templates are compiled into render functions that return VDOM trees. The mount function then invokes the render function which walks the returned virtual DOM tree, creates actual DOM nodes based on it and renders. This is performed as a reactive effect to apply changes to the actual DOM. Finally during mount changes, the effect reruns during patch, which creates a new VDOM, the runtime renderer walks the tree, does a diff, and applies updates to the actual DOM.


Templates & Render Functions

It’s important to know that Vue templates are compiled into VDOM render functions. Render functions can also be authored and called programmatically, bypassing a need to create a template. Even though vue recommends, and many if not most tutorials will show templates versus render functions, it’s important to know that render functions are available to use for more flexibility when dealing with dynamic logic or just odd business rules and such.

Vue.js Studies Day 3 – More Ways to Get Started

Method 3 – JetBrains WebStorm

For this next method on getting started I decided to give JetBrains WebStorm a go and see what it used, and what extras it would provide. I presumed correctly, that there is indeed lagniappe!

I opened up WebStorm – to note, I’ve got a full subscription to the entire line of JetBrains tools but you can go get a free trial version if you want to give it a try – and clicked on the File menu and New, then on Project.

That brings up another window with project and I clicked on New Project from there, which gives me a list of web projects to start and I chose Vue.js. After entering location and node interpreter, the Vue CLI – both of which I’ve already got installed but if they’re not, WebStorm can do that for you – and then click Create.

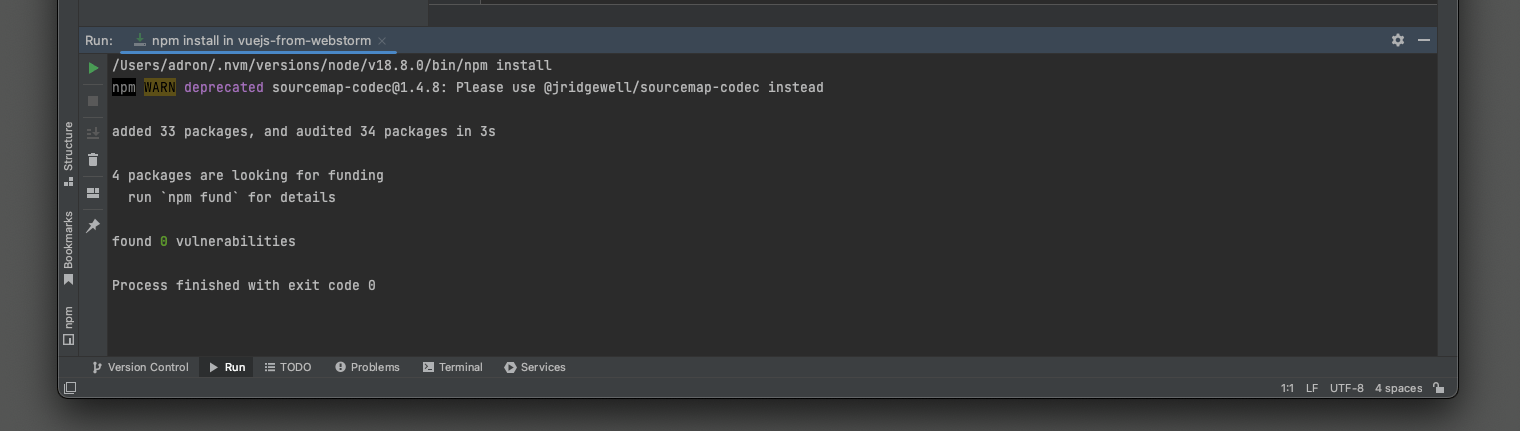
That’ll spin up a project and open it in the IDE itself. You’ll see a prompt popup that’ll ask if you want to run npm install and if not, be sure to run that either view the embedded CLI, or via the run npm option in the IDE. The IDE’s display will show the familiar “Process finished with exit code 0”.

Now there are a range of ways to run the application that was just generated for us. To note, WebStorm has used the same method that you can use if you execute npx create-vue. The big differences are there are now hooks, and the IDE itself is aware of a number of things that can help you do a number of things from debugging to application execution. For example, looking up at the top of the IDE (pending it’s a default install and you’ve not moved parts of the IDE around!) we now have a button to execute the application with npm, or to execute and debug the application.

When you execute the application, the window at the bottom of the IDE will pop up with the familiar launch of vite, and you can even click on the local URI and it’ll launch your default browser. You can also setup the IDE to, by default, launch the browser if you’d like.