The First Things
This week, the first thing I did was give a solid read to Mark Phillip’s Blog “themarkphillips” (@pharkmillups). Here’s a break down of some entries I found really interesting and helpful in getting kick started here at Basho (or just really a good read in and of itself):
- Using Open Source to Promote Sustainable Farming – Mark got to interview Chris Villalobos @frostbytten a long while back, but ended up getting a good interview and also got Chris to write an article on the Basho Blog “Riak in Production – A Distributed Event Registration System Written in Erlang”. Chris was working on Open AgroClimate Project a climate information and decision support system for managing agricultural and natural resources in the Southeastern US. Pretty interesting articles, the whole lot of them.
 Two Anecdotes About Community From JSConf and NodeConf – This is a great one, two anecdotes that I’m all “hell yeah” about. The entry caught my eye for the obvious reasons that the whole great team behind JSConf & NodeConf, I always have to read about. Mikael, Chris and the whole lot of Noders are a great crew of people, throwing absolutely great conferences. The two anecdotes; “You Want Your Users To Hug You” and “Meeting People In Real Life Never Gets Old And Is Incredibly Valuable”.
- Another great entry revolved around putting together RICON 2012. See my other entries “RICON2012 Shreds the House!” and “RICON 2012 Photos” for more on RICON. This entry really lays out ground work for the mission Mark Phillips, Tom Santera and the rest of the team I’ve joined at Basho have to grow the community that works with, around and building distributed databases and systems.
- The latest entry, the entry key to what I’m tackling, is the “Month One for Technical Evangelists at Basho“. This leads me to the next blog & entries and material I needed to dive into.
The next blog I gave a good review of was the Basho Blog.
- Riak Cloud Storage with Multi-Datacenter Replication – this blog entry outlines the release of, well, what the title says. This release though, is a pretty big deal. The storage is already S3 compliant, a huge benefit in the first place. The entry goes into some detail about the full and realtime sync capabilities of the system. However if you’re really interested in this there’s more to dive into – so ping me or jump on the Basho mailing list and strike up a conversation. We love talking about this stuff at Basho, so don’t shy away from throwing some conversation our way.
- The next blog entry that caught my attention, since some of my first demoes are going to be JavaScript, Node.js and Riak, the project around Riak.js getting a fresh start was a relief to read. I’ll admit, I read it when the blog entry was published. 😉
- One last entry I read, then dived into the content that it links to is the “Building Apps on Riak” content and use cases blog entry. It links to the Basho Docs (see below) and use cases page.
The last two major things that I read, which are really important in the field of distributed databases and also having a work culture that seriously rocks. These two papers are the Amazon Dynamo Paper and the Valve Handbook.
amazon-dynamo-sosp2007 & Valve Handbook
![]() The second thing I wanted to do was get Riak setup on my local machine to play with. I’d setup Riak a few times before in a multi-node cluster using Tier 3′ s Blueprint Technology to automate the process. This time however I’m taking the vantage of installing it locally for use. So what’s the steps? Well, it’s pretty straight forward. First however, I wanted to synch up my first install experience with the Basho Docs. Since the documentation is actually available via your standard open source repository on github, the Basho way, I wanted to get a local running copy of it.
The second thing I wanted to do was get Riak setup on my local machine to play with. I’d setup Riak a few times before in a multi-node cluster using Tier 3′ s Blueprint Technology to automate the process. This time however I’m taking the vantage of installing it locally for use. So what’s the steps? Well, it’s pretty straight forward. First however, I wanted to synch up my first install experience with the Basho Docs. Since the documentation is actually available via your standard open source repository on github, the Basho way, I wanted to get a local running copy of it.
Basho Documentation
 I wanted to business, not just to read but also to contribute back to the basho_docs. This isn’t just some filler docs either, they’re actually really useful and well written. In other words, it’s solid, updated and well maintained documentation.
I forked the basho_docs to my own repo and went to work setting it up. Everything was going great until I stumbled into blockenspiel, or so I thought it was blockenspiel. Thus, the adventure of crazy new machine forgetfulness begins.
Breaking blockenspiel
I’ve spent a couple hours trying to get middleman working for the basho_docs project. Why did I spend a few hours working on this? Well the obvious one is I wanted to get the docs up and running locally, ya see, I intend to contribute back (want to jump into them too, hit up the github repo). While I was getting these installed I made a few mistakes and ran into a few issues. Here’s the story.
The first thing I forgot was to install rvm. The basho_docs project uses rvm and I highly suggest you use it, or something like it. In this case the project has specific settings you definitely want. The simple reason I didn’t have it is that I’d forgotten that I hadn’t installed it on my new Mac Book Air! Doh! Easily fixed via https://rvm.io/. While there I also installed the Jewelry Box App, it’s pretty decent, but you’ll still want to dive into the command line where the real power is.
So with that all good I got through the next few steps.
[sourcecode language=”bash”]$ gem install bundler
ERROR: While executing gem … (Gem::FilePermissionError)
You don’t have write permissions into the /Library/Ruby/Gems/1.8 directory.
Adrons-MacBook-Air-2:basho_docs Adron$ sudo gem install bundler
Password:
Successfully installed bundler-1.2.3
1 gem installed
Installing ri documentation for bundler-1.2.3…
Installing RDoc documentation for bundler-1.2.3…
Adrons-MacBook-Air-2:basho_docs Adron$ bundle install
Fetching gem metadata from http://rubygems.org/…….
Fetching gem metadata from http://rubygems.org/..
Enter your password to install the bundled RubyGems to your system:
Using rake (0.9.2.2)
Using i18n (0.6.1)
Using multi_json (1.3.6)
Using activesupport (3.2.8)
Using builder (3.1.3)
Using mime-types (1.19)
Using xml-simple (1.1.1)
Using aws-s3 (0.6.3)
[/sourcecode]
At this point, the install seemed to be going great, and then BOOM, this happened!
[sourcecode language=”bash”]
Installing blockenspiel (0.4.5) with native extensions
Gem::Installer::ExtensionBuildError: ERROR: Failed to build gem native extension.
/System/Library/Frameworks/Ruby.framework/Versions/1.8/usr/bin/ruby extconf.rb
mkmf.rb can’t find header files for ruby at /System/Library/Frameworks/Ruby.framework/Versions/1.8/usr/lib/ruby/ruby.h
Gem files will remain installed in /Users/Adron/.bundler/tmp/13504/gems/blockenspiel-0.4.5 for inspection.
Results logged to /Users/Adron/.bundler/tmp/13504/gems/blockenspiel-0.4.5/ext/unmixer_mri/gem_make.out
An error occurred while installing blockenspiel (0.4.5), and Bundler cannot continue.
Make sure that `gem install blockenspiel -v ‘0.4.5’` succeeds before bundling.
Adrons-MacBook-Air-2:basho_docs Adron$ gem install blockenspiel
ERROR: While executing gem … (Gem::FilePermissionError)
You don’t have write permissions into the /Library/Ruby/Gems/1.8 directory.
Adrons-MacBook-Air-2:basho_docs Adron$ sudo gem install blockenspiel -v ‘0.4.5’
Building native extensions. This could take a while…
ERROR: Error installing blockenspiel:
ERROR: Failed to build gem native extension.
/System/Library/Frameworks/Ruby.framework/Versions/1.8/usr/bin/ruby extconf.rb
mkmf.rb can’t find header files for ruby at /System/Library/Frameworks/Ruby.framework/Versions/1.8/usr/lib/ruby/ruby.h
Gem files will remain installed in /Library/Ruby/Gems/1.8/gems/blockenspiel-0.4.5 for inspection.
Results logged to /Library/Ruby/Gems/1.8/gems/blockenspiel-0.4.5/ext/unmixer_mri/gem_make.out
[/sourcecode]
Ok, so maybe I shouldn’t have used sudo, but wasn’t sure what the permissions issue was in the first place. Yeah, that’s a bad idea just to barge ahead, but sometimes you gotta just move on things. Maybe that was or wasn’t the issue. I didn’t know at this point so started to do some research.
The first thing I realized, was barely anyone had run into this issue. I did however find two things that seemed like they may be the root cause of this blockenspiel problem.
https://github.com/dazuma/blockenspiel/issues/4 which shows the native extension not building and a bug is issued here http://bugs.ruby-lang.org/issues/4803. Ugh, how frustrating. Then I also noticed something else, the build is not passing per the README.md file displaying the Travis CI status.

That sux, but I kept digging at that point.
So which native extension did I need to install? I was missing it for some reason. Then I dug around a little more and discovered this in one of the logs.
[sourcecode language=”bash”]
[2012-12-07 09:50:07] ./configure –prefix=/Users/Adron/.rvm/usr
checking for a BSD-compatible install… /usr/bin/install -c
checking whether build environment is sane… yes
checking for a thread-safe mkdir -p… config/install-sh -c -d
checking for gawk… no
checking for mawk… no
checking for nawk… no
checking for awk… awk
checking whether make sets $(MAKE)… no
checking for gcc… no
checking for cc… no
checking for cl.exe… no
configure: error: in `/Users/Adron/.rvm/src/yaml-0.1.4′:
configure: error: no acceptable C compiler found in $PATH
See `config.log’ for more details
[/sourcecode]
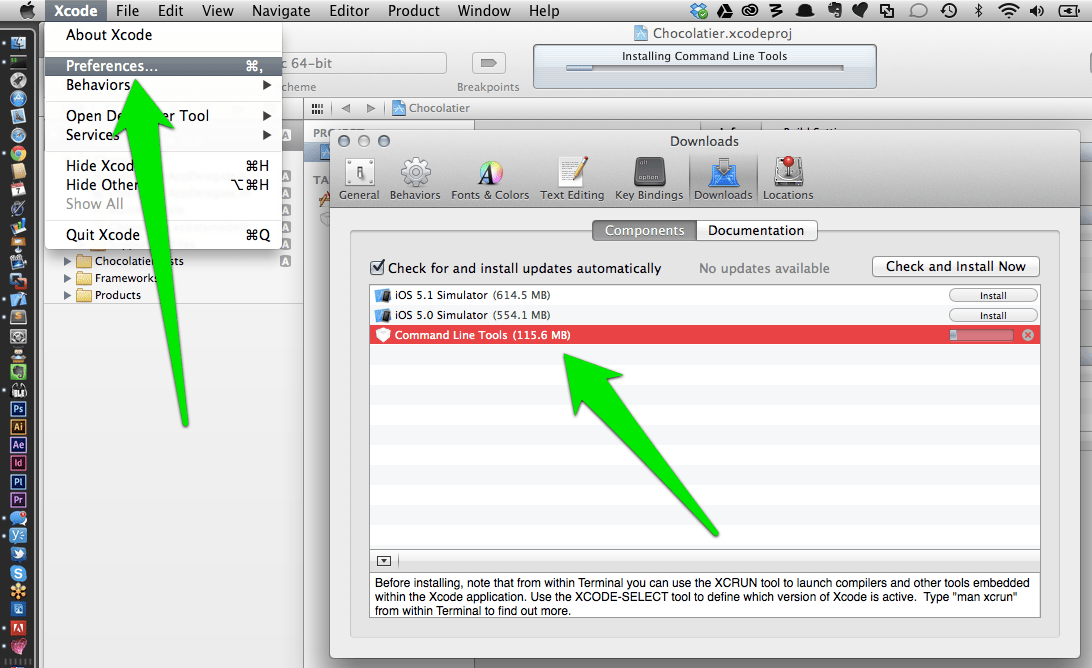
Hmmm, dammit, new machine mistake again. I needed a C compiler ASAP! Opening up XCode I immediately got this fixed by installing the CLI tools. These tools include about a zillion things I obviously needed, including the LLVM Compiler, Linker and the universally needed Make.
Ok, I finally got that installed and moved forward again. Pulled down the bits, and ran smack into the problem again. The blockenspiel lib can’t build the native extension. Ugh! However this time I got a slightly more useful error message at least.
[sourcecode language=”bash”]
/Users/Adron/.rvm/rubies/ruby-1.9.3-p327/bin/ruby extconf.rb
checking for ruby/backward/classext.h… *** extconf.rb failed ***
Could not create Makefile due to some reason, probably lack of
necessary libraries and/or headers. Check the mkmf.log file for more
details. You may need configuration options.
Provided configuration options:
–with-opt-dir
–without-opt-dir
–with-opt-include
–without-opt-include=${opt-dir}/include
–with-opt-lib
–without-opt-lib=${opt-dir}/lib
–with-make-prog
–without-make-prog
–srcdir=.
–curdir
–ruby=/Users/Adron/.rvm/rubies/ruby-1.9.3-p327/bin/ruby
/Users/Adron/.rvm/rubies/ruby-1.9.3-p327/lib/ruby/1.9.1/mkmf.rb:369:in `try_do’: The compiler failed to generate an executable file. (RuntimeError)
You have to install development tools first.
from /Users/Adron/.rvm/rubies/ruby-1.9.3-p327/lib/ruby/1.9.1/mkmf.rb:494:in `try_cpp’
from /Users/Adron/.rvm/rubies/ruby-1.9.3-p327/lib/ruby/1.9.1/mkmf.rb:919:in `block in have_header’
from /Users/Adron/.rvm/rubies/ruby-1.9.3-p327/lib/ruby/1.9.1/mkmf.rb:778:in `block in checking_for’
from /Users/Adron/.rvm/rubies/ruby-1.9.3-p327/lib/ruby/1.9.1/mkmf.rb:272:in `block (2 levels) in postpone’
from /Users/Adron/.rvm/rubies/ruby-1.9.3-p327/lib/ruby/1.9.1/mkmf.rb:242:in `open’
from /Users/Adron/.rvm/rubies/ruby-1.9.3-p327/lib/ruby/1.9.1/mkmf.rb:272:in `block in postpone’
from /Users/Adron/.rvm/rubies/ruby-1.9.3-p327/lib/ruby/1.9.1/mkmf.rb:242:in `open’
from /Users/Adron/.rvm/rubies/ruby-1.9.3-p327/lib/ruby/1.9.1/mkmf.rb:268:in `postpone’
from /Users/Adron/.rvm/rubies/ruby-1.9.3-p327/lib/ruby/1.9.1/mkmf.rb:777:in `checking_for’
from /Users/Adron/.rvm/rubies/ruby-1.9.3-p327/lib/ruby/1.9.1/mkmf.rb:918:in `have_header’
from extconf.rb:44:in `’
[/sourcecode]
My first thought was, WTF didn’t I just install the developer tools?
Went digging for this problem and found this interesting and likely related Stackoverflow Entry “”. One of the suggested solutions would be found in executing the following commands. As I read this I realized it wasn’t the marked answer, but I needed MacPorts so I downloaded MacPorts! A quick few seconds later I grabbed it and tried out these commands just to at least get things updated.
[sourcecode language=”bash”]
sudo xcodebuild -license
sudo port upgrade outdated
sudo port install apple-gcc42
sudo rvm reinstall 1.9.3
[/sourcecode]
At this point, still no go. I was getting pretty pissed. At least I was getting all these things setup on my machine, but seriously, this should NOT be this hard. The next thing I did was also update my Ruby Gems, as another place on the web suggested doing that. I tried installing middleman again.
[sourcecode language=”bash”]
gem install middleman
[/sourcecode]
At this point I was a bit frustrated, sat back and figured, I’ll give it a go in a while. Well after a few hours to let things sort out in my head, I picked up a completely different laptop. My Mac Book Air I’ve had and been using for over a year now. I opened up iTerm2 and through these commands in bash:
[sourcecode language=”bash”]
git clone https://github.com/basho/basho_docs.git
gem install bundler
bundle install
middleman
[/sourcecode]
…and the server started right up on port 4567. I opened up a browser and navigated to http://localhost:4567. Right there before my eyes loaded the Basho Riak Documentation!

After all that, it boils down to some stupid machine load issue. So I’ll come back to fixing that machine some other time. For now, it was finally time to move on to other things. But that’s a gist of week one, and week two will be starting in just about 47 minutes. Next week I’ll be diving in a bit more to all of these things plus some actual installation, setup and related skill with Riak. Until then, cheers.
")


You must be logged in to post a comment.